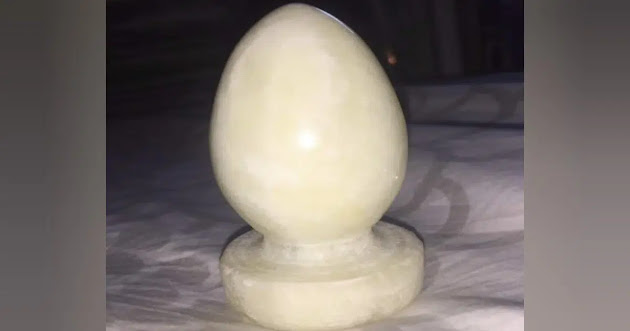
You don’t need a complicated sewing basket to bring this old-fashioned skill back to life. A few simple tools are enough to get started:
- 1 Darning Egg: The smooth, rounded surface gives you something firm to work against while you repair the hole. A wooden or metal darning mushroom works beautifully, too.
- Matching Darning Yarn: Choose a thread or yarn that closely matches the original fabric. For socks, wool or cotton darning yarn is usually a good choice.
- 1 Darning Needle: A blunt-tipped needle with a large enough eye to accommodate your yarn makes the work much easier.
- Sharp Scissors: You’ll need these to trim loose threads and tidy the finished repair.
- The Damaged Garment: Socks are the traditional favorite, but this technique can also be used on sweaters, sleeves, gloves, and other knitted garments.
- A Little Patience: Darning is not about making a repair completely invisible. It is about strengthening the fabric and giving a beloved item another chance at being useful.
Step-by-Step: How to Use a Darning Egg
1. Prepare the Damaged Area
Start by gently washing and completely drying the garment if necessary. Trim away only the loose, dangling threads around the hole. Don’t cut into healthy fabric, because those surrounding fibers are what you’ll use to anchor the repair.
2. Position the Egg
Slip the darning egg inside the sock or garment and place it directly underneath the damaged area.
If you’re working on a heel or toe, position the rounded portion of the egg so it naturally supports the curved shape of the fabric. Hold the garment gently around the egg so the area stays reasonably smooth without stretching it excessively.
3. Create the Foundation Stitches
Thread your needle with a length of darning yarn and begin stitching back and forth across the hole.
Start slightly beyond the damaged area, where the fabric is still strong. Make long, parallel stitches running across the opening. Leave a small amount of space between each stitch rather than pulling the yarn tightly together.
The goal is to create a foundation that will eventually support the woven repair.
4. Weave the Threads
Once you’ve covered the hole with parallel stitches, begin weaving your needle over and under those threads in the opposite direction.
Think of it as rebuilding a tiny piece of fabric. Each new row should pass through the existing threads, gradually filling the opening.
Keep your tension gentle. Pulling the yarn too tightly can cause the repaired section to pucker and become uncomfortable when worn.
5. Secure the Edges
As you reach the healthy fabric surrounding the original hole, continue your stitches slightly beyond the damaged area.
This helps distribute the tension and prevents the repair from placing too much stress on one small section of the garment.
When you’re finished, secure the yarn on the inside with a small knot or by weaving the remaining tail through several stitches.
6. Remove the Egg and Inspect Your Work
Carefully slide the darning egg out of the garment and turn the repaired area over.
It may not look perfectly smooth at first, and that’s completely fine. Handmade repairs often have a little character.
The important thing is that the opening has been reinforced and the surrounding fabric feels secure.
Why This Simple Tool Still Matters
The darning egg may seem almost quaint in an age when replacing a pair of socks can cost less than a cup of coffee. But that simplicity is precisely what makes it so charming.
A darning egg encourages us to pause before throwing something away.
A small hole doesn’t necessarily mean an item has reached the end of its useful life. With a needle, some thread, and a few quiet minutes, something that appeared destined for the trash can become perfectly wearable again.
There is also something deeply satisfying about repairing an object with your own hands. The finished garment carries a tiny record of your patience and care.
The Forgotten Art of Making Things Last
For generations, mending wasn’t considered a hobby. It was simply part of everyday life.
People repaired socks, patched elbows, reinforced collars, replaced buttons, and darned holes because clothing was valuable. A well-made garment was expected to last, and taking care of it was simply common sense.
Today, the practice has become something different. Mending can be a way to slow down, save money, reduce unnecessary waste, and reconnect with practical skills that were once passed naturally from one generation to another.
And perhaps that’s why the humble darning egg is experiencing a small revival.
It represents an idea that never really goes out of style:
Before you replace something, ask whether it can be repaired.
A Small Tool With a Big Lesson
That mysterious little egg sitting forgotten in an old drawer may look insignificant, but it tells a surprisingly meaningful story.
It reminds us that useful objects don’t always need complicated technology. Sometimes the cleverest solutions are the simplest ones.
So the next time you discover a hole in your favorite sock, don’t immediately reach for the trash can.
Find a needle.
Find some thread.
And if you’re lucky enough to have an old-fashioned darning egg tucked away somewhere, bring it out and give it another purpose.
You may discover that repairing something isn’t merely about saving a sock.
It’s about remembering that the things we value are often worth caring for.
More Blog
- Drinking Water on an Empty Stomach — What Science Actually Supports (No Hype, Just Facts)
- Waking Up Between 3 and 5 AM? It Might Be Your Soul Trying to Talk to You
- What a “Bleach” Patch on Your Underwear Really Means — And Why It’s Actually a Good Sign
- This Drink May Weaken Your Bones From The Inside — But Everyone Drinks It Anyway