Let me tell you about the exact moment my heart dropped into my stomach.
I was in the middle of a deep-cleaning spree, wearing an old, oversized tee, when a stray drop of bleach splashed onto my forearm. Without thinking, I grabbed the nearest towel to wipe it off.
That towel happened to be draped over my favorite black linen blouse hanging on the back of the door.
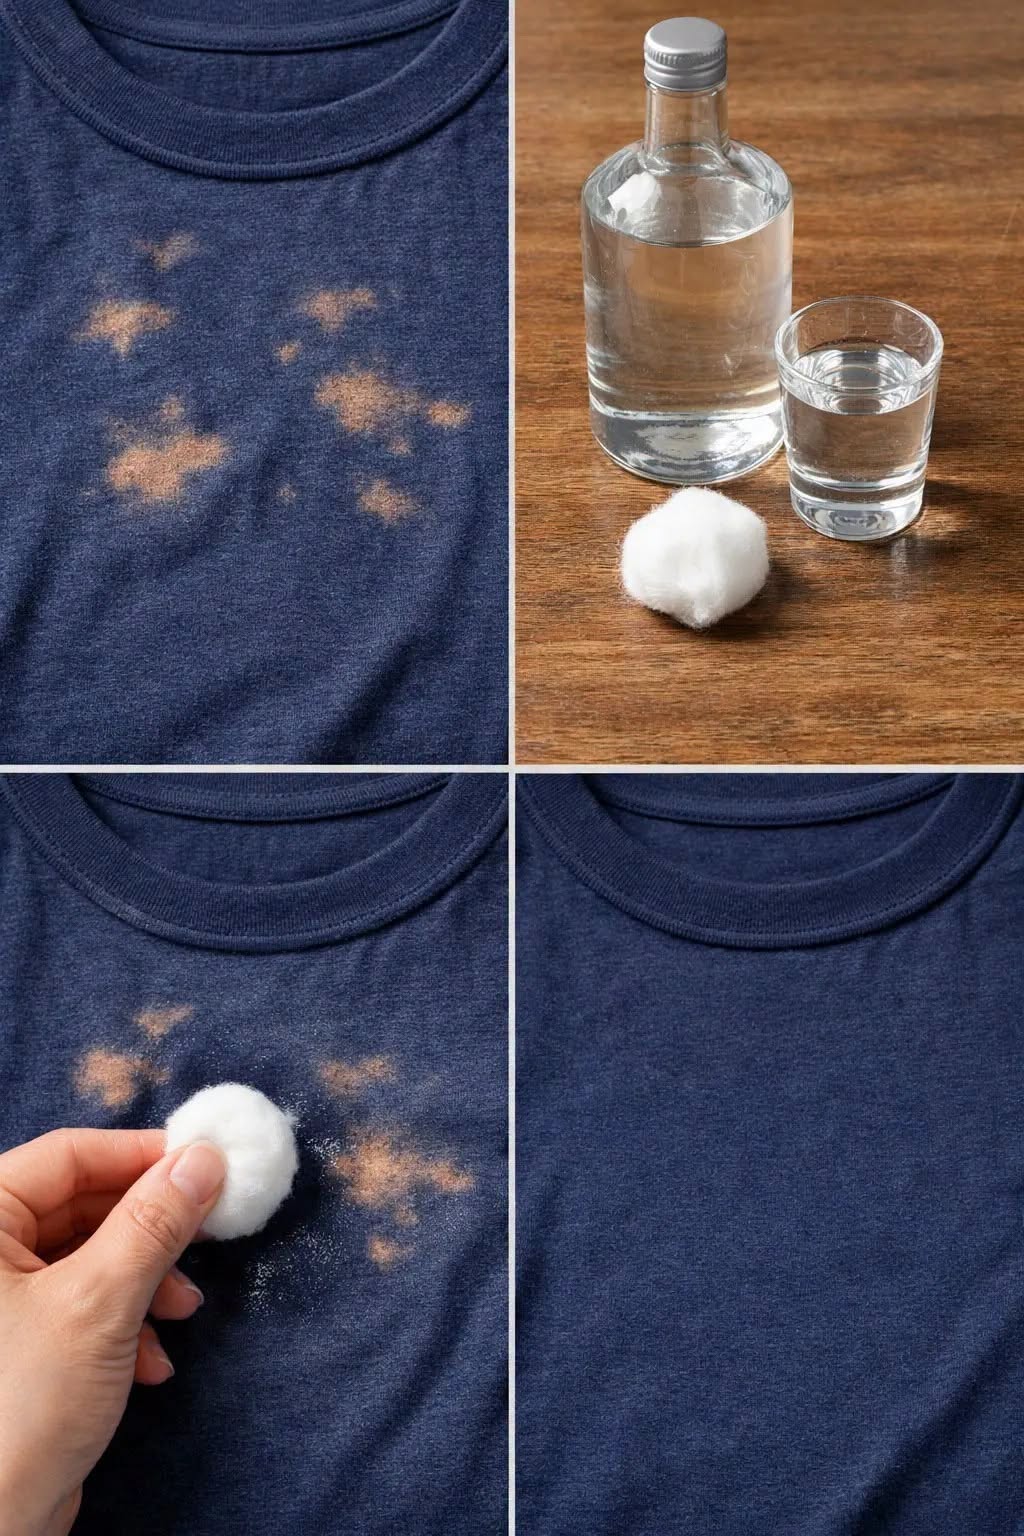
I turned around to find one stark, unforgiving orange-white splotch right in the center of the chest.
I stared at it for a full minute, willing it to magically fade back to black.
It didn’t.
I briefly considered throwing the shirt in the trash. I even entertained the wild idea of wearing it to a dinner party and claiming it was an avant-garde, intentional design choice.
But then, a memory sparked.
I remembered reading that a bleach “stain” isn’t actually a stain at all. It is an area where the original dye has been chemically removed.
And if the color is gone, the goal isn’t to clean it away. The goal is to restore or disguise the missing color.
So I did a little research, gathered a few simple supplies, and went to work.
The result wasn’t perfect in the sense that the fabric had magically returned to its original condition. But the mark became dramatically less noticeable, and my favorite blouse got a second chance.
Today, I’m sharing the practical rescue methods I wish I’d known before that bottle of bleach ever came near my wardrobe.
The Quick Science: Why Bleach “Stains” Happen
Before we jump into the fix, it helps to understand the enemy.
Household chlorine bleach contains sodium hypochlorite, a powerful oxidizing agent. On many dyed fabrics, it can break down the chemical structures responsible for color.
That means the pale orange, yellow, pink, or white mark you see isn’t simply sitting on top of the fabric.
The original color has been altered or removed.
That is why ordinary laundry detergent cannot simply wash a bleach mark away.
The good news is that you have several options.
You can recolor the affected area, dye the entire garment, or sometimes turn the accident into a deliberate design feature.
The best approach depends on the size of the damaged area, the fabric, and the original color.
Your Garment Rescue Kit
Before beginning, gather the following:
- Fabric dye or a fabric marker: Choose a product specifically designed for the material you’re treating.
- A clean cotton swab or small artist’s brush: Useful for applying color precisely to tiny areas.
- Paper towels or an old cloth: Place these behind the damaged section to prevent unwanted transfer.
- Mild laundry detergent: For washing the garment before and after treatment.
- Disposable gloves: Especially important when working with dyes or chemical products.
- A matching scrap of fabric or hidden seam: Useful for testing the color before touching the visible mark.
Always read the product instructions first. Different dyes and fabric markers behave differently on cotton, linen, polyester, rayon, wool, and blended fabrics.
Step 1: Rinse the Area Immediately
If the bleach has just spilled, don’t immediately reach for another chemical to “neutralize” it.
Instead, rinse the affected area thoroughly with cool running water as soon as possible.
The goal is to remove remaining bleach from the fabric and reduce continued chemical damage.
Gently blot the area rather than aggressively rubbing it.
If a large amount of bleach has contacted the garment, continue rinsing thoroughly and follow appropriate garment-care guidance.
Step 2: Wash the Garment
Once you’ve thoroughly rinsed the affected area, wash the garment according to its care label.
Use the recommended water temperature and detergent.
Don’t put the garment into a hot dryer until you’ve inspected the damaged area.
Heat won’t restore the lost color, and drying can make it harder to continue treating the garment if additional work is needed.
Let the fabric dry naturally if practical.
Step 3: Identify the Fabric
This step is easy to overlook, but it can make a huge difference.
Check the garment’s care label.
Cotton and linen are generally much easier to recolor than some synthetic fabrics. Polyester, nylon, acrylic, and fabric blends may require specially formulated dyes.
If the garment is expensive, delicate, vintage, or made from a difficult-to-dye material, consider taking it to a professional cleaner or textile specialist rather than experimenting on the visible area.
Step 4: Test Your Color First
This might be the most important step of the entire process.
Don’t apply your chosen fabric marker or dye directly to the bleach mark.
Instead, test it on an inconspicuous location.
A hidden seam, inside hem, or spare piece of matching fabric is ideal.
Remember that the color may look different after drying.
A black marker, for example, may dry with a slightly blue, purple, or gray undertone depending on the product and fabric.
Testing first gives you an opportunity to adjust before you create a second problem.
Step 5: Treat a Small Bleach Mark
For a tiny spot, a fabric marker can be the simplest solution.
Place a piece of paper towel behind the damaged section.
Then carefully apply a small amount of matching fabric color to the discolored fibers.
Don’t flood the fabric.
Instead, build the color gradually.
Allow each application to dry before deciding whether another layer is necessary.
This technique works best when the bleach mark is small and the surrounding color is relatively uniform.
It is much more difficult to disguise a large, irregular bleach mark with a tiny marker.
Step 6: What If the Mark Is Large?
When the damaged area is substantial, spot treatment may actually make the garment look worse.
In that situation, consider dyeing the entire garment.
For example, if a black cotton shirt has several noticeable bleach marks, recoloring the whole shirt black may produce a much more consistent appearance than trying to repair every individual spot.
The original bleach damage may still affect how the dye takes, so the final color can have subtle variations.
That isn’t necessarily a bad thing.
Sometimes the result looks intentionally vintage or softly distressed.
Always make sure the dye is compatible with your fabric before beginning.
Step 7: Turn the Accident Into a Design
Here’s the option nobody talks about enough.
You don’t always have to hide the damage.
If the garment is casual, you can transform the bleach marks into part of the design.
A shirt with several small spots might become a tie-dye-inspired piece.
You could use fabric paint, embroidery, patches, appliqué, or intentional patterning to make the original accident look deliberate.
One tiny bleach mark may be frustrating.
Several marks can sometimes become an opportunity for creativity.
What Not to Do
There are a few common mistakes worth avoiding.
Don’t Add More Bleach
If one bleach mark is bad, adding more bleach isn’t automatically going to make it better.
Unless you’re intentionally creating a bleach-dye pattern and understand the fabric you’re working with, additional bleach can weaken fibers and create more damage.
Don’t Mix Cleaning Chemicals
Never experiment by mixing bleach with vinegar, ammonia, acids, or other household cleaners.
Some combinations can release dangerous gases.
If you’re working with bleach, keep the process simple and follow the product label carefully.
Don’t Scrub Aggressively
A bleach-damaged area may already have weakened fibers.
Hard scrubbing can make the fabric look thinner, fuzzy, or distorted.
Gentle handling is your friend.
Don’t Assume Every Fabric Can Be Re-Dyed
Some synthetic materials are resistant to ordinary fabric dyes.
Always check the dye manufacturer’s compatibility information before attempting a whole-garment recolor.
What About Black Clothes?
Black clothing can be particularly frustrating because bleach often produces surprisingly colorful marks.
Instead of simply turning white, a black fabric may become orange, reddish, yellow, or brown.
That’s because different dye components can react differently to oxidation.
For a very small mark, a black fabric marker may help.
For larger damage, whole-garment dyeing is often worth considering if the fabric is dye-compatible.
Just remember that a garment exposed to bleach may not absorb the new dye evenly.
Can a Bleach-Damaged Shirt Ever Look Perfect Again?
Sometimes.
But it’s important to have realistic expectations.
If the original dye has been chemically destroyed, no washing trick can magically restore the exact original color.
The most successful repair is usually one that makes the damage much less noticeable rather than pretending the fabric was never touched by bleach.
And sometimes, the best result is a garment that looks slightly different but is still perfectly wearable.
How to Prevent the Next Bleach Disaster
The easiest bleach stain to fix is the one that never happens.
When cleaning with bleach:
- Wear old clothing or protective clothing.
- Keep bleach away from colored garments.
- Don’t place freshly bleached cleaning cloths on furniture or clothing.
- Store bleach securely and away from fabrics.
- Use only the amount recommended on the product label.
- Rinse cleaning tools thoroughly when appropriate.
- Keep the area well ventilated.
- Never mix bleach with other household cleaners.
A little caution can save a favorite shirt from becoming an unexpected science experiment.
The Beautiful Lesson of a Ruined Shirt
I still have that black linen blouse.
It isn’t exactly the same as it was before my cleaning accident. If you look closely, you can probably find the place where the original color was damaged.
But I kept it.
Because sometimes we get so focused on making everything perfect that we forget the value of simply making something useful again.
A tiny bleach mark doesn’t necessarily mean your favorite shirt belongs in the trash.
Sometimes it needs a little recoloring.
Sometimes it needs a new design.
And sometimes it simply needs you to look at it differently.
So the next time a bottle of bleach betrays you, don’t panic and don’t immediately reach for the trash can.
Rinse the fabric, assess the damage, identify the material, test your repair method, and give that garment a second chance.
After all, a well-loved wardrobe isn’t made up of things that never get damaged.
It’s made up of things worth saving.
More Blog
- Drinking Water on an Empty Stomach — What Science Actually Supports (No Hype, Just Facts)
- Waking Up Between 3 and 5 AM? It Might Be Your Soul Trying to Talk to You
- What a “Bleach” Patch on Your Underwear Really Means — And Why It’s Actually a Good Sign
- This Drink May Weaken Your Bones From The Inside — But Everyone Drinks It Anyway