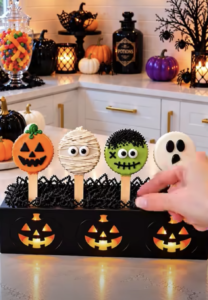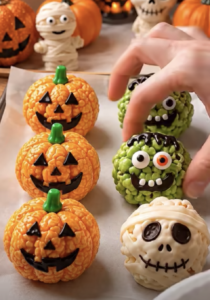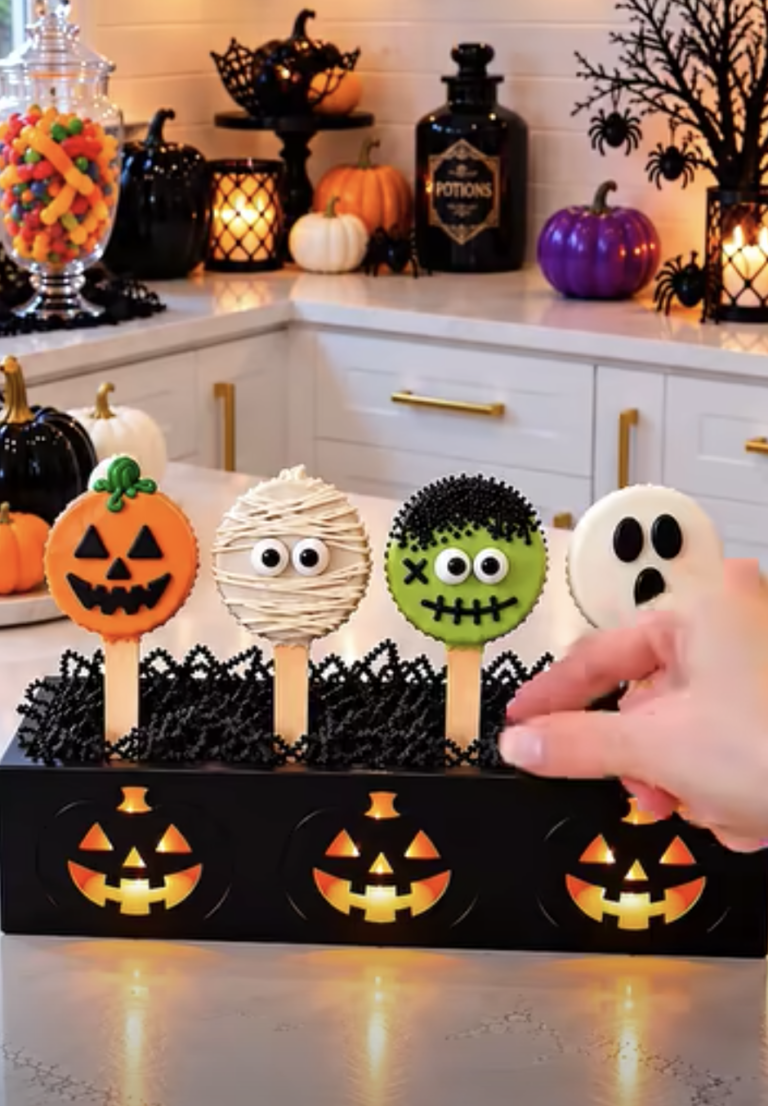
Halloween Cake Pops are fun, festive, and delicious bite-sized desserts that combine moist cake, creamy frosting, and colorful candy coatings. Decorate them as adorable ghosts, cheerful pumpkins, or silly monsters for a Halloween treat that looks just as good as it tastes.
These homemade cake pops feature a soft, rich cake center surrounded by a smooth chocolate or candy coating. The contrast between the tender filling and the crisp outer shell makes every bite especially satisfying.
Halloween Cake Pops – Easy Spooky Treats for Halloween Parties
Ingredients
Equipment
Method
- Allow the baked cake to cool completely. Crumble it into fine crumbs in a large mixing bowl.
- Mix in approximately 1/4 cup frosting. Add more gradually, up to 1/2 cup total, until the crumbs hold together when pressed. Avoid adding too much frosting.
- Roll the cake mixture into 20 to 24 evenly sized balls and arrange them on a parchment-lined baking sheet.
- Refrigerate the cake balls for 1 to 2 hours or freeze for 15 to 20 minutes until firm but not frozen solid.
- Melt a small amount of candy coating. Dip one end of each cake pop stick into the coating, insert it halfway into a cake ball, and allow the coating around the stick to firm up.
- Melt the white chocolate wafers, orange candy melts, and green or purple candy melts separately according to package directions. Add a little coconut oil if needed for a smoother consistency.
- Let very cold cake balls rest for a few minutes. Dip each cake pop into the desired coating, turn gently to cover, tap off excess coating, and stand upright in a cake pop stand or foam block.
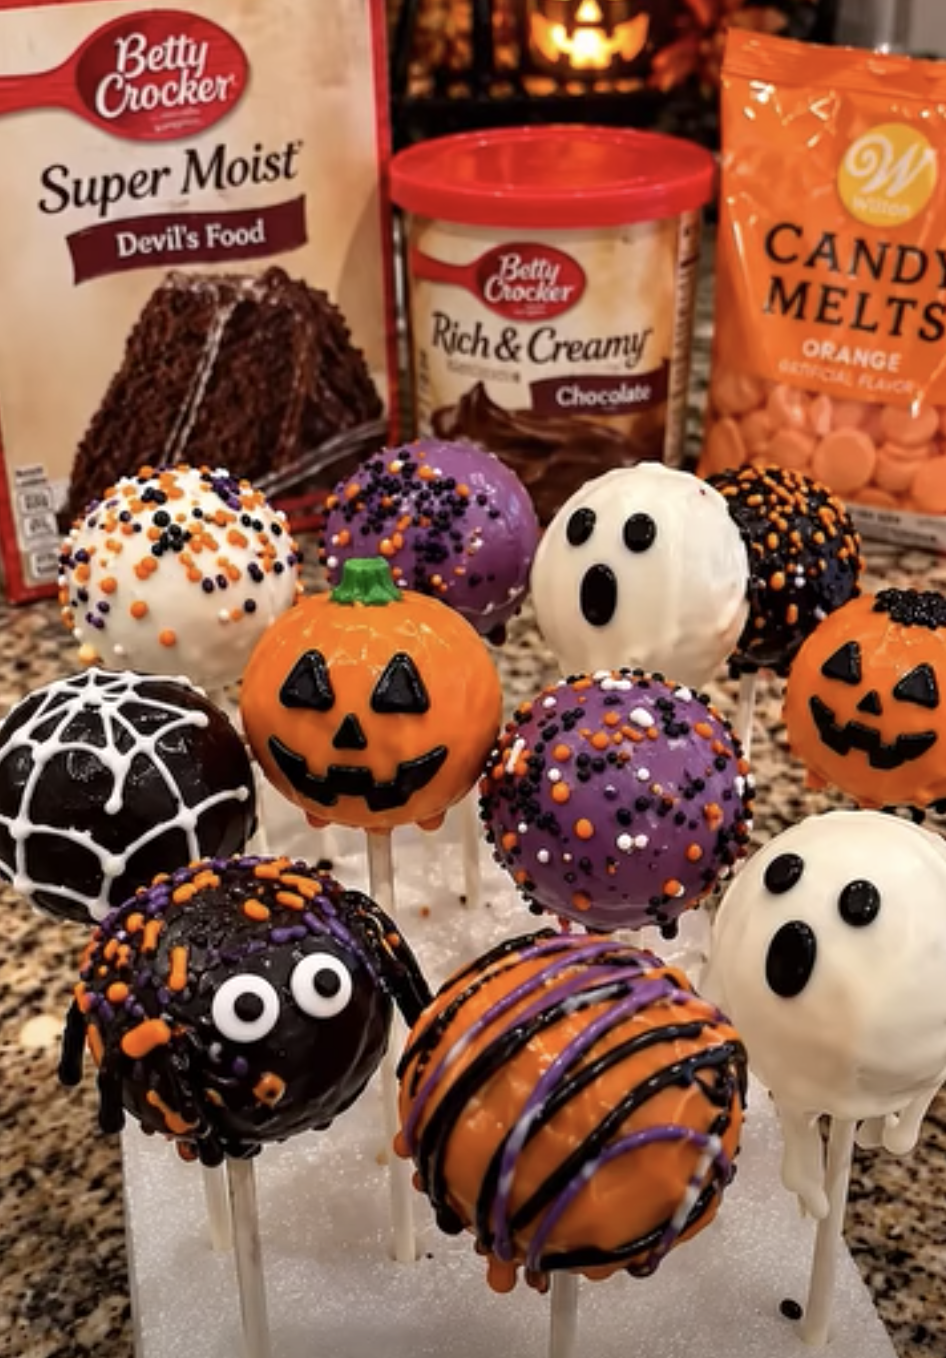
- For ghost pops, use white coating, attach candy eyes, and draw small spooky mouths with black decorating icing once the coating sets.
- For pumpkin pops, use orange coating, draw curved pumpkin lines, and add small green candy stems. For monster pops, use green or purple coating and decorate with candy eyes, sprinkles, and funny faces.
- Allow the coating and decorations to set completely before serving, arranging on a dessert table, or wrapping individually.
Notes
Best of all, you can customize Halloween Cake Pops with different cake flavors, candy colors, sprinkles, and decorations.
Chocolate cake creates a rich, indulgent center, while vanilla cake offers a lighter flavor that pairs beautifully with colorful candy melts.
White chocolate melting wafers create the perfect coating for ghost cake pops. Meanwhile, orange candy melts transform the treats into miniature pumpkins.
Green and purple candy melts make playful monster designs that children and adults will enjoy.
Whether you’re planning a Halloween party, classroom celebration, fall gathering, or family baking activity, these spooky cake pops make an excellent addition to your dessert table.
You can also wrap them individually for party favors or arrange them in a decorative stand.
Although the recipe involves several steps, each one is beginner-friendly.
The most important techniques include using the correct amount of frosting, chilling the cake balls properly, and dipping them into smooth, melted candy coating.
With a little patience, you can create beautiful homemade Halloween Cake Pops that look festive and taste wonderful.
I first became interested in making Halloween cake pops when I wanted a dessert that felt more playful than traditional cupcakes. I loved the idea of turning simple cake crumbs into little ghosts and pumpkins, but I worried that decorating them would require complicated baking skills. After trying a basic cake-and-frosting mixture, I discovered how easy the process could be. The biggest improvement came when I started chilling the cake balls before dipping them. They held their shape much better, and the decorations became easier to apply. I especially enjoyed making silly monster faces because every cake pop looked a little different. Now these colorful treats are one of my favorite ways to make a Halloween dessert table feel special.
| Recipe Detail | Information |
|---|---|
| Preparation time | 45 minutes |
| Cake baking and cooling | Approximately 1–2 hours, if starting from batter |
| Chilling time | 1–2 hours |
| Coating and setting time | 30–45 minutes |
| Total time | Approximately 3–5 hours, including cake preparation |
| Yield | 20–24 cake pops |
| Servings | 20–24 |
| Difficulty | Beginner-friendly |
| Best occasion | Halloween parties and celebrations |
Why Halloween Cake Pops Are the Perfect Spooky Dessert
Moist Cake Centers and Sweet Candy Coatings
The secret to delicious Halloween Cake Pops is the combination of soft cake crumbs and creamy frosting.
When you crumble a fully cooled cake and mix it with frosting, the ingredients form a soft mixture that holds together when pressed.
This creates a rich, truffle-like center.
Unlike ordinary cake slices, cake pops have a compact texture that makes them easy to shape into small balls.
The frosting adds moisture and helps the crumbs bind together.
However, using too much frosting can make the mixture sticky and overly soft.
For the best results, add the frosting gradually.
Start with a smaller amount, then mix until the cake crumbs hold together when you squeeze them.
The mixture should feel moist but not greasy.
Once you shape the cake balls, chilling helps them become firm enough for dipping.
The outer candy coating creates another delicious layer.
White chocolate melting wafers provide a smooth, sweet coating for ghost designs.
Meanwhile, orange, green, and purple candy melts create bright Halloween colors.
As the coating sets, it forms a delicate shell around the soft cake center.
This contrast makes the finished dessert especially enjoyable.
Why These Festive Treats Work for Halloween Parties
Halloween Cake Pops make wonderful party desserts because they combine attractive presentation with convenient individual servings.
Each cake pop sits on a stick, so guests can enjoy it without needing a plate or fork.
This makes the treats especially practical for dessert tables and casual celebrations.
You can also create several different designs from one batch.
For example, white ghost cake pops offer a simple, recognizable Halloween theme.
Orange pumpkin cake pops add a cheerful fall-inspired look.
Green and purple monster cake pops introduce playful colors and funny expressions.
Arranging the three designs together creates a colorful display.
You can place the cake pops upright in a decorative foam block or a cake pop stand.
For party favors, wrap each finished pop in a clear food-safe treat bag.
Then secure the bag around the stick with a ribbon.
Because each cake pop has its own decoration, guests can choose their favorite design.
Another advantage is that you can prepare the cake pops ahead of time.
This reduces last-minute dessert preparation and gives you more time to enjoy your gathering.
Choosing the Best Ingredients for Halloween Cake Pops
Select the Right Cake, Frosting, and Candy Melts
The best Halloween Cake Pops begin with a moist, fully cooled cake.
You’ll need one baked chocolate or vanilla cake, approximately 9 inches in diameter.
A homemade cake works beautifully.
However, a cake mix also provides a convenient option.
Chocolate cake creates a rich center that pairs well with white chocolate and colorful candy coatings.
Vanilla cake offers a milder flavor and a lighter-colored interior.
Either option tastes delicious.
Next, measure half a cup vanilla or chocolate frosting.
Vanilla frosting works with both cake flavors.
Chocolate frosting creates a richer filling, especially when you use chocolate cake.
Start with approximately one-quarter cup frosting and gradually add more as needed.
Different cakes contain different amounts of moisture, so you may not need the full amount.
Next, prepare two cups white chocolate melting wafers.
Choose wafers designed for melting and coating desserts.
These usually melt more smoothly than ordinary chocolate chips.
You’ll also need one cup orange candy melts and one cup green or purple candy melts.
The colored coatings allow you to create different Halloween designs without using additional food coloring.
If the melted coating seems too thick, a small amount of coconut oil can help thin it.
However, add the oil gradually to avoid making the coating too runny.
Choose Fun Decorations for Ghosts, Pumpkins, and Monsters
Decorating supplies transform ordinary cake pops into festive Halloween treats.
You’ll need 20–24 cake pop sticks.
Choose sturdy food-safe sticks that can support the cake balls.
Next, prepare candy eyes.
Candy eyes work especially well for ghost and monster designs.
They instantly create expressive faces without complicated piping.
You’ll also need black decorating icing.
Use it to create ghost mouths, monster expressions, and pumpkin details.
For pumpkin cake pops, you can draw curved lines with black decorating icing.
Alternatively, use a little melted chocolate for darker pumpkin ridges.
A small amount of green candy coating can create pumpkin stems.
Simply add a tiny dab to the top of each orange cake pop.
Halloween sprinkles provide another easy decorating option.
Choose colors and shapes that complement the finished designs.
For example, orange and black sprinkles work beautifully with pumpkins.
Meanwhile, purple and green sprinkles suit monster cake pops.
The decorations don’t need to look identical.
In fact, slightly different faces make the finished treats more playful.
For the best results, organize the decorating supplies before melting the candy coatings.
This helps you work efficiently while the coating remains soft.
How to Make Halloween Cake Pops Step by Step
Prepare the Cake Mixture and Shape the Pops
Begin with a completely cooled chocolate or vanilla cake.
If you baked the cake specifically for this recipe, allow it to cool to room temperature before proceeding.
Warm cake can soften the frosting and create a sticky mixture.
Next, crumble the cake into a large mixing bowl.
Use clean hands or a fork to break it into fine crumbs.
Try to remove any unusually hard crust pieces.
Once the cake resembles fine crumbs, add approximately one-quarter cup frosting.
Mix thoroughly.
Then add more frosting a tablespoon at a time until the mixture holds together when pressed.
Avoid adding all the frosting immediately.
The correct amount depends on the moisture of your cake.
Next, scoop small portions of the mixture.
Roll each portion between your palms to create smooth, evenly sized balls.
Aim for approximately 1–1½ tablespoons of mixture per cake pop.
Place the balls on a parchment-lined baking sheet.
Continue until you’ve used the mixture.
Next, refrigerate the cake balls for one to two hours.
Alternatively, freeze them for 15–20 minutes.
The cake balls should feel firm but not frozen solid.
This helps them stay on the sticks during dipping.
Dip, Decorate, and Set the Halloween Cake Pops
Once the cake balls feel firm, melt a small amount of candy coating.
Follow the package directions and avoid overheating.
Dip the tip of a cake pop stick into the melted coating.
Then insert the coated end halfway into a cake ball.
The melted coating acts like glue and helps secure the stick.
Repeat with the remaining cake balls.
Allow the coating around the sticks to firm up briefly.
Next, melt the white chocolate wafers and colored candy melts in separate microwave-safe bowls.
Heat in short intervals, stirring between each interval.
If necessary, add a small amount of coconut oil to thin the coating.
Before dipping, allow very cold cake balls to sit at room temperature for a few minutes.
This helps reduce cracking caused by a large temperature difference between the cake and coating.
Next, dip each cake pop into the desired coating.
Turn it gently until the coating covers the entire ball.
Lift the pop and allow excess coating to drip back into the bowl.
Tap the stick gently against the edge of the bowl.
Then place the cake pop upright in a foam block or cake pop stand.
Add candy eyes and sprinkles while the coating remains soft.
Once the coating sets, use black decorating icing to create faces and pumpkin details.
Allow the decorations to dry completely before serving.
Decorating Ideas, Serving Tips, and Storage
Create Ghost, Pumpkin, and Monster Cake Pops
One of the most enjoyable parts of making Halloween Cake Pops is decorating them.
For ghost cake pops, dip the cake balls into melted white chocolate coating.
Allow excess coating to drip away.
Next, add two candy eyes while the coating remains slightly soft.
Once the coating sets, use black decorating icing to draw a small round mouth.
This creates an adorable surprised ghost expression.
For pumpkin cake pops, use orange candy melts.
Dip the cake balls until completely coated.
After the coating sets, draw several curved vertical lines around each pumpkin.
Use black decorating icing or a little melted chocolate.
Next, add a small green candy stem at the top.
You can also create tiny leaves with green candy coating.
For monster cake pops, use green or purple candy melts.
Add one, two, or several candy eyes.
Then decorate with Halloween sprinkles.
Use black icing to draw funny mouths, crooked smiles, or tiny monster teeth.
The monster designs allow plenty of creativity.
You don’t need perfect lines or matching expressions.
For a colorful Halloween dessert display, make approximately equal numbers of ghosts, pumpkins, and monsters.
This creates a festive assortment that guests can enjoy.
How to Serve, Store, and Make Cake Pops Ahead
Halloween Cake Pops taste delicious once the coating has completely set.
For parties, arrange them upright in a cake pop stand.
You can also use a clean foam block covered with decorative food-safe paper.
Leave enough space between the pops so the decorations don’t touch.
For individual treats, wrap each cake pop in a clear food-safe bag.
Secure the bag around the stick after the coating and icing have dried.
This makes the pops convenient for party favors.
If you plan to serve them later, store them in an airtight container in the refrigerator.
They generally keep well for up to five days when you use fresh cake and frosting and maintain proper refrigeration.
However, follow any shorter storage guidance for the specific ingredients you use.
To prevent condensation, keep the container closed while the chilled pops gradually approach room temperature.
Avoid placing warm cake pops directly into the refrigerator because moisture can affect the coating.
You can also prepare the cake balls ahead of time.
Refrigerate the undipped balls for a day or two before decorating.
For longer storage, freeze undecorated cake balls in an airtight freezer-safe container.
Thaw them in the refrigerator before dipping.
For the smoothest finish, keep the cake balls cool but not frozen solid during coating.
Ingredients
- 1 baked chocolate or vanilla cake, approximately 9 inches in diameter, fully cooled
- ½ cup vanilla or chocolate frosting, added gradually as needed
- 2 cups white chocolate melting wafers
- 1 cup orange candy melts
- 1 cup green or purple candy melts
- 20–24 cake pop sticks
- 24 candy eyes, or more as needed for decorating
- 2 tablespoons black decorating icing
- ¼ cup Halloween sprinkles
- 1 teaspoon coconut oil, optional, for thinning the coating
Instructions
- Crumble the cake. Allow the baked cake to cool completely. Crumble it into fine crumbs in a large mixing bowl.
- Add the frosting. Mix in approximately ¼ cup frosting. Add more gradually, up to ½ cup total, until the crumbs hold together when pressed.
- Shape the cake balls. Roll the mixture into 20–24 evenly sized balls and arrange them on a parchment-lined baking sheet.
- Chill until firm. Refrigerate for 1–2 hours or freeze for 15–20 minutes. The cake balls should feel firm but not frozen solid.
- Attach the sticks. Melt a small amount of candy coating. Dip one end of each cake pop stick into the coating, then insert it halfway into a cake ball. Allow the coating around the stick to firm up.
- Melt the coatings. Melt the white chocolate wafers, orange candy melts, and green or purple candy melts separately according to package directions. Add a little coconut oil if needed for a smoother consistency.
- Dip the cake pops. Let very cold cake balls rest for a few minutes. Dip each pop into the desired coating, turn gently, and tap off the excess. Stand upright in a cake pop stand or foam block.
- Make ghost pops. Use white coating, add candy eyes, and draw small spooky mouths with black decorating icing once the coating sets.
- Make pumpkin and monster pops. Use orange coating for pumpkins, then draw curved pumpkin lines and add green candy stems. Use green or purple coating for monsters, then add candy eyes, sprinkles, and funny faces.
- Allow to set and serve. Let the coating and decorations dry completely before serving, arranging on a dessert table, or wrapping individually.
Frequently Asked Questions
Why do my Halloween Cake Pops crack after dipping?
Cake pop coatings often crack when the cake balls are much colder than the melted coating. To reduce cracking, avoid dipping frozen-solid cake balls. Instead, allow them to rest briefly at room temperature before dipping.
Can I make Halloween Cake Pops ahead of time?
Yes. You can prepare and decorate the cake pops one or two days before your celebration. Store them in an airtight container in the refrigerator. This makes them convenient for Halloween parties and school events.
What can I use instead of candy melts?
You can use suitable chocolate melting wafers or confectionery coating. However, ordinary chocolate may require tempering to achieve a firm, glossy finish. Candy melts remain a convenient choice for colorful decorations.
How do I keep cake pops from falling off the sticks?
Use enough frosting to bind the cake crumbs without making the mixture overly soft. Chill the cake balls until firm, dip the stick tips into melted coating, and allow that coating to set before dipping the entire pop.
How long do homemade Halloween Cake Pops last?
Store finished cake pops in an airtight container in the refrigerator for up to five days, provided you use fresh ingredients and maintain proper refrigeration. For the best flavor and texture, enjoy them within the first few days.
Conclusion
Halloween Cake Pops are a fun, colorful, and delicious way to celebrate the spooky season.
With moist cake crumbs, creamy frosting, smooth candy coatings, and playful decorations, these bite-sized treats make a wonderful addition to Halloween parties, dessert tables, and family celebrations.
The recipe also offers plenty of creative freedom.
You can make adorable white ghosts, cheerful orange pumpkins, or silly green and purple monsters.
For the best results, add frosting gradually, chill the cake balls until firm, and use smooth melted candy coating.
Then decorate each pop with candy eyes, black icing, and festive sprinkles.
Whether you prepare them as party favors, classroom treats, or a fun family baking project, Halloween Cake Pops offer a delicious combination of homemade flavor and festive creativity.