
Halloween Chocolate-Covered Mini Pretzels bring together everything you love about festive treats. They’re crunchy, sweet, salty, colorful, and incredibly easy to make. With just a handful of ingredients and a little creativity, you can turn ordinary mini pretzels into adorable Halloween snacks that everyone will want to grab.
Whether you’re planning a Halloween party, preparing treats for a classroom celebration, or putting together a spooky dessert platter, these chocolate-dipped pretzels make a wonderful addition. Plus, you don’t need an oven, special baking skills, or complicated equipment.
The best part? You can decorate them with orange candy melts, white chocolate, colorful sprinkles, and playful candy eyes. Every batch can look a little different, which makes this recipe especially fun for families.
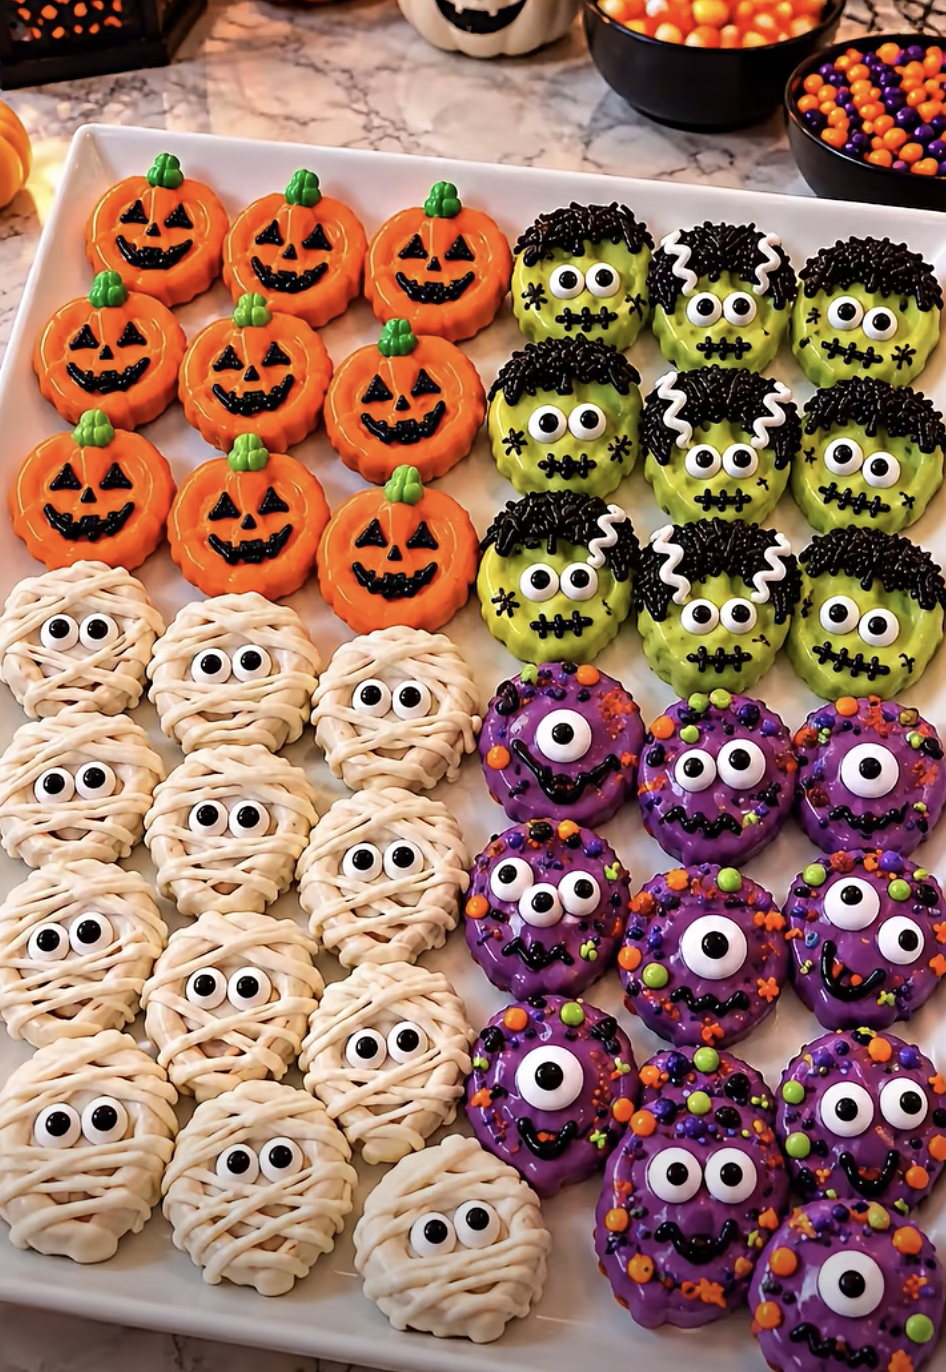
Halloween Chocolate-Covered Mini Pretzels: Easy Sweet and Salty Halloween Treats
Equipment
- large baking sheet
- Parchment paper
- 3 microwave-safe bowls
- Fork or chocolate dipping tool
- Spoon or piping bag
- Measuring cups and spoons
- microwave
- Airtight storage container
Ingredients
- 2 cups mini pretzel twists
- 1 cup white chocolate chips or white candy melts
- 1 cup milk chocolate chips or dark chocolate chips
- 1/2 cup orange candy melts
- 2 tablespoons Halloween sprinkles
- 2 tablespoons candy eyes (optional)
- 1 teaspoon coconut oil (optional)
Instructions
- Line a large baking sheet with parchment paper. Arrange the mini pretzels and Halloween decorations nearby.
- Place the white chocolate chips or candy melts in a microwave-safe bowl. Microwave in 20–30-second intervals, stirring between intervals until smooth.
- Melt the milk or dark chocolate and orange candy melts separately using the same method. If regular chocolate seems too thick, stir in a little coconut oil.
- Dip each mini pretzel halfway or completely into the desired melted chocolate. Lift with a fork and gently tap off excess chocolate.
- Transfer the coated pretzels to the parchment-lined baking sheet, leaving space between pieces.
- Immediately add Halloween sprinkles or gently press candy eyes into the wet chocolate coating.
- Allow the first chocolate coating to firm up. Drizzle contrasting melted chocolate or orange candy melts over the pretzels for decorative patterns.
- Let the pretzels set at room temperature or refrigerate for approximately 15–20 minutes until the coating becomes firm.
- Serve the finished pretzels on a festive platter or store in an airtight container in a cool, dry location.
Notes
Nutrition
I started making chocolate-covered pretzels for Halloween after looking for something simple that could brighten a dessert table without taking hours to prepare. I wanted a treat that combined chocolate with something crunchy, but I also wanted the decorations to feel festive. Mini pretzels turned out to be the perfect choice. Their twisted shapes looked adorable under colorful chocolate, and the little openings made them especially fun to decorate. Since then, I’ve loved the idea of making a big batch with different colors, sprinkles, and silly candy eyes. They always bring a playful touch to Halloween gatherings, and they’re surprisingly easy to customize.
Why You’ll Love Halloween Chocolate-Covered Mini Pretzels
The Perfect Combination of Sweet, Salty, and Crunchy
One of the biggest reasons to make Halloween Chocolate-Covered Mini Pretzels is their irresistible combination of flavors and textures.
The pretzels provide a satisfying crunch and a light salty flavor. Meanwhile, the chocolate coating adds creamy sweetness that balances the salt beautifully.
Unlike many Halloween desserts, these treats don’t feel overly heavy. Their small size makes them easy to enjoy alongside cookies, cupcakes, and other party snacks.
Here are a few reasons they make such a great seasonal treat:
- No baking required: You only need to melt chocolate, dip pretzels, and decorate.
- Quick preparation: Most of the hands-on work takes about 20 minutes.
- Budget-friendly ingredients: Basic pretzels and melting chocolate form the foundation.
- Easy customization: Choose different colors and decorations for every batch.
- Great for sharing: A single recipe makes plenty of bite-sized treats.
- Kid-friendly decorating: Children can help add sprinkles and candy eyes with adult supervision.
Additionally, you can prepare these pretzels ahead of time, which helps reduce last-minute party preparation.
Their small size also makes them convenient for dessert trays and individual treat bags.
A Fun Halloween Treat for Every Occasion
Halloween Chocolate-Covered Mini Pretzels fit almost any autumn celebration.
For example, you can arrange them on a black serving platter with orange and purple candies for a festive Halloween dessert display.
You can also place several pretzels inside clear treat bags and tie them with colorful ribbon. These little packages make thoughtful homemade gifts for neighbors, friends, and teachers.
For family movie nights, serve the pretzels alongside popcorn, apple slices, and hot chocolate.
If you’re organizing a classroom celebration, consider preparing individual portions ahead of time. However, always check school food policies and allergy requirements before bringing homemade treats.
These mini pretzels also work beautifully for Halloween dessert boards. Their bright colors create contrast next to brownies, chocolate cookies, marshmallow treats, and fresh fruit.
Best of all, you can adjust the decorations to match your Halloween theme.
Choose bright orange and white for a classic look, or add purple and green for a playful monster-inspired collection.
Choosing the Best Ingredients for Halloween Chocolate-Covered Mini Pretzels
Mini Pretzels and Chocolate Coatings
The quality of your ingredients can make a noticeable difference in the finished Halloween Chocolate-Covered Mini Pretzels.
Start with fresh, crunchy mini pretzels. Traditional twisted mini pretzels work especially well because their openings create interesting patterns when you coat them with chocolate.
Avoid stale or broken pretzels whenever possible. Fresh pretzels hold their shape better during dipping and provide the best crunch.
For the chocolate coating, you have several delicious options.
White chocolate: White chocolate creates a bright background for colorful Halloween decorations. It also pairs beautifully with orange, purple, and black sprinkles.
Milk chocolate: Milk chocolate adds a smooth, familiar sweetness that appeals to many chocolate lovers.
Dark chocolate: Dark chocolate offers a deeper cocoa flavor and balances the salty pretzels particularly well.
Orange candy melts: Orange candy melts provide a festive color without requiring additional food coloring.
Candy melts generally create a convenient coating because manufacturers formulate them for melting and setting.
However, regular chocolate chips also work. You may need a small amount of coconut oil to improve their consistency.
When melting chocolate, use a microwave-safe bowl and work in short intervals.
Stir frequently because chocolate can overheat quickly.
Also, keep water away from the melted chocolate. Even a small amount of moisture can cause some melted chocolates to become thick and grainy.
Halloween Sprinkles, Candy Eyes, and Creative Decorations
Decorations turn simple chocolate-dipped pretzels into eye-catching Halloween snacks.
Fortunately, you don’t need expensive decorating supplies to create impressive results.
Halloween sprinkle mixes offer an easy starting point. Look for combinations of orange, black, purple, green, and white.
You can also choose sprinkles shaped like bats, pumpkins, stars, or tiny ghosts.
Candy eyes add a particularly playful touch. Place one or two eyes on each coated pretzel to create funny little monsters.
For a more dramatic look, drizzle contrasting melted chocolate over the pretzels.
Here are several fun decorating combinations:
- Pumpkin pretzels: Orange candy coating with green sprinkles.
- Ghost pretzels: White chocolate with two candy eyes.
- Monster pretzels: Purple or green coating with mismatched candy eyes.
- Spiderweb pretzels: Dark chocolate with thin white chocolate drizzle.
- Classic Halloween pretzels: Milk chocolate with orange and black sprinkles.
Additionally, you can mix several designs on one serving platter.
This variety makes the finished batch look more festive and gives guests different flavors to try.
For the neatest decorations, add sprinkles while the coating remains wet. Otherwise, they may not stick properly.
How to Make Perfect Halloween Chocolate-Covered Mini Pretzels
Melting Chocolate and Dipping Pretzels Successfully
Making Halloween Chocolate-Covered Mini Pretzels is simple, but a few small techniques help you achieve a smoother finish.
First, prepare your workspace before melting the chocolate.
Line a large baking sheet with parchment paper and arrange your decorations nearby. This preparation helps you work quickly once the chocolate reaches the right consistency.
Next, place each chocolate variety in a separate microwave-safe bowl.
Heat the chocolate in 20-second intervals, stirring after each interval. As the chocolate begins to melt, shorten the heating time if necessary.
Stop heating when a few small pieces remain, then stir until the residual warmth melts them completely.
If regular chocolate chips seem too thick, stir in a little coconut oil. However, add only enough to create a smooth dipping consistency.
Candy melts usually don’t need additional oil.
Once the coatings reach a smooth consistency, dip each mini pretzel halfway or completely into the chocolate.
Use a fork or dipping tool to lift the pretzel from the bowl.
Then, gently tap the fork against the edge of the bowl to remove excess chocolate.
This step prevents thick puddles of chocolate from collecting around the pretzels.
Finally, place each coated pretzel on the parchment-lined baking sheet.
Leave a little space between pieces so they don’t stick together as the coating sets.
Decorating, Setting, and Avoiding Common Mistakes
The decorating stage gives Halloween Chocolate-Covered Mini Pretzels their festive personality.
For the best results, decorate small batches rather than dipping every pretzel before adding toppings.
Chocolate can begin setting quickly, especially in a cool kitchen.
Therefore, dip four or five pretzels, add your decorations, and continue with the next group.
Press candy eyes gently into the wet coating. Then, scatter sprinkles over the surface while the chocolate still feels soft.
If you want contrasting chocolate drizzle, allow the first coating to become firm before adding the second color.
Use a small piping bag or a resealable plastic bag with a tiny corner opening to create thin lines.
You can also use a spoon for a more casual drizzle.
After decorating, let the pretzels rest at room temperature until the coating hardens.
Alternatively, place the baking sheet in the refrigerator for approximately 15–20 minutes.
However, avoid leaving the pretzels in a humid refrigerator longer than necessary. Condensation can affect the appearance of the chocolate.
Common mistakes include overheating the chocolate, adding decorations too late, and applying overly thick coatings.
Fortunately, you can prevent most of these problems by working slowly and keeping the chocolate smooth.
If the chocolate starts thickening while you dip, warm it briefly and stir again.
Serving, Storing, and Customizing Halloween Chocolate-Covered Mini Pretzels
Creative Serving Ideas for Halloween Parties
Halloween Chocolate-Covered Mini Pretzels look especially attractive when you combine several colors and designs.
Instead of serving one style, create a mix of white, orange, milk chocolate, and dark chocolate pretzels.
Arrange them in small clusters on a large platter to highlight the different decorations.
For a Halloween dessert table, place them near cupcakes, brownies, and decorated cookies.
You can also fill small paper treat cups with a handful of pretzels. This approach makes serving easier during busy gatherings.
Another fun idea involves creating a Halloween snack board.
Combine the chocolate pretzels with popcorn, fresh strawberries, marshmallows, and candy corn.
The salty pretzels provide a nice contrast to the sweeter additions.
For homemade gifts, wait until the coating hardens completely before packaging.
Then, fill food-safe treat bags with several pretzels and seal them securely.
Keep the packages in a cool place until you’re ready to share them.
Because these treats contain chocolate, avoid leaving them outdoors in warm weather.
Also, remember that small hard decorations may pose choking hazards for very young children.
With thoughtful presentation, even a simple batch can become a memorable Halloween party centerpiece.
Storage Tips, Make-Ahead Preparation, and Variations
One of the greatest advantages of Halloween Chocolate-Covered Mini Pretzels is how easily you can prepare them ahead of a celebration.
Once the coating sets completely, transfer the pretzels to an airtight container.
Separate layers with parchment paper to protect the decorations.
Store the container in a cool, dry location away from direct sunlight.
For the best flavor and crunch, enjoy the pretzels within one to two weeks, provided your ingredients remain within their freshness dates.
In hot or humid conditions, refrigeration may help prevent melting. However, condensation can soften pretzels and create marks on chocolate coatings.
If you refrigerate them, keep the container tightly closed and allow it to return to room temperature before opening.
You can also experiment with several delicious variations.
Peanut butter chocolate pretzels: Drizzle a little melted peanut butter-flavored candy coating over milk chocolate pretzels.
Cookies-and-cream pretzels: Sprinkle finely crushed chocolate sandwich cookies over wet white chocolate.
Dark chocolate sea salt pretzels: Add a tiny pinch of flaky sea salt to dark chocolate-coated pretzels.
Colorful monster pretzels: Use purple and green candy melts with playful candy eyes.
Double-chocolate pretzels: Dip pretzels in milk chocolate and finish with white chocolate drizzle.
For allergy-sensitive gatherings, check the labels on chocolate, candy melts, sprinkles, and pretzels carefully.
With these easy adjustments, you can create a different batch for every Halloween celebration.
Ingredients
Yield: Approximately 60 mini pretzels (10 servings) | Prep time: 20 minutes | Setting time: 20 minutes | Total time: 40 minutes
- 2 cups mini pretzel twists (approximately 60 pretzels)
- 1 cup white chocolate chips or white candy melts
- 1 cup milk chocolate chips or dark chocolate chips
- 1/2 cup orange candy melts
- 2 tablespoons Halloween sprinkles
- 2 tablespoons candy eyes (optional)
- 1 teaspoon coconut oil (optional, divided between chocolate coatings as needed)
Instructions
1. Prepare the baking sheet. Line a large baking sheet with parchment paper. Place the mini pretzels, sprinkles, and candy eyes nearby.
2. Melt the white chocolate. Place the white chocolate chips or candy melts in a microwave-safe bowl. Heat in 20–30-second intervals, stirring between each interval until smooth.
3. Melt the remaining coatings. Repeat the process with the milk or dark chocolate and orange candy melts, using separate bowls. If regular chocolate seems too thick, stir in a little coconut oil.
4. Dip the pretzels. Use a fork to dip each mini pretzel halfway or completely into your preferred chocolate coating. Gently tap off excess chocolate.
5. Arrange the coated pretzels. Place each pretzel on the parchment-lined baking sheet, leaving a little space between pieces.
6. Add Halloween decorations. Immediately sprinkle the wet chocolate with Halloween sprinkles or gently press candy eyes into the coating.
7. Create colorful drizzles. Let the first chocolate layer firm up. Then, drizzle contrasting melted chocolate or orange candy melts over selected pretzels.
8. Let the chocolate set. Allow the pretzels to harden at room temperature, or refrigerate for approximately 15–20 minutes until firm.
9. Serve or store. Arrange the finished pretzels on a serving platter or transfer them to an airtight container. Keep them in a cool, dry place.
Frequently Asked Questions
1. Can I make Halloween Chocolate-Covered Mini Pretzels ahead of time?
Yes! You can prepare Halloween Chocolate-Covered Mini Pretzels several days before your celebration. Once the chocolate hardens, place them in an airtight container and separate layers with parchment paper. Store them somewhere cool and dry. For the best crunch and flavor, enjoy them within one to two weeks.
2. What is the best chocolate for dipping mini pretzels?
Candy melts work especially well because they melt smoothly and set relatively quickly. However, white chocolate, milk chocolate, and dark chocolate chips also make delicious coatings. If you use chocolate chips, a small amount of coconut oil can help create a smoother dipping consistency.
3. Why does my melted chocolate become thick or grainy?
Chocolate may become thick or grainy when it overheats or comes into contact with moisture. To prevent this problem, heat it in short microwave intervals and stir frequently. Also, make sure your bowls and utensils remain completely dry. If chocolate seizes from moisture, adding oil may not restore a smooth dipping texture.
4. Can kids help make Halloween Chocolate-Covered Mini Pretzels?
Absolutely! Children can help arrange the pretzels, add sprinkles, and place candy eyes on the chocolate. However, adults should handle melting chocolate and hot bowls. For younger children, prepare the chocolate coatings first and let them focus on decorating under supervision.
5. Can I freeze chocolate-covered mini pretzels?
You can freeze them, although freezing may affect their crunch and appearance. Place the fully set pretzels in a freezer-safe airtight container with parchment between layers. For the best quality, use them within one to two months. Thaw them inside the closed container to reduce condensation.
Conclusion
Halloween Chocolate-Covered Mini Pretzels offer a simple, delicious way to celebrate the spooky season. With crunchy pretzels, creamy chocolate, bright candy melts, and festive decorations, you can create a treat that looks impressive without spending hours in the kitchen.
Whether you’re preparing snacks for a Halloween party, making homemade gifts, or planning a cozy movie night, these colorful pretzels fit the occasion perfectly.
Plus, the recipe gives you plenty of room to experiment with different chocolate flavors, colors, and decorations.
Try a combination of orange pumpkin pretzels, white chocolate ghosts, and colorful candy-eyed monsters for an especially festive assortment.
Most importantly, have fun with the decorating process. Every pretzel can look unique, and those playful little details make Halloween Chocolate-Covered Mini Pretzels such a delightful seasonal treat.