Halloween Oreo Pops turn classic chocolate sandwich cookies into adorable, spooky treats with creamy centers, colorful candy coatings, and playful Halloween decorations. These no-bake cookie pops combine crushed Oreos, smooth cream cheese, white chocolate, and vibrant candy melts to create a dessert that looks festive and tastes delicious.
Whether you’re planning a Halloween party, preparing treats for a school celebration, or decorating a spooky dessert table, Halloween Oreo Pops make a wonderful choice.
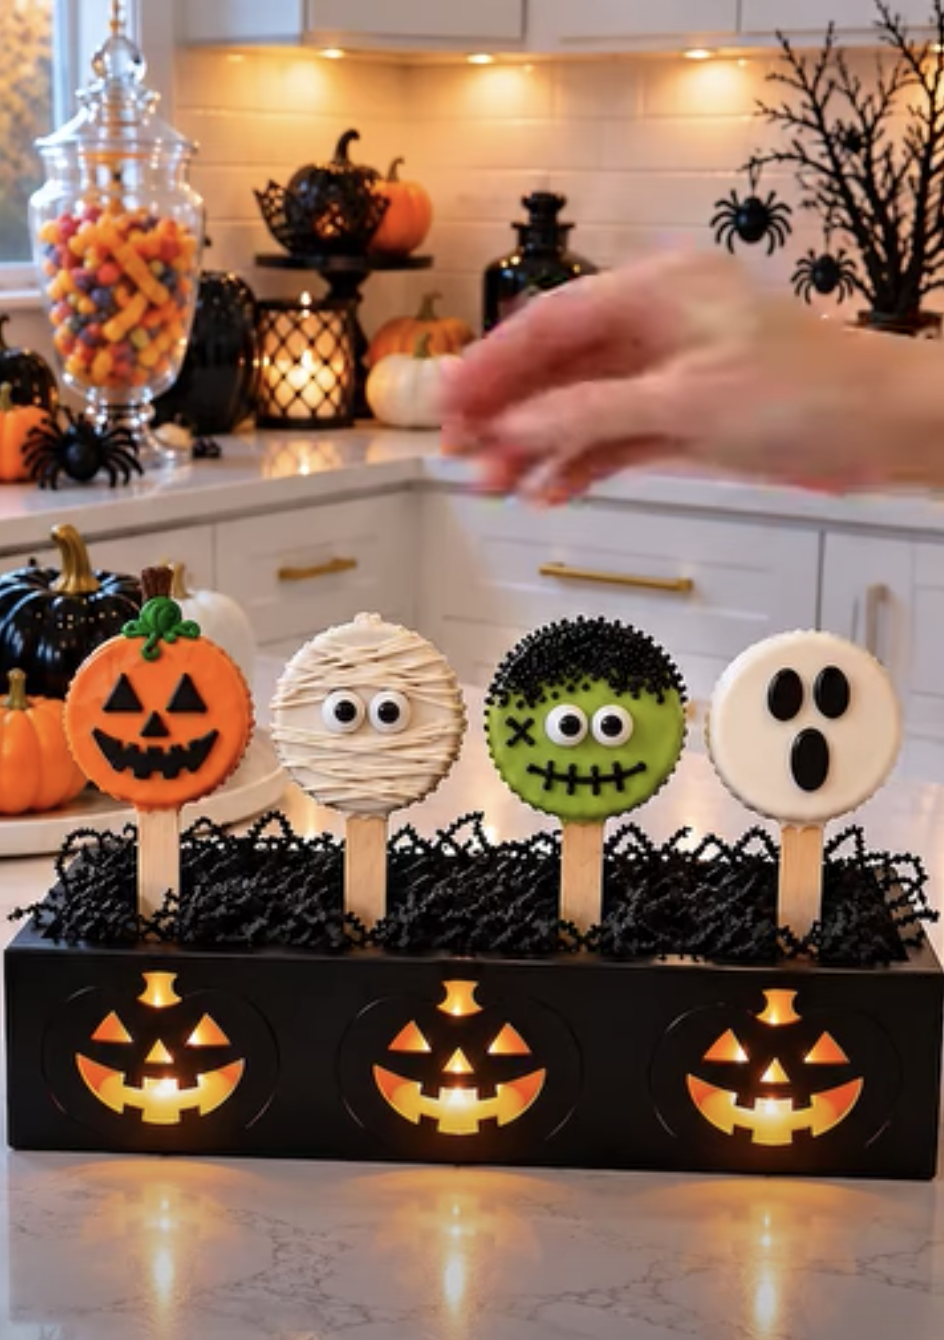
Halloween Oreo Pops – Easy No-Bake Ghost, Monster, and Pumpkin Treats
Ingredients
Equipment
Method
- Place 24 Oreo cookies in a food processor and pulse into fine crumbs. Alternatively, crush them in a sealed plastic bag with a rolling pin.
- Combine Oreo crumbs with softened cream cheese. Mix until a thick, uniform dough forms.
- Divide mixture into 24 portions and roll into balls. Arrange on a parchment-lined baking tray and refrigerate for 30–60 minutes until firm.
- Melt a small amount of candy coating. Dip the tip of each lollipop stick into coating, then insert halfway into an Oreo ball.
- Return pops to refrigerator for 10–15 minutes so coating around sticks can harden.
- Melt white chocolate wafers, orange candy melts, and purple or green candy melts separately according to package directions. Stir in a little coconut oil if needed to thin coating.
- Working in small batches, dip each chilled Oreo pop into desired coating. Gently tap off excess coating.
- Immediately add candy eyes or Halloween sprinkles while coating remains soft. After coating sets, use black decorating icing to draw ghost, monster, or pumpkin faces.
- Stand pops upright in a cake-pop stand or clean foam block. Refrigerate until completely set, approximately 20 minutes. Arrange on a serving platter and serve chilled.
Notes
Each pop features a rich chocolate cookie center with a soft, truffle-like texture. Meanwhile, the colorful candy coating adds sweetness and a satisfying outer shell.
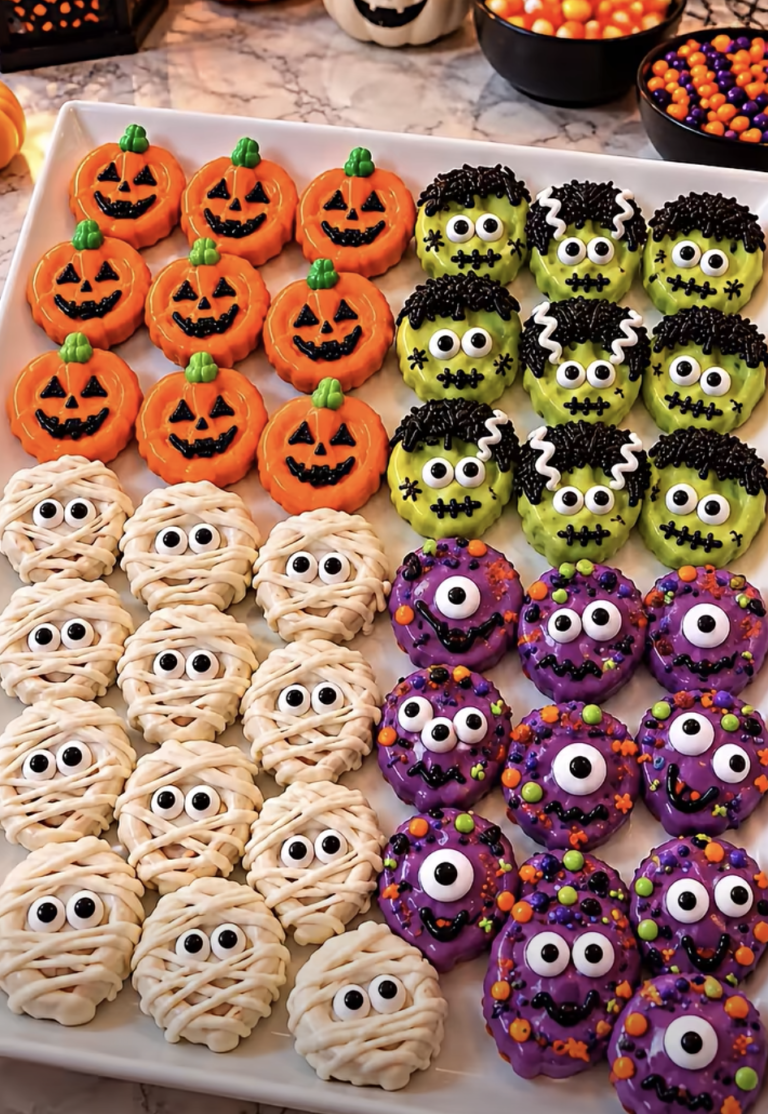
You can decorate the pops as friendly ghosts, silly monsters, bright orange pumpkins, or other Halloween characters.
Best of all, you don’t need an oven or complicated baking techniques.
The recipe uses familiar ingredients and simple decorating methods. With a little patience during chilling and dipping, you can create 24 individual treats that look impressive on a party platter.
You can also prepare these pops ahead of time and keep them refrigerated until your celebration.
I first started making Halloween Oreo Pops when I wanted a festive dessert that everyone could help decorate. Instead of baking cookies from scratch, I crushed chocolate sandwich cookies and mixed them with cream cheese to create a soft, rich filling. After chilling the mixture, I shaped it into little balls and added lollipop sticks. The decorating turned into the most enjoyable part. Some pops became white ghosts, while others turned into orange pumpkins and colorful monsters. The finished treats looked cheerful and spooky, and their creamy chocolate centers made them especially popular. Since then, I’ve enjoyed preparing these pops whenever Halloween calls for something fun and homemade.
Why You’ll Love These Halloween Oreo Pops
A Delicious Combination of Chocolate Cookies and Creamy Filling
The appeal of Halloween Oreo Pops comes from their rich chocolate flavor and playful presentation.
The center combines crushed Oreo cookies with softened cream cheese.
Together, these ingredients create a thick, smooth mixture that resembles chocolate cookie truffles.
The cookie crumbs provide a deep chocolate flavor, while the cream cheese adds richness and a slight tang.
Because the mixture contains no cake batter, you don’t need to bake anything.
Instead, you simply combine the ingredients, shape them into balls, and chill them until firm.
Next, the candy coating adds another delicious layer.
White chocolate melting wafers create a sweet shell that works beautifully for ghost designs.
Orange candy melts make cheerful pumpkin pops.
Purple or green candy melts create colorful monsters.
The coating hardens around the chilled cookie mixture, producing a satisfying contrast between the crisp exterior and soft center.
Finally, candy eyes, black decorating icing, and Halloween sprinkles add personality.
You can create different expressions on every pop.
Some can look friendly and funny, while others can appear wonderfully spooky.
Because each pop has its own design, the finished platter looks colorful and festive.
A Fun No-Bake Halloween Activity for Families and Parties
Halloween Oreo Pops offer a fun decorating activity without requiring advanced baking skills.
The recipe begins with only two ingredients for the filling: Oreo cookies and cream cheese.
After shaping the mixture, you simply chill the balls and add lollipop sticks.
The decorating process allows plenty of creativity.
For example, you can use white coating and black icing to create ghost faces.
Orange coating works beautifully for pumpkins.
Green or purple coating creates playful monsters with candy eyes.
Another advantage comes from the individual serving size.
Guests can pick up a pop without needing plates or forks.
This makes the treats convenient for Halloween dessert tables and casual gatherings.
Furthermore, the recipe makes approximately 24 pops.
You can decorate them in several different styles to create an attractive assortment.
The recipe also works well for preparing ahead of time.
You can shape the Oreo balls and refrigerate them before decorating.
Alternatively, complete the pops a day before your party and store them in an airtight container.
Because the finished treats contain cream cheese, keep them refrigerated until serving.
For a festive presentation, arrange the pops upright in a cake-pop stand or decorative container.
The colorful designs create a cheerful Halloween display.
Essential Ingredients for the Best Halloween Oreo Pops
Choosing Oreo Cookies, Cream Cheese, and Candy Coatings
The ingredients you choose make a noticeable difference in Halloween Oreo Pops.
Start with 24 Oreo cookies.
You can crush the cookies with their cream filling intact.
The filling adds sweetness and helps create a smooth mixture.
Next, use eight ounces of softened cream cheese.
Full-fat cream cheese creates a rich, creamy center that holds together well after chilling.
Allow the cream cheese to soften before mixing.
This makes it easier to combine with the cookie crumbs.
For the coating, use two cups of white chocolate melting wafers.
Melting wafers work well because they melt smoothly and create a firm shell.
Next, prepare one cup of orange candy melts.
Orange coating makes excellent pumpkin designs.
You will also need one cup of purple or green candy melts.
These colors work beautifully for monster pops.
If you want both purple and green designs, divide the quantity between the two colors.
Finally, prepare 24 lollipop sticks.
Choose sturdy sticks designed for cake pops or candy treats.
You can also use food-safe paper sticks.
A small amount of melted coating helps secure each stick inside the chilled Oreo ball.
For easier dipping, keep the melted coating in a narrow, deep container.
This allows you to submerge each pop without using excessive coating.
Decorating with Candy Eyes, Icing, and Halloween Sprinkles
The decorations transform simple Oreo truffles into festive Halloween Oreo Pops.
Candy eyes create instant monster faces.
You can use one, two, or several eyes on each pop.
Black decorating icing works beautifully for ghost faces, pumpkin expressions, and monster details.
For example, draw two small eyes and an oval mouth on a white-coated pop to create a friendly ghost.
For pumpkins, use orange coating and draw a simple jack-o’-lantern face.
You can also add a small green icing stem if you have extra decorating supplies.
For monster pops, use green or purple coating.
Add candy eyes while the coating remains soft.
Next, create mouths, eyebrows, or silly expressions with black decorating icing.
Halloween sprinkles provide another easy decorating option.
Choose sprinkles in orange, black, purple, green, or white.
You can sprinkle them over the coating immediately after dipping.
However, add black icing details after the candy coating sets.
This helps the designs remain neat.
If the melted coating feels too thick, stir in a small amount of coconut oil.
Start with a few drops and add more only if necessary.
Avoid adding water because moisture can cause melted chocolate or candy coating to seize.
How to Make Halloween Oreo Pops Step by Step
Prepare the Oreo Filling and Secure the Lollipop Sticks
Making Halloween Oreo Pops begins with preparing the chocolate cookie filling.
First, place 24 Oreo cookies in a food processor.
Pulse until the cookies become fine crumbs.
Alternatively, place the cookies in a sealed plastic bag and crush them with a rolling pin.
Next, transfer the crumbs to a large mixing bowl.
Add eight ounces of softened cream cheese.
Mix until the ingredients form a thick, uniform dough.
You can use a sturdy spoon, silicone spatula, or electric mixer.
Make sure the cream cheese blends evenly with the cookie crumbs.
Next, divide the mixture into 24 portions.
Roll each portion between your palms to form a smooth ball.
Try to keep the balls approximately the same size.
Uniform portions make dipping easier and create a more attractive presentation.
Arrange the balls on a parchment-lined baking tray.
Refrigerate for 30 to 60 minutes, or until firm.
Once the balls feel firm, melt a small amount of candy coating.
Dip the tip of each lollipop stick into the melted coating.
Insert the coated tip approximately halfway into an Oreo ball.
The melted coating acts like glue and helps secure the stick.
Next, return the pops to the refrigerator for 10 to 15 minutes.
This allows the coating around the sticks to harden.
Keep the remaining Oreo balls chilled while you work.
Dip, Decorate, and Set the Halloween Pops
Once the lollipop sticks feel secure, prepare the candy coatings.
Melt the white chocolate wafers according to the package directions.
Use short microwave intervals and stir between heating sessions.
Next, melt the orange candy melts in a separate bowl.
Repeat with the purple or green candy melts.
Avoid overheating the coatings.
If necessary, add a little coconut oil to create a smoother consistency.
Now, remove a few chilled Oreo pops from the refrigerator.
Hold one pop by its stick and dip the ball into the melted coating.
Rotate gently until the coating covers the entire surface.
Lift the pop and allow excess coating to drip back into the bowl.
Tap the stick gently against the edge of the bowl if necessary.
Next, decorate according to your chosen design.
For monster pops, add candy eyes while the coating remains soft.
For sprinkle-covered pops, add the sprinkles immediately.
For ghost and pumpkin faces, allow the coating to set before applying black decorating icing.
Place each decorated pop upright in a cake-pop stand or clean foam block.
Repeat with the remaining pops.
Work in small batches to keep the cookie centers firm.
Finally, refrigerate the completed Halloween Oreo Pops until the coating sets completely.
Arrange them on a serving platter or display them upright.
Serve chilled for the best texture.
Helpful Tips, Creative Designs, and Storage Ideas
How to Prevent Cracking, Falling Sticks, and Uneven Coating
A few simple techniques help Halloween Oreo Pops turn out beautifully.
First, crush the Oreo cookies into fine crumbs.
Large cookie pieces can make the mixture difficult to shape.
Next, soften the cream cheese before mixing.
This helps create a smooth filling without lumps.
Another important tip involves chilling.
Refrigerate the Oreo balls until firm before adding the sticks.
Soft cookie balls may slide off during dipping.
However, avoid freezing the balls until extremely cold.
A large temperature difference between frozen centers and warm coating can contribute to cracking.
For the sticks, dip each tip into melted coating before inserting it into the cookie ball.
Then, chill the pops again to secure the sticks.
Next, melt the candy coating gently.
Overheated coating can become thick or difficult to work with.
Use short heating intervals and stir frequently.
If necessary, add a small amount of coconut oil.
Keep all dipping tools completely dry.
Even a little water can affect melted chocolate.
Finally, avoid making the coating too thick.
Allow excess coating to drip away before decorating.
A smooth, even shell looks attractive and sets more consistently.
Fun Halloween Designs, Serving Ideas, and Make-Ahead Storage
Halloween Oreo Pops offer endless decorating possibilities.
For ghost pops, use white chocolate coating.
Once the coating sets, draw two eyes and a small mouth with black decorating icing.
For pumpkin pops, use orange candy melts.
Add a jack-o’-lantern face after the coating hardens.
For monster pops, use green or purple coating.
Attach candy eyes while the coating remains soft.
You can create funny expressions by adding extra eyes or unusual mouth shapes.
For a mummy-inspired variation, coat the pops in white chocolate.
Then, drizzle thin lines of additional white coating across the surface.
Add two candy eyes before the final drizzle sets.
You can also create sprinkle-covered pops using Halloween-themed sprinkles.
For serving, arrange the pops upright in a cake-pop stand.
Alternatively, place them on a parchment-lined platter.
If you’re preparing party favors, wrap each fully set pop in a food-safe treat bag.
Keep the packaged pops refrigerated until distribution.
Storage: Store Halloween Oreo Pops in an airtight container in the refrigerator at 40°F or below.
For the best quality, enjoy them within three to four days.
Separate layers with parchment paper if necessary.
Avoid leaving the cream cheese-filled pops at room temperature for more than two hours, or more than one hour above 90°F.
Ingredients
Yield: 24 Oreo pops | Prep time: 30 minutes | Initial chilling: 30–60 minutes | Stick-setting time: 10–15 minutes | Final setting: approximately 20 minutes | Total time: approximately 1 hour 30 minutes to 2 hours
For the Oreo filling:
- 24 Oreo cookies
- 8 oz cream cheese, softened
For the candy coating:
- 2 cups white chocolate melting wafers
- 1 cup orange candy melts
- 1 cup purple or green candy melts
- 1 tsp coconut oil, optional, for thinning the coating
For decorating:
- 48 candy eyes, approximately
- 2 tbsp black decorating icing, approximately
- ¼ cup Halloween sprinkles, approximately
For assembling:
– 24 food-safe lollipop sticks
Instructions
1. Crush the cookies. Place 24 Oreo cookies in a food processor and pulse into fine crumbs. Alternatively, crush them in a sealed plastic bag with a rolling pin.
2. Make the filling. Combine the Oreo crumbs with softened cream cheese. Mix until a thick, uniform dough forms.
3. Shape and chill. Divide the mixture into 24 portions and roll into balls. Arrange on a parchment-lined baking tray and refrigerate for 30–60 minutes until firm.
4. Insert the sticks. Melt a small amount of candy coating. Dip the tip of each lollipop stick into the coating, then insert it halfway into an Oreo ball.
5. Secure the sticks. Return the pops to the refrigerator for 10–15 minutes so the coating around the sticks can harden.
6. Melt the coatings. Melt the white chocolate wafers, orange candy melts, and purple or green candy melts separately according to package directions. Stir in a little coconut oil if needed to thin the coating.
7. Dip the pops. Working in small batches, dip each chilled Oreo pop into the desired coating. Gently tap off excess coating.
8. Decorate. Immediately add candy eyes or Halloween sprinkles while the coating remains soft. After the coating sets, use black decorating icing to draw ghost, monster, or pumpkin faces.
9. Set and serve. Stand the pops upright in a cake-pop stand or clean foam block. Refrigerate until completely set, approximately 20 minutes. Arrange on a serving platter and serve chilled.
Frequently Asked Questions
1. Can I make Halloween Oreo Pops ahead of time?
Yes. Halloween Oreo Pops work beautifully as a make-ahead treat.
Prepare the cookie filling, shape the balls, and chill them before decorating.
You can also complete the pops a day or two before your Halloween celebration.
Store them in an airtight container in the refrigerator.
For the best appearance, keep the finished pops away from excess moisture and condensation.
2. Why do my Oreo pops fall off the lollipop sticks?
Oreo pops may fall off when the filling feels too soft or the sticks lack a secure coating.
To prevent this, chill the Oreo balls until firm.
Next, dip the tip of each stick into melted candy coating before inserting it.
Refrigerate the pops again so the coating hardens around the sticks.
Finally, dip the pops gently without excessive twisting.
3. Can I use regular chocolate instead of candy melts?
Yes. You can use suitable melting chocolate or chocolate wafers.
However, regular chocolate may require tempering to achieve a firm, glossy finish at room temperature.
Candy melts offer a convenient option because they come in festive colors and set easily.
If you use white chocolate, choose a product that melts smoothly and follow its heating instructions carefully.
4. How do I make ghost, pumpkin, and monster Oreo pops?
For ghosts, dip the pops in white coating and draw simple faces with black icing.
For pumpkins, use orange candy melts and add jack-o’-lantern expressions.
For monsters, use green or purple coating and attach candy eyes.
You can also add Halloween sprinkles for extra color.
Allow the coating to set before drawing detailed icing decorations.
5. How long do Halloween Oreo Pops last in the refrigerator?
Store the pops in an airtight container at 40°F or below.
For the best quality, enjoy them within three to four days.
The cream cheese filling requires refrigeration.
If you stack the pops, place parchment paper between the layers to protect the decorations.
Avoid leaving them at room temperature for more than two hours, or more than one hour when temperatures exceed 90°F.
Conclusion
Halloween Oreo Pops combine rich chocolate sandwich cookies, creamy cream cheese filling, colorful candy coatings, and playful Halloween decorations into one delicious no-bake treat.
The soft, truffle-like centers contrast beautifully with the firm candy shells.
Meanwhile, white, orange, purple, and green coatings make it easy to create ghosts, pumpkins, monsters, and other festive designs.
Furthermore, the simple preparation makes this recipe ideal for Halloween parties, family decorating activities, and seasonal dessert tables.
For the best results, crush the Oreo cookies finely, soften the cream cheese before mixing, and chill the cookie balls thoroughly.
Secure each lollipop stick with melted coating before dipping.
Then, decorate the pops while the coating remains soft or add icing details after it sets.
You can prepare these treats ahead of time and refrigerate them until serving.
Whether you arrange them on a platter or display them upright, Halloween Oreo Pops offer a colorful, creative, and delicious way to celebrate the spooky season.