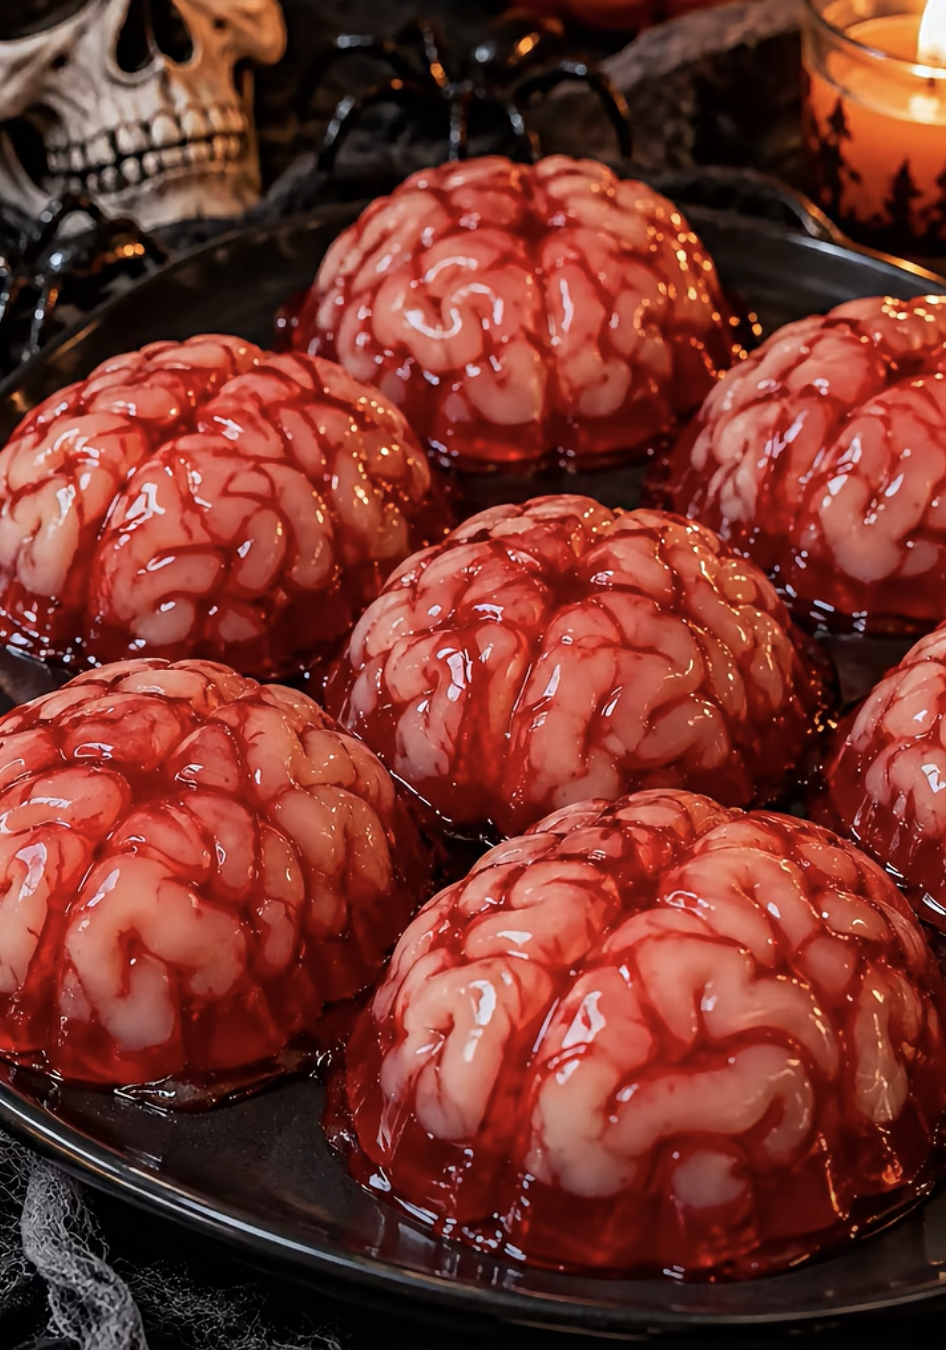
Edible Zombie Brains are a fun, creepy, and delicious Halloween dessert that combines creamy vanilla pudding, fluffy whipped topping, sweet cream cheese, and eerie pink and red decorations. These no-bake treats look like miniature zombie brains, but underneath their spooky appearance, they taste like a rich, fluffy vanilla cheesecake mousse.
If you’re planning a Halloween party, haunted-house celebration, classroom gathering, or spooky movie night, Edible Zombie Brains make an unforgettable addition to your dessert table.
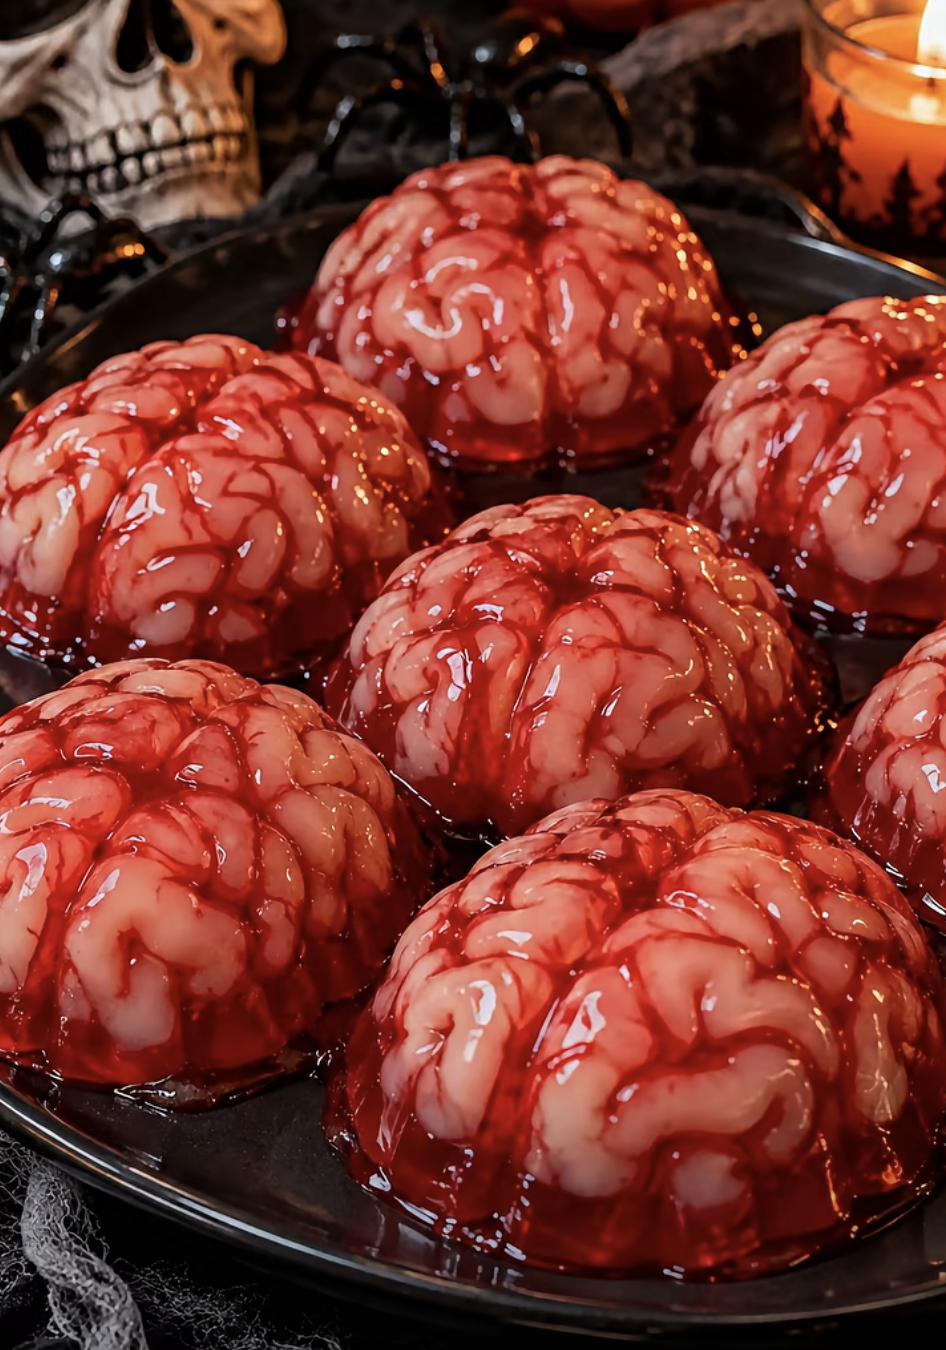
Edible Zombie Brains – A Spooky, Creamy Halloween Dessert Recipe
Ingredients
Equipment
Method
- In a large mixing bowl, whisk instant vanilla pudding mix with 2 cups cold milk until thickened, approximately 2 minutes.
- Refrigerate prepared pudding for 5 minutes while making the cream cheese mixture.
- In a separate bowl, beat softened cream cheese, powdered sugar, and vanilla extract until smooth and creamy.
- Gently fold thawed whipped topping into cream cheese mixture until evenly combined.
- Fold prepared pudding into cream cheese mixture. Add 3–5 drops pink food coloring and mix gently until pale pink.
- Divide most of mixture among 12 clear dessert cups or brain-shaped molds, reserving some for decorating. Shape tops into 2 rounded sections with a narrow center groove.
- Transfer reserved mixture to a piping bag fitted with a round tip. Pipe curved, squiggly lines across each dessert to resemble brain folds.
- Drizzle red decorating gel or strawberry syrup between folds. Add thin strawberry syrup shortly before serving for the neatest appearance.
- Cover and refrigerate for at least 2 hours. Add optional mini marshmallows and serve cold.
Notes
The best part? You don’t need an oven, complicated decorating skills, or expensive ingredients.
You simply prepare a creamy pudding mixture, tint it pale pink, pipe realistic-looking brain folds, and add a drizzle of red decorating gel or strawberry syrup.
The result looks wonderfully creepy while tasting sweet, smooth, and delicious.
You can serve these treats in individual clear dessert cups or use brain-shaped silicone molds for a more dramatic presentation.
Because the recipe makes approximately 12 servings, it’s especially convenient for parties.
You can also prepare the desserts several hours ahead of time and keep them refrigerated until your guests arrive.
With their unusual appearance and familiar vanilla flavor, these treats offer a playful way to celebrate Halloween.
I first decided to make edible zombie brains when I wanted a Halloween dessert that looked impressive without requiring hours of baking or decorating. I had vanilla pudding, cream cheese, and whipped topping in the refrigerator, so I experimented with a fluffy dessert mixture. After adding a little pink food coloring, I spooned the mixture into clear cups and used a piping bag to create squiggly lines across the top. A drizzle of strawberry syrup gave the desserts their final spooky appearance. The finished treats looked creepy enough for a Halloween party, but they tasted like a creamy vanilla cheesecake dessert. Everyone enjoyed the contrast between their frightening appearance and sweet, familiar flavor.
Why You’ll Love These Edible Zombie Brains
A Creepy Halloween Dessert That Tastes Surprisingly Delicious
The appeal of Edible Zombie Brains comes from their playful appearance and delicious creamy texture.
At first glance, the pale pink swirls and red syrup resemble miniature zombie brains.
However, the dessert itself tastes sweet, rich, and comforting.
Instant vanilla pudding creates a smooth foundation.
Meanwhile, softened cream cheese adds richness and a gentle tang that balances the sweetness.
Powdered sugar makes the mixture pleasantly sweet without creating a grainy texture.
Vanilla extract enhances the familiar dessert flavor.
Next, whipped topping adds a light, fluffy consistency.
This keeps the finished dessert from feeling too dense.
A few drops of pink food coloring transform the pale vanilla mixture into a convincing brain-like shade.
The red decorating gel or strawberry syrup creates the final spooky effect.
For a dramatic presentation, drizzle the red topping between the piped folds.
The contrast between pale pink cream and deep red syrup creates a creepy appearance that suits Halloween perfectly.
Another advantage comes from the individual serving portions.
Clear cups allow guests to see the pink dessert mixture and red decorations.
Brain-shaped molds create an even more realistic presentation.
Because the dessert tastes like a creamy vanilla mousse, it appeals to people who enjoy classic pudding and cheesecake flavors.
A Simple No-Bake Treat for Halloween Parties
Edible Zombie Brains work beautifully for Halloween parties because they require no baking.
You only need a few mixing bowls, a whisk, an electric mixer, and a piping bag.
The preparation takes approximately 20 minutes.
Afterward, the desserts need at least two hours in the refrigerator.
This makes the recipe ideal for preparing ahead of time.
You can assemble the desserts in the morning and refrigerate them until an evening party.
Another benefit comes from the recipe’s flexibility.
You can serve the dessert in small clear cups for convenient individual portions.
Alternatively, use silicone brain molds for a more realistic shape.
If you don’t have a piping bag, use a resealable plastic bag with a small corner cut off.
The decorations also offer room for creativity.
For example, strawberry syrup creates a fruity flavor, while red decorating gel provides more precise lines.
Mini marshmallows can add a playful finishing touch.
Furthermore, the recipe works well for family Halloween activities.
Children can help stir the pudding, choose the pink color, and decorate the finished cups with adult supervision.
Because the dessert requires no oven, it offers a convenient alternative to Halloween cakes, cookies, and cupcakes.
Essential Ingredients for the Best Edible Zombie Brains
Choosing the Right Pudding, Cream Cheese, and Whipped Topping
The ingredients you choose make a noticeable difference in Edible Zombie Brains.
Start with one 3.4-ounce package of instant vanilla pudding mix.
Instant pudding works best because it thickens quickly without cooking.
Next, add two cups of cold milk.
Cold milk helps the instant pudding reach its intended consistency.
Whisk the pudding mix and milk until smooth, then refrigerate briefly.
For the creamy base, use eight ounces of softened cream cheese.
Full-fat cream cheese provides a rich texture and helps the dessert hold its shape.
Allow the cream cheese to soften before mixing.
This makes it easier to beat into a smooth mixture without lumps.
Next, add half a cup of powdered sugar.
Powdered sugar blends smoothly into the cream cheese.
A teaspoon of vanilla extract enhances the flavor.
Finally, add one cup of thawed whipped topping.
Whipped topping creates a lighter texture and makes the dessert easier to spoon and pipe.
Fold it into the cream cheese mixture gently to preserve its fluffy consistency.
Together, these ingredients create a sweet, creamy filling that resembles a soft vanilla cheesecake mousse.
Creating Realistic Pink Brain Folds and Spooky Red Details
The decorations give Edible Zombie Brains their signature Halloween appearance.
Start with pink food coloring.
Add only a few drops at first.
You want a pale pink shade rather than a bright neon color.
Mix gently until the color looks even.
If necessary, add another drop or two.
Next, choose your serving containers.
Small clear cups work well because they display the dessert and make serving easy.
Brain-shaped silicone molds offer a more realistic appearance.
However, the mixture has a soft mousse-like texture, so clear cups provide the most reliable presentation.
For realistic brain folds, use a piping bag fitted with a medium round tip.
Pipe curved, squiggly lines over the dessert.
Create two rounded sections with a narrow groove between them.
The lines don’t need to look perfectly symmetrical.
Slightly uneven folds can make the decorations appear more natural.
Finally, add red decorating gel or strawberry syrup.
Red decorating gel creates defined streaks.
Strawberry syrup offers a fruity flavor but may spread more easily.
For the best effect, drizzle small amounts between the pink folds.
Avoid covering the entire dessert with red topping.
The contrast between pink and red creates the most convincing spooky appearance.
How to Make Edible Zombie Brains Step by Step
Prepare the Creamy Vanilla Pudding Mixture
Making Edible Zombie Brains begins with preparing the pudding.
First, pour two cups of cold milk into a large mixing bowl.
Add one package of instant vanilla pudding mix.
Whisk for approximately two minutes, or until the mixture begins to thicken.
Next, place the pudding in the refrigerator for five minutes.
This gives the mixture time to develop a thicker consistency.
Meanwhile, prepare the cream cheese base.
Place eight ounces of softened cream cheese in a separate mixing bowl.
Add half a cup of powdered sugar and one teaspoon of vanilla extract.
Beat with an electric mixer until the mixture becomes smooth and creamy.
Scrape down the sides of the bowl as needed.
Make sure no large cream cheese lumps remain.
Next, add one cup of thawed whipped topping.
Using a spatula, gently fold the whipped topping into the cream cheese mixture.
Avoid vigorous stirring because it can reduce the fluffy texture.
Once the mixture looks smooth, add the prepared vanilla pudding.
Fold everything together until evenly combined.
The finished mixture should have a thick, creamy consistency.
Next, add a few drops of pink food coloring.
Stir gently until the dessert turns a pale pink shade.
The mixture is now ready for shaping and decorating.
Shape, Decorate, and Chill the Zombie Brains
Once the pink dessert mixture is ready, prepare 12 small clear cups or brain-shaped molds.
For the easiest presentation, choose clear dessert cups.
Spoon the pink mixture evenly into the containers.
Reserve some of the mixture for piping the brain folds.
Next, smooth the surface of each dessert.
Create two slightly rounded sections with a narrow groove down the center.
Transfer the reserved pink mixture to a piping bag fitted with a round tip.
Pipe curved, wavy lines across the top of each dessert.
Try to follow the shape of natural brain folds.
You can create short squiggles, loops, and curved ridges.
However, avoid making the lines too thin.
Thicker lines hold their shape better.
Next, add the red decorating gel or strawberry syrup.
Drizzle a small amount between the pink folds.
For a dramatic appearance, allow a few red streaks to run down the sides.
If you use strawberry syrup, add it closer to serving time to prevent excessive spreading.
Next, cover the dessert cups carefully.
Place them in the refrigerator for at least two hours.
This allows the mixture to chill and become firmer.
Finally, remove the Edible Zombie Brains from the refrigerator shortly before serving.
Add any final red decorations and optional mini marshmallows.
Serve cold for the best texture and flavor.
Helpful Tips, Creative Variations, and Storage Ideas
How to Make Zombie Brains Look Realistic
A few simple techniques help Edible Zombie Brains look especially impressive.
First, choose a pale pink color.
Realistic-looking brain desserts usually have a soft pink shade rather than a bright candy color.
Add food coloring gradually until you reach the desired appearance.
Next, use a piping bag with a round decorating tip.
This creates smooth, raised lines that resemble brain folds.
If you don’t own a piping bag, use a sturdy resealable plastic bag.
Fill the bag with the dessert mixture and cut a small opening in one corner.
Next, pipe the folds in two sections.
Leave a narrow groove down the center to create the familiar brain shape.
Avoid perfectly straight lines.
Curved, uneven squiggles create a more convincing appearance.
Another helpful tip involves the red decoration.
Use red gel for defined streaks and a stronger visual effect.
Strawberry syrup works well when you want a sweeter, fruitier finish.
However, thinner syrup may spread into the dessert.
For the neatest presentation, add the red topping shortly before serving.
Finally, use clear cups if you want a simple, reliable serving method.
The dessert’s soft texture makes cups easier to handle than unmolded shapes.
Delicious Flavor Variations and Make-Ahead Storage Tips
Edible Zombie Brains offer plenty of creative possibilities.
For a strawberry-flavored version, add a small amount of strawberry extract to the pudding mixture.
You can also use a little strawberry puree, although too much liquid may soften the dessert.
For a raspberry variation, drizzle raspberry dessert sauce between the brain folds.
If you prefer a richer flavor, add a little melted and cooled white chocolate to the cream cheese mixture.
However, allow the chocolate to cool before mixing so it doesn’t melt the whipped topping.
For additional texture, sprinkle a few mini marshmallows over the finished dessert.
You can also serve the treats with vanilla wafer cookies.
Another option involves layering crushed chocolate cookies at the bottom of each cup.
This creates a fun contrast between the creamy pink filling and dark cookie crumbs.
For make-ahead preparation, assemble the dessert cups several hours before serving.
Cover them carefully and refrigerate.
Storage: Keep Edible Zombie Brains refrigerated at 40°F or below.
For the best flavor and texture, enjoy them within three days.
Add strawberry syrup or other thin decorations shortly before serving.
Avoid leaving the desserts at room temperature for more than two hours, or more than one hour when temperatures exceed 90°F.
Because the filling contains dairy ingredients, proper refrigeration is essential.
Ingredients
Servings: 12 | Prep time: 20 minutes | Initial pudding chilling: 5 minutes | Final chilling: 2 hours | Total time: approximately 2 hours 25 minutes
For the creamy zombie brain dessert:
- 1 package (3.4 oz) instant vanilla pudding mix
- 2 cups cold milk
- 1 cup whipped topping, thawed
- 8 oz cream cheese, softened
- ½ cup powdered sugar
- 1 tsp vanilla extract
- 3–5 drops pink food coloring, or as needed
For decorating:
- ¼ cup red decorating gel or strawberry syrup, approximately
- ½ cup mini marshmallows (optional)
For serving and shaping:
– 12 small clear dessert cups or brain-shaped silicone molds
Instructions
1. Prepare the pudding. In a large mixing bowl, whisk the instant vanilla pudding mix with two cups of cold milk until thickened, approximately two minutes.
2. Chill briefly. Refrigerate the prepared pudding for five minutes while making the cream cheese mixture.
3. Beat the cream cheese. In a separate bowl, beat softened cream cheese, powdered sugar, and vanilla extract until smooth and creamy.
4. Add the whipped topping. Gently fold the thawed whipped topping into the cream cheese mixture until evenly combined.
5. Combine and color. Fold the prepared pudding into the cream cheese mixture. Add three to five drops of pink food coloring and mix gently until pale pink.
6. Fill the containers. Divide most of the mixture among 12 clear dessert cups or brain-shaped molds, reserving some for decorating. Shape the tops into two rounded sections with a narrow center groove.
7. Pipe the brain folds. Transfer the reserved mixture to a piping bag fitted with a round tip. Pipe curved, squiggly lines across each dessert to resemble brain folds.
8. Add the spooky decoration. Drizzle red decorating gel or strawberry syrup between the folds. For the neatest appearance, add thin strawberry syrup shortly before serving.
9. Chill and serve. Cover and refrigerate for at least two hours. Add optional mini marshmallows and serve cold.
Frequently Asked Questions
1. Can I make Edible Zombie Brains ahead of time?
Yes. Edible Zombie Brains make an excellent make-ahead Halloween dessert.
Prepare the pudding mixture, fill the cups, and pipe the brain folds several hours before serving.
Cover the desserts carefully and refrigerate them.
For the neatest presentation, add the red decorating gel or strawberry syrup shortly before serving.
This helps prevent the red topping from spreading into the pink mixture.
2. Can I use homemade whipped cream instead of whipped topping?
Yes, but homemade whipped cream may create a softer dessert.
For the best results, whip cold heavy cream until it forms firm peaks.
Fold it gently into the cream cheese mixture.
However, the finished dessert may not hold piped decorations as firmly as one made with stabilized whipped topping.
Keep the dessert refrigerated until serving.
3. How do I make the brain folds look realistic?
Use a piping bag fitted with a medium round tip.
Pipe thick, curved squiggles over the pale pink dessert.
Create two rounded sections with a narrow groove down the center.
Avoid perfectly straight or symmetrical lines.
Finally, drizzle a small amount of red decorating gel between the folds for a spooky appearance.
4. Can I make Edible Zombie Brains without brain-shaped molds?
Absolutely. Small clear dessert cups work beautifully.
Spoon the pink dessert mixture into each cup.
Next, create two rounded sections on the surface.
Use a piping bag to add curved brain-like folds.
The clear cups make serving easy and eliminate the need to remove the dessert from a mold.
5. How long do Edible Zombie Brains last in the refrigerator?
Store the desserts in covered containers at 40°F or below.
For the best flavor and texture, enjoy them within three days.
The pudding mixture may gradually soften, and thin strawberry syrup can spread into the pink filling.
Keep the desserts refrigerated until serving.
Discard any portions that remain at room temperature for more than two hours, or more than one hour above 90°F.
Conclusion
Edible Zombie Brains combine creamy vanilla pudding, rich cream cheese, fluffy whipped topping, and spooky pink-and-red decorations into a fun Halloween dessert.
The smooth filling tastes like a sweet vanilla cheesecake mousse, while the piped brain folds create an unforgettable presentation.
Furthermore, the simple no-bake preparation makes this recipe ideal for Halloween parties, spooky movie nights, and family celebrations.
You can customize the treats with strawberry syrup, raspberry sauce, white chocolate, or mini marshmallows.
For the best results, soften the cream cheese before mixing, fold the whipped topping gently, and use only a few drops of pink food coloring.
Pipe thick, curved lines to create realistic brain folds.
Then, add red decorating gel or strawberry syrup for a dramatic finishing touch.
Refrigerate the desserts for at least two hours before serving.
Whether you arrange them on a Halloween dessert table or serve them in individual cups, Edible Zombie Brains offer a playful combination of creepy appearance, creamy texture, and delicious vanilla flavor.