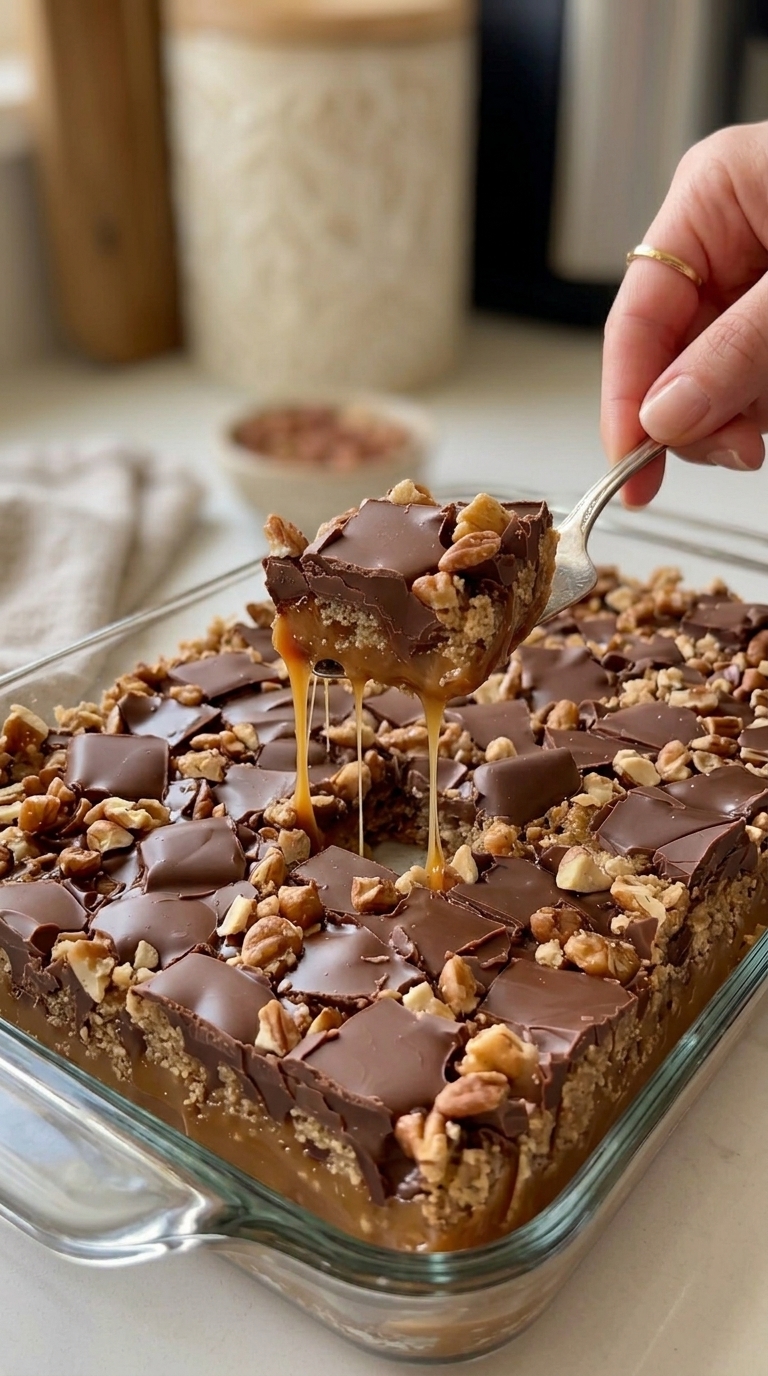
Caramel Chocolate Crunch Bars deliver everything you want in a dessert—sweet caramel, smooth chocolate, and a buttery crunchy base that melts in your mouth. These layered bars are simple to prepare, yet they taste like something from a high-end bakery. Whether you’re planning a party, holiday gathering, or just need a quick homemade treat, this recipe brings indulgence without the stress.
I first made these bars on a rainy afternoon when I was craving something sweet but didn’t want to spend hours baking. I had basic pantry ingredients and a jar of caramel sauce sitting in the kitchen. As the bars baked, the smell of butter and caramel filled the house, creating an almost cozy, bakery-like atmosphere. When I finally cut into them, the layers held perfectly—crunchy base, gooey caramel, and melted chocolate on top. Since then, they’ve become one of my easiest go-to desserts for any occasion.
Why Caramel Chocolate Crunch Bars Are So Popular
The Perfect Mix of Texture and Flavor
Caramel Chocolate Crunch Bars stand out because they combine multiple textures in every bite. The base is buttery and slightly crisp, while the caramel layer adds chewiness and richness. Meanwhile, melted chocolate creates a smooth finish that ties everything together.
This contrast makes the bars incredibly satisfying. Instead of a one-note dessert, you get layers of flavor and texture that keep each bite interesting from start to finish.
Easy Dessert for Any Occasion
Another reason these bars are so loved is their simplicity. You don’t need special baking skills or complicated equipment. In fact, most of the ingredients are pantry staples, which makes this recipe convenient for last-minute baking.
Additionally, these bars travel well and slice neatly once cooled. That makes them ideal for potlucks, parties, or holiday dessert trays. Because they are both easy and impressive, they quickly become a favorite among home bakers.
Ingredients That Make Caramel Chocolate Crunch Bars Irresistible
Simple Pantry Ingredients with Big Impact
This recipe uses everyday ingredients that come together to create a rich dessert:
- All-purpose flour
- Brown sugar
- Unsalted butter
- Caramel sauce
- Chocolate chunks
- Chocolate chips
- Optional chopped nuts
Each ingredient plays a key role. The flour and butter form a sturdy base, while brown sugar adds depth and slight caramel flavor. The caramel sauce provides gooey richness, and the chocolate layers bring sweetness and smooth texture.
Optional Add-Ins for Extra Crunch
Although the basic recipe is delicious on its own, you can easily enhance it. For example, chopped pecans or walnuts add a crunchy contrast. Alternatively, you can sprinkle sea salt on top for a sweet-and-salty flavor boost.
You can also experiment with dark chocolate instead of milk chocolate if you prefer a less sweet version. These small adjustments allow you to customize the bars to match your taste.
Step-by-Step Guide to Making Caramel Chocolate Crunch Bars
Creating the Buttery Crust
Start by preheating your oven to 350°F (175°C). In a mixing bowl, combine flour, brown sugar, and melted butter until the mixture forms a soft dough-like texture.
Press this mixture evenly into a greased baking dish. Make sure the layer is compact and even, as this forms the foundation of your bars. Bake for 10 to 12 minutes until lightly golden. This step creates a firm base that supports the gooey layers above.
Adding the Caramel and Chocolate Layers
Once the crust is baked, immediately pour caramel sauce over the warm base. The heat helps it spread evenly and soak slightly into the crust.
Next, sprinkle chocolate chunks and nuts over the caramel layer. Return the dish to the oven for about 10 minutes, allowing the caramel to bubble and the chocolate to melt.
Finally, remove the bars and top them with chocolate chips. Let them sit for a few minutes so the chips soften, then gently spread them for a smooth finish. Allow the entire dessert to cool completely before slicing.
Tips for Perfect Caramel Chocolate Crunch Bars
Getting Clean Layers and Neat Cuts
To achieve clean layers, make sure each step is evenly spread. Uneven crust or caramel can cause the bars to fall apart when slicing.
For cleaner cuts, chill the bars in the refrigerator for at least an hour before slicing. Use a sharp knife and wipe it between cuts to keep edges neat.
Flavor Variations and Serving Ideas
You can easily adjust Caramel Chocolate Crunch Bars to suit different tastes. For example, adding crushed pretzels creates a salty crunch, while white chocolate drizzle adds sweetness and visual appeal.
These bars pair well with coffee, milk, or even vanilla ice cream. Because of their rich flavor, small portions are often enough to satisfy cravings.
Frequently Asked Questions
Can I use store-bought caramel sauce?
Yes, store-bought caramel works perfectly and saves time. Homemade caramel can also be used if preferred.
Can I freeze caramel chocolate crunch bars?
Yes, you can freeze them in an airtight container for up to two months. Thaw before serving.
Why are my bars too soft?
They may need more cooling time. Letting them set fully helps the layers firm up.
Can I use milk chocolate instead of chocolate chunks?
Yes, milk chocolate, dark chocolate, or semi-sweet chocolate all work well.
How do I store leftovers?
Store them in an airtight container at room temperature for up to three days or refrigerate for longer freshness.
Ingredients
Equipment
Method
- Preheat oven to 350°F and mix flour, brown sugar, and melted butter.
- Press mixture into a greased baking dish to form the crust.
- Bake crust for 10–12 minutes until lightly golden.
- Pour caramel sauce over warm crust.
- Sprinkle chocolate chunks and nuts over caramel.
- Bake for another 10 minutes until caramel is bubbly and chocolate melts.
- Top with chocolate chips, cool completely, and cut into bars.
Notes
Conclusion
Caramel Chocolate Crunch Bars are the perfect combination of simplicity and indulgence. With their buttery crust, gooey caramel center, and smooth chocolate topping, they deliver a dessert experience that feels rich yet effortless.
Because they require minimal ingredients and straightforward steps, they are ideal for both beginner and experienced bakers. Whether you make them for a special occasion or a simple treat at home, they consistently impress with their flavor and texture. Once you try them, they will likely become a regular favorite in your dessert rotation.
More Dessert
- Can’t Believe I’ve Been Drinking Coca-Cola for Years and Just Noticed the ‘Hidden Detail’ in the Logo!
- The Power of the Walnut: 5 Science-Backed Health Benefits (And How Many You Should Actually Eat)
- The Mystery of Lobster’s Green Goodies: What Is Tomalley and Should You Eat It?
- Southern Tea Cake Cookies Recipe: Soft Buttery Classic Cookies