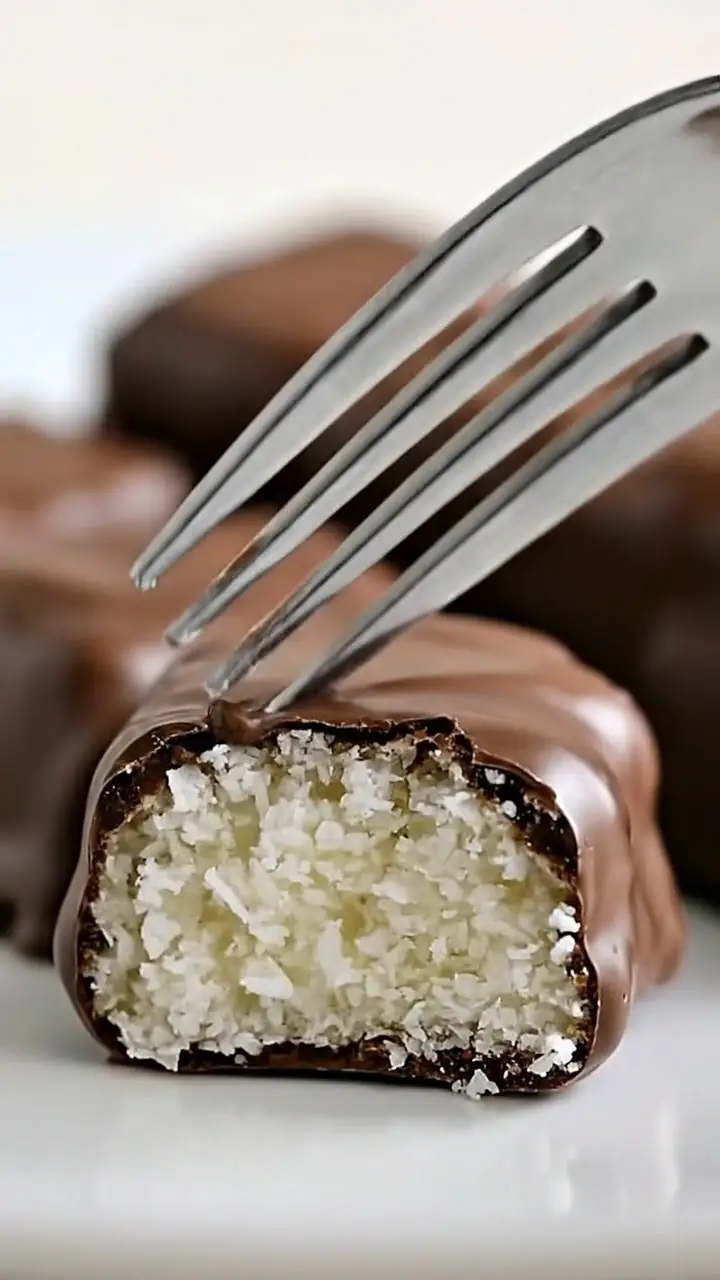
Homemade Coconut Chocolate Bars are the kind of sweet treat that instantly brings comfort with every bite. They combine creamy coconut filling with a smooth chocolate coating, creating a dessert that feels indulgent yet surprisingly simple to prepare. Because they require no baking, they’re perfect for quick cravings, special occasions, or make-ahead desserts you can store in the fridge.
These bars have become a favorite in many kitchens because they strike the perfect balance between rich chocolate and sweet coconut. Even better, they come together with just a handful of pantry staples. Once you try them, they often become a regular go-to dessert for busy days when you still want something homemade and satisfying.
There’s something special about recipes that feel both nostalgic and effortless. These bars fall exactly into that category. They remind many people of classic candy shop treats but with a fresher, homemade twist.

Ingredients
Equipment
Method
- Mix shredded coconut, condensed milk, and vanilla until fully combined.
- Press mixture into a lined baking dish and chill until firm.
- Cut chilled coconut base into even bars.
- Melt chocolate until smooth and glossy.
- Dip or coat bars in melted chocolate and place on parchment paper.
- Refrigerate until chocolate is fully set.
Notes
Building the Perfect Coconut Base
Choosing the Right Coconut Texture
The foundation of Homemade Coconut Chocolate Bars starts with shredded coconut. The texture you choose plays a big role in the final bite. Fine shredded coconut creates a smoother filling, while medium shreds add more chewiness and structure. Either option works well, depending on your preference.
Sweetened shredded coconut is commonly used because it enhances the dessert’s richness. However, if you prefer a less sweet version, unsweetened coconut can also be used. In that case, the condensed milk will provide most of the sweetness.
The key is consistency. The coconut should be evenly coated once mixed, so every bite feels balanced and flavorful. This step ensures your bars hold together well after chilling.
Sweetened Condensed Milk as the Binder
Sweetened condensed milk is what transforms simple coconut into a firm, sliceable filling. It adds creaminess while acting as the glue that holds everything together. Without it, the mixture would be too dry and crumbly.
Vanilla extract is also added to enhance the flavor profile. It deepens the sweetness and gives the filling a warm, bakery-style aroma. When combined, these ingredients create a soft but structured base that sets beautifully in the fridge.
Mixing and Shaping the Coconut Filling
Creating a Smooth, Sticky Mixture
To prepare Homemade Coconut Chocolate Bars, start by combining shredded coconut, sweetened condensed milk, and vanilla extract in a large bowl. Mix thoroughly until every strand of coconut is coated.
At first, the mixture may seem too wet, but as you stir, it thickens. This is exactly what you want. The texture should be sticky enough to hold its shape when pressed together. If it feels too loose, a small handful of extra coconut can help firm it up.
This step is important because it determines how well the bars will hold after chilling. A well-mixed base ensures clean slices later.
Pressing and Setting the Base
Once mixed, transfer the coconut mixture into a lined baking dish. Press it down firmly using a spatula or the back of a spoon. The goal is to create an even, compact layer.
The tighter you press, the better your bars will hold together. Uneven pressing can lead to crumbly edges, so take your time with this step. After shaping, place the dish in the refrigerator to firm up before cutting.
Chilling helps the mixture set slightly, making it easier to coat with chocolate later. This step also enhances the overall texture of Homemade Coconut Chocolate Bars.
Chocolate Coating and Finishing Touches
Melting Chocolate for a Smooth Shell
The chocolate coating is what transforms this simple coconut base into something truly irresistible. Use good-quality chocolate chips or chopped chocolate bars for the best results.
Melt the chocolate slowly using a microwave or double boiler. Stir frequently to avoid burning and ensure a silky finish. A small amount of coconut oil can be added to make the coating smoother and easier to work with.
The melted chocolate should be glossy and fluid but not too thin. This consistency allows it to coat each bar evenly without dripping excessively.
Dipping and Coating the Bars
Once the coconut base is firm, cut it into even rectangles. Dip each piece into the melted chocolate, ensuring full coverage on all sides. Alternatively, you can pour chocolate over the bars for a quicker method.
Place the coated bars on parchment paper and let them set at room temperature or in the refrigerator. As the chocolate hardens, it forms a crisp outer shell that contrasts beautifully with the soft coconut inside.
This contrast is what makes Homemade Coconut Chocolate Bars so satisfying. Every bite delivers a mix of creamy, chewy, and crunchy textures.
Storing, Serving, and Creative Variations
Keeping Bars Fresh and Delicious
Proper storage helps maintain the texture and flavor of these bars. Once set, store them in an airtight container in the refrigerator. They stay fresh for several days and taste even better when chilled.
For longer storage, you can freeze them. Simply layer parchment paper between each piece to prevent sticking. When ready to serve, let them thaw slightly for the best texture.
Because they are chilled desserts, they are especially refreshing on warm days. They also make excellent make-ahead treats for gatherings or celebrations.
Fun Flavor Variations to Try
One of the best things about Homemade Coconut Chocolate Bars is how easily they can be customized. You can add chopped almonds or hazelnuts for extra crunch. A pinch of sea salt on top also enhances the chocolate flavor.
For a twist, try using dark chocolate instead of milk chocolate for a richer taste. White chocolate is another popular variation that adds extra sweetness and visual appeal.
You can even mix in dried fruit like cranberries or raisins to add a chewy surprise. These small adjustments make the recipe flexible while keeping its core simplicity intact.
Frequently Asked Questions
1. Can I make these without condensed milk?
Yes, but the texture will change. You can use coconut cream with a sweetener, though the bars may be softer.
2. Do Homemade Coconut Chocolate Bars need to be refrigerated?
Yes, refrigeration helps them set properly and keeps them fresh longer.
3. Can I use dark chocolate instead of milk chocolate?
Absolutely. Dark chocolate adds a richer, less sweet flavor that pairs well with coconut.
4. Why are my bars falling apart?
The mixture may need more condensed milk or tighter pressing before chilling.
5. How long do they last?
They last up to one week in the refrigerator or one month in the freezer.
Conclusion
Homemade Coconut Chocolate Bars offer the perfect combination of simplicity and indulgence. With just a few ingredients, you can create a dessert that feels both nostalgic and satisfying. The creamy coconut filling paired with smooth chocolate makes every bite memorable.
Whether you’re preparing them for a gathering or simply treating yourself, these bars deliver consistent results with minimal effort. Once you make them, they’re likely to become a regular part of your dessert rotation.
More Dessert
- Can’t Believe I’ve Been Drinking Coca-Cola for Years and Just Noticed the ‘Hidden Detail’ in the Logo!
- The Power of the Walnut: 5 Science-Backed Health Benefits (And How Many You Should Actually Eat)
- The Mystery of Lobster’s Green Goodies: What Is Tomalley and Should You Eat It?
- Southern Tea Cake Cookies Recipe: Soft Buttery Classic Cookies