Introduction
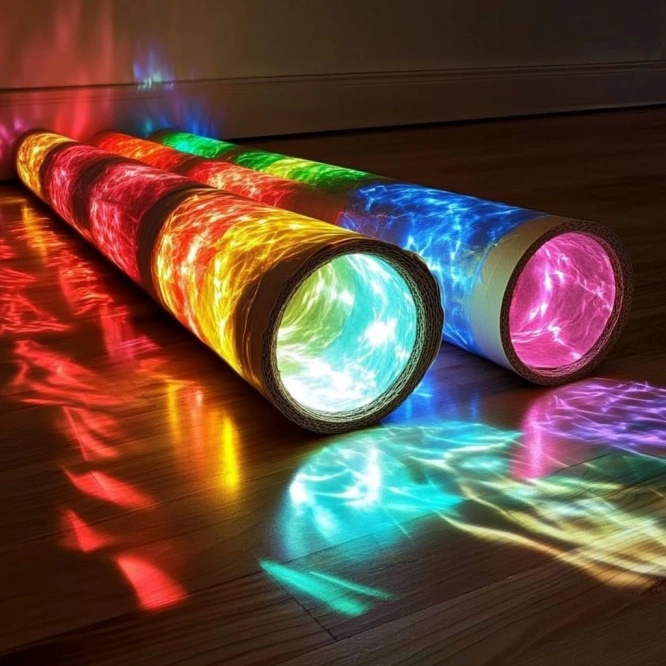
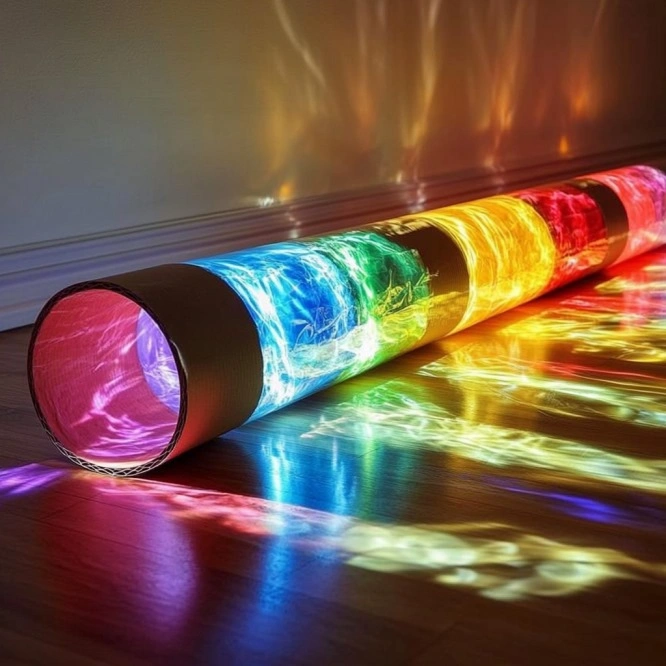
Looking for a creative, hands-on activity that combines art, science, and fun? The DIY Rainbow Light Show is a perfect project for kids and families to explore the wonders of light and color using simple household items. This engaging experiment not only sparks creativity but also introduces basic principles of optics in an interactive way.Rookie Parenting
Why You’ll Love This Project
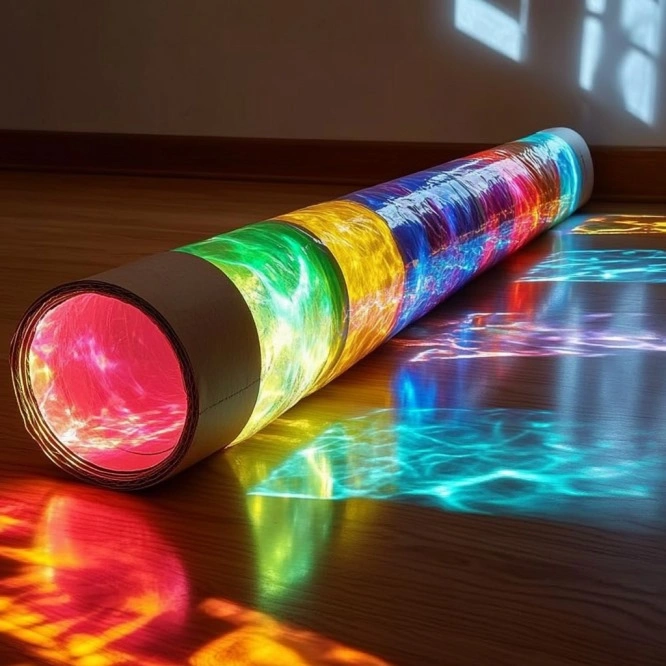
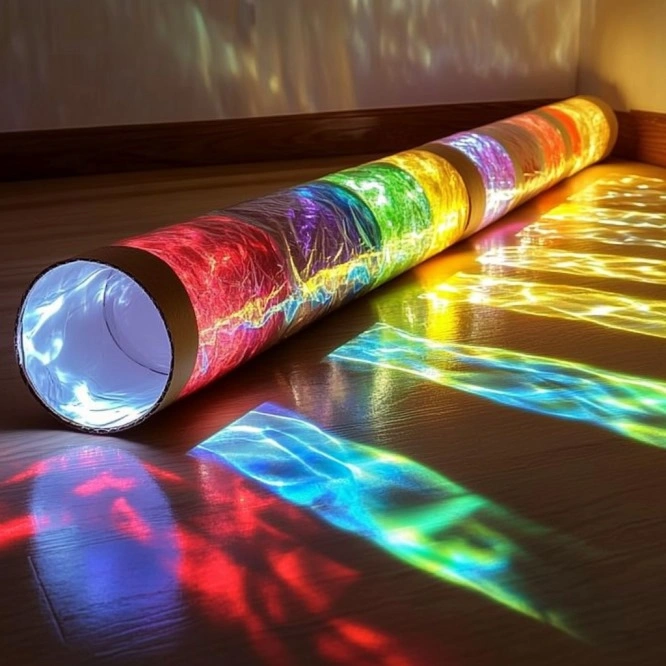
This DIY Rainbow Light Show is more than just a craft; it’s an educational experience that captivates children and adults alike. By constructing a simple projector using cardboard tubes and cling film, participants can create mesmerizing light patterns that demonstrate the dispersion of light into various colors. It’s an excellent way to encourage curiosity about science while enjoying a fun and artistic activity.
Materials Needed
To create your own Rainbow Light Show, gather the following materials:
- Empty cardboard tubes (toilet paper or paper towel rolls)
- Cling film (plastic wrap)
- Rubber bands or tape
- Permanent markers (variety of bright colors)
- Scissors
- Flashlight or phone light
- Craft stick or pencil (optional, for support)
Necessary Tools
- Scissors: For cutting cling film and shaping the cardboard tube if needed.
- Markers: Permanent markers work best on cling film to create vivid colors.
- Flashlight or phone light: Serves as the light source to project the colored patterns.
- Rubber bands or tape: To secure the cling film onto the cardboard tube.
Step-by-Step Instructions
- Prepare the Film Lens: Cut a small square of cling film large enough to cover one end of the cardboard tube with a little extra around the edges.
- Color the Film: Using permanent markers, color bold rainbow designs directly onto the cling film. Be creative with stripes, swirls, or dots!
- Attach to Tube: Stretch the colored cling film over one end of the cardboard tube. Secure tightly with a rubber band or tape so it’s smooth and taut.
- Insert Light Source: In a dark room, shine a flashlight through the open end of the tube, aiming the beam through the colored film.
- Create the Light Show: Slowly rotate the tube or move the light around to project dancing rainbow patterns onto walls and ceilings!
- Optional Handle: For added control, insert a craft stick or pencil into the bottom of the tube as a handle.
Pro Tips for Success
- Use Bright Colors: The more vibrant your marker colors, the more vivid the projected patterns will be.
- Smooth Surface: Ensure the cling film is stretched tightly over the tube to avoid wrinkles that can distort the light patterns.
- Experiment with Designs: Try different patterns and color combinations to see how they affect the projected light.
- Dark Environment: Perform the activity in a dark room for the best visual effect.walktalkplay.com
Serving Suggestions
While this project is not edible, it’s perfect for:
- Educational Demonstrations: Use it to teach children about light and color.Rookie Parenting
- Creative Play: Incorporate it into storytelling or imaginative play sessions.
- Decorative Displays: Use the light show as a unique decoration for parties or events.
Storing and Maintenance
- Storage: Keep the cardboard tube and cling film projector in a dry place to prevent damage.
- Maintenance: If the cling film becomes wrinkled or the colors fade, simply replace it with a new piece and create a fresh design.
Educational Value
This project offers educational benefits, including:
- Understanding Light Dispersion: Demonstrates how white light can be split into various colors.Rookie Parenting
- Color Mixing: Shows how different colors blend and interact.
- Creative Expression: Encourages artistic design and experimentation.
FAQs
Q: Can I use regular markers instead of permanent ones?
A: Permanent markers are recommended as they adhere better to cling film and produce more vibrant colors.
Q: What if I don’t have a cardboard tube?
A: You can use any cylindrical object, like a plastic bottle or a rolled-up piece of sturdy paper.
Q: Is this activity safe for young children?
A: Yes, but adult supervision is advised, especially when using scissors and handling the flashlight.
Q: Can I use colored cling film instead of coloring it myself?
A: Yes, pre-colored cling film can be used, but creating your own designs adds a personal touch and educational value.
Q: How can I make the light show more dynamic?
A: Try moving the flashlight closer or farther from the tube, or rotate the tube to change the patterns.
Conclusion
The DIY Rainbow Light Show is a delightful blend of science and art that provides endless entertainment and learning opportunities. By engaging in this simple yet fascinating project, children can explore the basics of light and color while expressing their creativity. It’s an ideal activity for classrooms, rainy days, or family science nights.Rookie Parenting

DIY Rainbow Light Show
Ingredients
Method
- Cut a small square of cling film large enough to cover one end of the cardboard tube with a little extra around the edges.
- Using permanent markers, color bold rainbow designs directly onto the cling film. Be creative with stripes, swirls, or dots!
- Stretch the colored cling film over one end of the cardboard tube. Secure tightly with a rubber band or tape.
- In a dark room, shine a flashlight through the open end of the tube, aiming the beam through the colored film.
- Slowly rotate the tube or move the light around to project dancing rainbow patterns onto walls and ceilings!
- For added control, insert a craft stick or pencil into the bottom of the tube as a handle.