Classic Lemon Bars combine a buttery, tender shortbread crust with a bright, tangy lemon filling and a delicate dusting of powdered sugar. These homemade dessert bars offer the perfect balance of sweet and tart flavors, making them a favorite for family gatherings, holidays, bake sales, and afternoon treats.
The recipe starts with a simple three-ingredient shortbread crust made from butter, powdered sugar, and all-purpose flour.
After a short baking time, the crust develops a lightly golden color and a delicate, crumbly texture.
Meanwhile, fresh lemon juice and zest create a smooth, citrusy filling that tastes wonderfully refreshing.
The lemon layer bakes directly over the warm crust, creating two delicious layers in every bite.
Finally, a generous dusting of powdered sugar adds sweetness and gives the finished bars their classic appearance.
These Classic Lemon Bars require approximately 15 minutes of preparation, 40–45 minutes of baking, and at least two hours of chilling.
The recipe makes 16 generous squares, making it ideal for sharing.
Whether you’re planning a spring celebration, summer picnic, holiday dessert tray, or simple family treat, these easy lemon bars bring fresh citrus flavor to any occasion.
I first started making homemade lemon bars when I wanted a dessert that tasted lighter and fresher than a traditional chocolate cake. I had several lemons in the kitchen and enough butter and flour to prepare a simple shortbread crust. I mixed the ingredients, pressed the dough into a baking pan, and baked it until the edges turned golden. Then I poured the lemon filling over the warm crust and returned the pan to the oven. After chilling, I cut the dessert into neat squares and added powdered sugar. The combination of buttery crust and tangy lemon filling quickly became a family favorite.
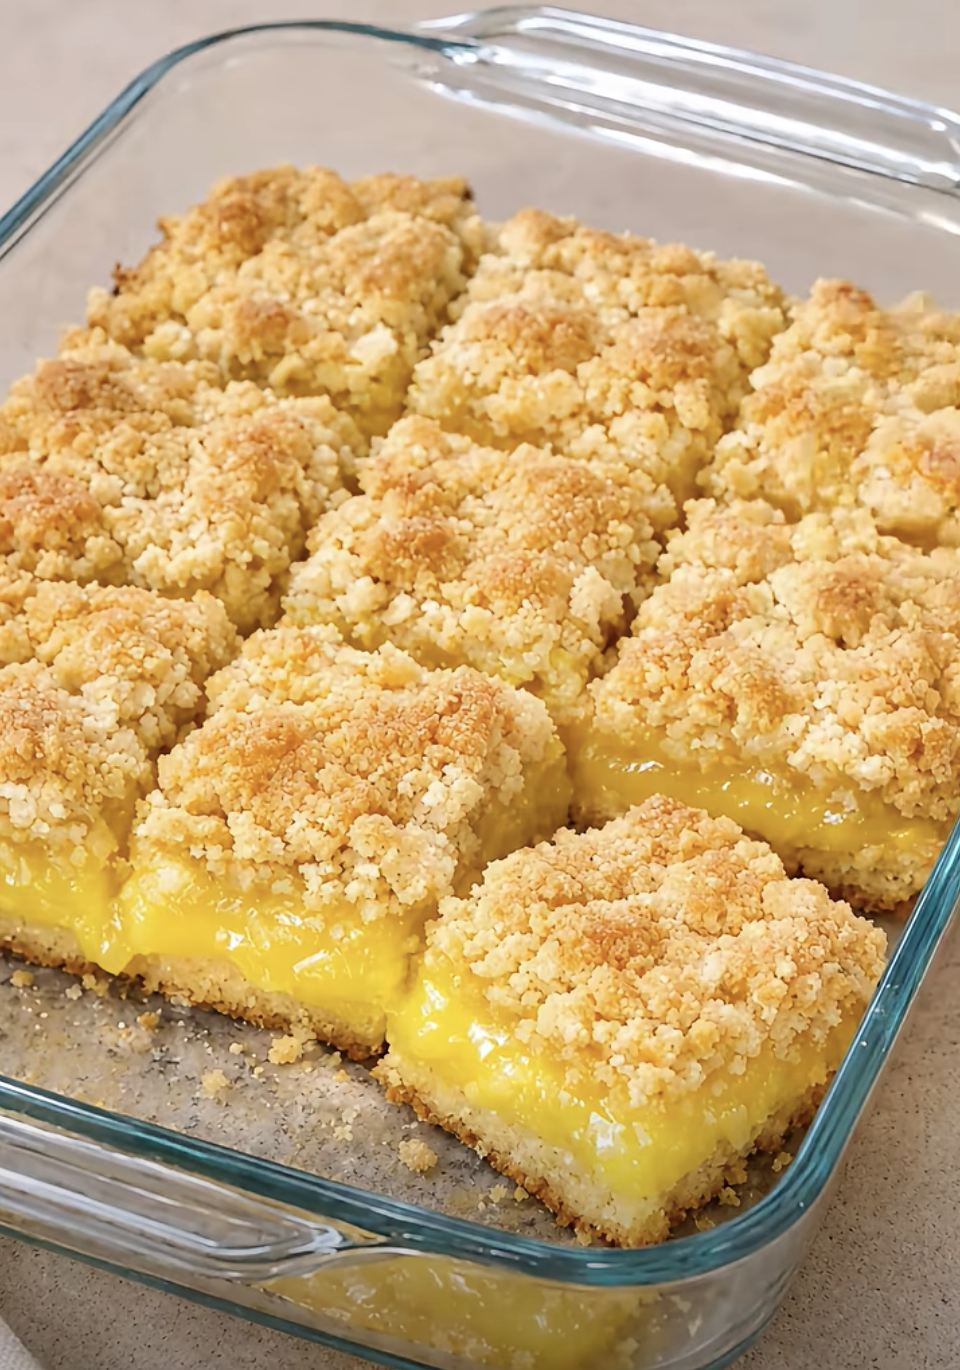
Classic Lemon Bars – Easy Homemade Recipe with Buttery Shortbread Crust
Ingredients
Equipment
Method
- Preheat oven to 350°F (175°C). Line 9×13-inch baking pan with parchment paper, leaving overhang for easy removal.
- In large mixing bowl, beat softened unsalted butter and 1/2 cup powdered sugar together until smooth and creamy.
- Gradually add 2 cups all-purpose flour and mix until soft, crumbly dough forms.
- Transfer dough to prepared baking pan and press evenly across bottom.
- Bake crust for approximately 18–20 minutes until edges become lightly golden.
- While crust bakes, whisk eggs and granulated sugar together until smooth. Add 1/4 cup all-purpose flour, fresh lemon juice, and lemon zest. Whisk until fully combined.
- Carefully remove hot crust from oven. Pour lemon filling evenly over crust.
- Return pan to oven and bake for approximately 20–25 minutes until filling sets and center no longer jiggles noticeably.
- Allow lemon bars to cool completely at room temperature. Refrigerate for at least 2 hours.
- Lift chilled bars from pan using parchment overhang. Cut into 16 squares and dust with approximately 2 tablespoons powdered sugar just before serving.
Notes
Why You’ll Love Classic Lemon Bars
Buttery Shortbread Crust with Bright Lemon Filling
One of the biggest reasons to love Classic Lemon Bars is the contrast between the rich shortbread crust and the refreshing lemon filling.
The crust provides a tender, buttery foundation.
Meanwhile, the lemon layer adds bright citrus flavor.
Together, these two layers create a delicious balance.
The shortbread crust requires only three ingredients.
Butter adds richness.
Powdered sugar provides gentle sweetness.
All-purpose flour creates structure.
As the crust bakes, the edges become lightly golden.
The center develops a delicate, crumbly texture.
This creates a sturdy base for the lemon filling.
Next, the filling combines eggs, granulated sugar, flour, fresh lemon juice, and lemon zest.
The eggs help the filling set.
Meanwhile, the sugar balances the tartness of the lemons.
Fresh lemon juice provides the signature citrus flavor.
Lemon zest adds aromatic oils that make the filling taste even brighter.
The flour helps stabilize the mixture during baking.
As a result, the finished lemon layer becomes smooth and sliceable.
Another advantage is the simple preparation.
You don’t need complicated baking techniques.
Instead, you prepare the crust, bake it briefly, and add the filling.
Then the oven handles the remaining work.
After chilling, the bars become firm enough to cut into neat squares.
Finally, powdered sugar creates a beautiful finishing touch.
The result is a classic homemade dessert with rich buttery flavor, refreshing lemon tang, and a soft, satisfying texture.
Perfect for Holidays, Parties, and Make-Ahead Desserts
Classic Lemon Bars work beautifully for many different occasions.
Their bright flavor makes them especially popular during spring and summer.
However, they also make a delicious addition to holiday dessert trays.
For Easter gatherings, serve them alongside fresh fruit and other light desserts.
Their golden-yellow filling adds cheerful color to the table.
For summer parties, arrange the bars on a chilled serving platter.
The refreshing lemon flavor pairs well with warm-weather meals.
You can also prepare them for bake sales.
Their square shape makes portioning easy.
Another benefit is the make-ahead convenience.
Lemon bars need at least two hours of chilling.
Therefore, preparing them in advance actually improves their texture.
You can bake them the day before serving.
Then refrigerate overnight.
The filling becomes firmer, making the bars easier to slice.
For family gatherings, the recipe makes 16 generous servings.
However, you can cut the bars into smaller pieces for larger dessert platters.
This makes them convenient for parties.
Another advantage is their simple presentation.
You don’t need frosting or elaborate decorations.
A light dusting of powdered sugar creates the classic finish.
You can also arrange the bars on a white serving platter.
The contrast between the golden filling and powdered sugar creates an attractive appearance.
For afternoon snacks, enjoy a lemon bar with tea or coffee.
The sweet-tart flavor complements both beverages.
Whether you’re preparing a special celebration or a simple homemade dessert, these lemon bars offer delicious flavor and convenient preparation.
Choosing the Best Ingredients for Classic Lemon Bars
Butter, Powdered Sugar, and Flour for the Shortbread Crust
The foundation of Classic Lemon Bars starts with a buttery shortbread crust.
This recipe uses one cup of softened unsalted butter.
Butter provides richness and creates the delicate shortbread texture.
For the best results, use butter that feels soft but still holds its shape.
Avoid melting it.
Melted butter can change the dough’s consistency.
Instead, allow the butter to soften at room temperature.
Next, add half a cup of powdered sugar.
Powdered sugar blends smoothly with softened butter.
It also creates a tender texture.
Granulated sugar can produce a slightly different result.
Therefore, powdered sugar works best for the original crust.
Next, add two cups of all-purpose flour.
Flour provides structure and helps the crust hold together.
Add it gradually to the butter mixture.
Mix until a soft, crumbly dough forms.
At first, the dough may look dry.
However, the butter provides enough moisture to bring everything together.
Avoid overmixing.
Excessive mixing can develop too much gluten and create a tougher crust.
Once the dough forms, transfer it to the prepared baking pan.
Press it evenly across the bottom.
Try to maintain a consistent thickness.
This helps the crust bake evenly.
Next, bake at 350°F (175°C) for approximately 18–20 minutes.
The edges should become lightly golden.
However, the center may remain pale.
That’s normal for shortbread.
The goal is to create a firm, lightly baked base before adding the lemon filling.
This prevents the crust from becoming excessively soft.
Fresh Lemon Juice, Zest, Eggs, and Sugar
The lemon filling gives Classic Lemon Bars their signature flavor.
Start with four large eggs.
The eggs provide structure and help the filling set during baking.
For the best results, use fresh eggs.
Next, add one and a half cups of granulated sugar.
The sugar balances the tartness of the lemons.
It also contributes to the smooth texture.
Then add one-quarter cup of all-purpose flour.
The flour helps stabilize the filling.
Next, prepare two-thirds cup of fresh lemon juice.
Fresh lemon juice provides the brightest flavor.
You can use bottled lemon juice in a pinch.
However, freshly squeezed juice generally produces a fresher taste.
Depending on their size and juiciness, you may need approximately four to six lemons.
Next, add one tablespoon of fresh lemon zest.
The zest contains aromatic citrus oils.
These oils add a strong lemon fragrance without increasing the liquid.
For the best results, zest the lemons before juicing them.
Use a fine grater or citrus zester.
Avoid removing the white pith.
The pith can taste bitter.
Instead, grate only the yellow outer layer.
Next, whisk the eggs and sugar until smooth.
Then add the flour, lemon juice, and zest.
Continue whisking until the ingredients combine completely.
The mixture should look smooth and evenly blended.
Finally, prepare powdered sugar for topping.
Dust the bars shortly before serving.
This creates a beautiful finish and adds a touch of sweetness.
Together, these ingredients create a bright, tangy lemon filling that complements the buttery shortbread crust.
How to Make Classic Lemon Bars
Preparing and Baking the Buttery Shortbread Crust
Making Classic Lemon Bars begins with preheating the oven.
Set the temperature to 350°F (175°C).
Next, line a 9×13-inch baking pan with parchment paper.
Leave some parchment hanging over the sides.
This overhang makes it easier to lift the finished bars from the pan.
Then place one cup of softened unsalted butter in a large mixing bowl.
Add half a cup of powdered sugar.
Beat the ingredients together until smooth and creamy.
You can use a hand mixer or a sturdy spoon.
Next, gradually add two cups of all-purpose flour.
Mix until a soft, crumbly dough forms.
Avoid excessive mixing.
The dough should hold together when you press it.
Next, transfer the dough to the prepared baking pan.
Use your fingers or the bottom of a measuring cup to press it evenly across the bottom.
Pay special attention to the corners.
The crust should have a consistent thickness.
This helps it bake evenly.
Next, place the pan in the preheated oven.
Bake for approximately 18–20 minutes.
The edges should become lightly golden.
However, the center may remain pale.
Avoid overbaking because the crust will return to the oven with the lemon filling.
While the crust bakes, prepare the lemon mixture.
This allows you to pour the filling over the crust while it remains hot.
The warm crust helps the two layers bake together.
Once the crust reaches a light golden color, carefully remove the pan from the oven.
Keep the oven heated.
The crust is now ready for the lemon filling.
Mixing the Lemon Filling and Baking Until Set
While the shortbread crust bakes, prepare the lemon filling.
Start by cracking four large eggs into a mixing bowl.
Add one and a half cups of granulated sugar.
Whisk until the mixture becomes smooth.
Next, add one-quarter cup of all-purpose flour.
Whisk until no dry flour remains.
Then pour in two-thirds cup of fresh lemon juice.
Add one tablespoon of fresh lemon zest.
Continue whisking until the ingredients combine completely.
The filling should look smooth and evenly blended.
Next, carefully remove the baked shortbread crust from the oven.
Pour the lemon filling over the hot crust.
Spread it evenly if necessary.
Then return the pan to the oven.
Bake for approximately 20–25 minutes.
The filling should become set around the edges.
The center should no longer jiggle noticeably when you gently move the pan.
However, a slight movement in the center is acceptable.
Avoid baking until the filling becomes dry or cracked.
Overbaking can create a rubbery texture.
Once the filling sets, remove the pan from the oven.
Place it on a wire rack.
Allow the lemon bars to cool completely at room temperature.
Next, transfer the pan to the refrigerator.
Chill for at least two hours.
This helps the filling become firm enough for clean slicing.
For even neater squares, refrigerate overnight.
Once chilled, use the parchment overhang to lift the dessert from the pan.
Place it on a cutting board.
Use a sharp knife to cut the bars into 16 squares.
Wipe the knife between cuts for clean edges.
Finally, dust the bars with powdered sugar just before serving.
The finished dessert should have a buttery crust, smooth lemon filling, and bright citrus flavor.
Serving, Storing, and Customizing Your Lemon Bars
Beautiful Serving Ideas for Parties and Family Gatherings
Classic Lemon Bars make a beautiful addition to dessert platters.
Their golden-yellow filling creates an inviting appearance.
Meanwhile, the powdered sugar adds a delicate finishing touch.
For the best presentation, cut the bars into even squares.
Use a sharp knife.
Then wipe the blade between cuts.
This helps create clean edges.
Next, arrange the bars on a white ceramic serving platter.
The pale background highlights the lemon filling.
You can also place each square in a small paper dessert liner.
This makes the bars easier to serve at parties.
For spring celebrations, pair them with fresh berries.
Strawberries, raspberries, and blueberries complement the citrus flavor.
You can also add a few thin lemon slices to the platter for decoration.
However, avoid placing juicy lemon slices directly on the bars.
The extra moisture can affect the powdered sugar.
For afternoon tea, serve the bars with hot tea.
Their tangy flavor pairs beautifully with black tea or herbal blends.
You can also enjoy them with coffee.
For summer gatherings, keep the bars chilled until shortly before serving.
The cool lemon filling tastes especially refreshing.
For holiday dessert trays, combine them with cookies, brownies, and other small treats.
The bright lemon flavor provides variety.
Another serving idea is to cut the bars into smaller rectangles.
This creates bite-sized portions for large gatherings.
Finally, dust the bars with powdered sugar immediately before serving.
This helps maintain their classic appearance.
Storage, Freezing, Make-Ahead Tips, and Variations
Proper storage helps Classic Lemon Bars maintain their smooth texture and fresh lemon flavor.
After baking, allow the bars to cool completely.
Then refrigerate them for at least two hours.
Once chilled, cut them into squares.
Store the bars in an airtight container.
Refrigerate for up to five days.
For the best results, place parchment paper between layers.
This helps prevent sticking.
Another important tip is to wait before adding powdered sugar.
If you dust the bars too early, the sugar may absorb moisture and disappear.
Instead, add the topping shortly before serving.
The recipe also works beautifully for make-ahead preparation.
You can bake the lemon bars one day before your gathering.
Then refrigerate overnight.
The filling becomes firmer, making slicing easier.
For longer storage, freeze the bars without powdered sugar.
First, chill them completely.
Then cut them into individual portions.
Wrap each bar tightly.
Place the wrapped bars in a freezer-safe container.
For the best quality, enjoy within three months.
Thaw overnight in the refrigerator.
Then dust with powdered sugar before serving.
You can also customize the flavor.
For a stronger lemon taste, add a little extra lemon zest.
However, avoid adding too much additional juice because extra liquid can affect the filling’s texture.
For a slightly different citrus flavor, substitute a small portion of the lemon juice with lime juice.
You can also add a little orange zest.
However, these variations change the original classic lemon flavor.
For the traditional version, fresh lemon juice and zest provide the best balance.
Ingredients
Servings: 16 bars | Prep time: 15 minutes | Bake time: 40–45 minutes | Chill time: at least 2 hours | Total time: approximately 3 hours, plus cooling
For the Shortbread Crust
- 1 cup unsalted butter, softened
- ½ cup powdered sugar
- 2 cups all-purpose flour
For the Lemon Filling
- 4 large eggs
- 1½ cups granulated sugar
- ¼ cup all-purpose flour
- ⅔ cup fresh lemon juice
- 1 tablespoon fresh lemon zest
For the Topping
– 2 tablespoons powdered sugar, for dusting
Instructions
- Preheat the oven. Preheat your oven to 350°F (175°C). Line a 9×13-inch baking pan with parchment paper, leaving some overhang for easy removal.
- Cream the butter and sugar. In a large mixing bowl, beat the softened butter and half a cup of powdered sugar together until smooth and creamy.
- Prepare the crust dough. Gradually add two cups of all-purpose flour and mix until a soft, crumbly dough forms.
- Press into the pan. Transfer the dough to the prepared baking pan. Press it evenly across the bottom.
- Bake the crust. Bake for approximately 18–20 minutes, until the edges become lightly golden.
- Mix the lemon filling. While the crust bakes, whisk the eggs and granulated sugar together until smooth. Add one-quarter cup of flour, fresh lemon juice, and lemon zest. Whisk until fully combined.
- Add the filling. Carefully remove the hot crust from the oven. Pour the lemon filling evenly over the crust.
- Bake until set. Return the pan to the oven and bake for approximately 20–25 minutes, until the filling sets and the center no longer jiggles noticeably.
- Cool and chill. Allow the lemon bars to cool completely at room temperature. Then refrigerate for at least two hours.
- Slice and serve. Lift the chilled bars from the pan using the parchment overhang. Cut into 16 squares and dust with two tablespoons of powdered sugar just before serving.
Frequently Asked Questions
1. Why are my Classic Lemon Bars runny in the center?
The filling may need additional baking time or more chilling. Bake until the edges set and the center no longer jiggles noticeably. Then cool completely and refrigerate for at least two hours before slicing.
2. Can I use bottled lemon juice instead of fresh lemon juice?
Yes. However, fresh lemon juice generally provides a brighter, more natural citrus flavor. Fresh zest also adds aromatic lemon oils that improve the finished taste.
3. How do I get clean slices when cutting lemon bars?
Chill the bars thoroughly before slicing. Use a sharp knife and wipe the blade clean between cuts. For especially neat squares, refrigerate the bars overnight.
4. Can I make Classic Lemon Bars ahead of time?
Absolutely. Bake the bars one day in advance and refrigerate overnight. Cut them into squares and dust with powdered sugar shortly before serving.
5. Can I freeze homemade lemon bars?
Yes. Chill the bars completely, cut them into portions, and freeze without powdered sugar. Store in an airtight freezer-safe container for up to three months for best quality. Thaw in the refrigerator and dust with powdered sugar before serving.
Conclusion
Classic Lemon Bars are a delicious homemade dessert that combines a buttery shortbread crust with a bright, tangy lemon filling.
The crust provides a rich, tender foundation.
Meanwhile, fresh lemon juice and zest create a refreshing citrus flavor.
The eggs and flour help the filling set into a smooth, sliceable layer.
Finally, powdered sugar adds the classic finishing touch.
For the best results, use softened butter and fresh lemons.
Then bake the shortbread crust until lightly golden.
Pour the lemon filling over the warm crust and bake until set.
After cooling, refrigerate the bars for at least two hours.
This helps create clean slices and the perfect texture.
Whether you’re preparing a spring celebration, summer gathering, holiday dessert tray, or simple family treat, these easy homemade lemon bars offer a wonderful balance of sweet, tart, and buttery flavors.