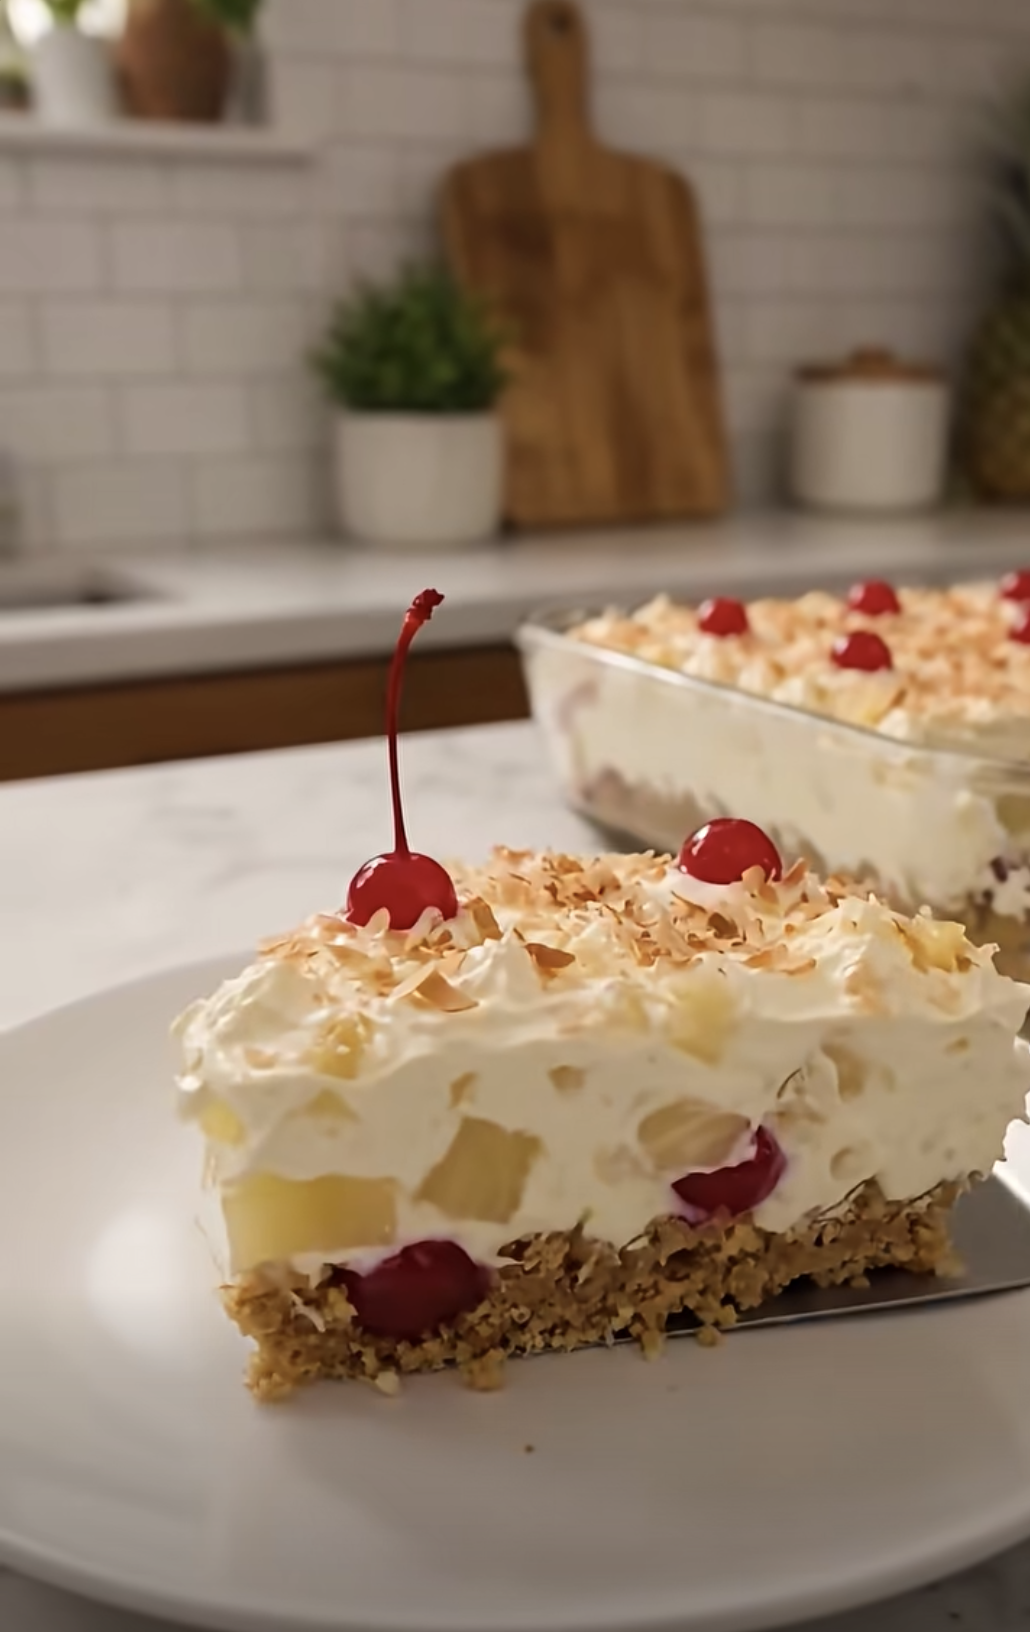
No-Bake Pineapple Dream Dessert is an easy layered treat with a buttery graham cracker crust, a fluffy cream cheese and pineapple filling, and a soft whipped topping. It delivers plenty of tropical flavor without requiring you to turn on the oven, which makes it especially convenient for warm-weather gatherings, potlucks, holidays, and casual family desserts.
The combination works beautifully because every layer brings something different. The graham cracker crust adds a lightly crisp, buttery base. Meanwhile, cream cheese gives the filling richness, and crushed pineapple adds a bright fruit flavor. Whipped topping keeps everything light enough that the dessert never feels overly heavy.
Even better, No-Bake Pineapple Dream Dessert is beginner-friendly. Most of the preparation involves mixing, folding, spreading, and chilling. However, one step deserves extra attention: you need to drain the pineapple extremely well. Too much pineapple juice can loosen the filling and make the dessert harder to slice.
I first made a dessert like this on a hot afternoon when turning on the oven sounded completely unappealing. I had cream cheese, graham crackers, and canned pineapple already in the kitchen, so I started layering them into a simple chilled dessert. At first, the filling seemed almost too soft, but after spending the night in the refrigerator, it became creamy, fluffy, and easy to slice. The combination of buttery crumbs and cold pineapple filling disappeared quickly at the table. Since then, I have loved keeping this dessert in mind whenever I need something simple that I can prepare ahead of time.
Why No-Bake Pineapple Dream Dessert Is So Delicious
A Creamy Pineapple Filling With the Right Balance
The filling makes No-Bake Pineapple Dream Dessert especially memorable because it balances richness and freshness.
Cream cheese creates the smooth foundation. For the best texture, soften it before mixing. Cold cream cheese tends to create stubborn lumps, while softened cream cheese blends easily with powdered sugar.
Powdered sugar works particularly well because it dissolves quickly. Therefore, the filling becomes smooth instead of grainy.
Vanilla extract adds gentle warmth and rounds out the sharper flavor of the cream cheese.
However, crushed pineapple creates the real tropical character. Because the pineapple spreads throughout the filling, every spoonful contains fruity flavor.
The key involves removing as much excess juice as possible. Start by draining the pineapple in a fine-mesh strainer. Then press gently with the back of a spoon. If it still feels very wet, blot it with paper towels.
This extra step matters because No-Bake Pineapple Dream Dessert does not contain gelatin or another strong setting ingredient. Instead, the cream cheese, whipped topping, and refrigerator time create the structure.
Next, fold in the whipped topping gently. Do not beat it aggressively because you want to preserve the air that makes the filling fluffy.
Once everything comes together, the mixture should look creamy and light rather than thin or runny.
Why the Graham Cracker Crust Works So Well
The graham cracker crust provides an important contrast to the soft filling.
Graham cracker crumbs have a toasted, slightly honeyed flavor that complements pineapple naturally. Meanwhile, melted butter binds the crumbs, and a small amount of granulated sugar adds sweetness.
For No-Bake Pineapple Dream Dessert, combine 2 cups of graham cracker crumbs with 1/2 cup melted unsalted butter and 2 tablespoons granulated sugar.
Stir until every crumb looks evenly moistened. The mixture should resemble damp sand.
Next, transfer it to a 9×9-inch baking dish. Spread the mixture evenly before pressing it firmly into the bottom.
The pressing step matters more than it may seem. A loosely packed crust crumbles when you cut the dessert. However, a firmly compressed crust creates a more stable base.
Use the flat bottom of a measuring cup or drinking glass to press the crumbs down. Pay extra attention to the corners and edges.
Afterward, refrigerate the crust for about 20 to 30 minutes.
During this time, the butter cools and firms. Consequently, the graham cracker layer becomes sturdy enough to support the pineapple filling.
Although you may feel tempted to skip this short chilling step, keeping it makes assembly easier. The filling spreads more smoothly over a cold, firm crust without disturbing the crumbs underneath.
How to Make No-Bake Pineapple Dream Dessert
Preparing the Crust and Pineapple
Begin by measuring all the ingredients before assembling No-Bake Pineapple Dream Dessert. Because the recipe moves quickly, having everything ready keeps the process simple.
First, combine 2 cups graham cracker crumbs, 1/2 cup melted unsalted butter, and 2 tablespoons granulated sugar in a medium mixing bowl.
Stir thoroughly until the crumbs become evenly coated.
Transfer them to a 9×9-inch baking dish, then press the mixture firmly across the bottom. Create an even layer rather than leaving thick areas around the edges.
Refrigerate the crust for 20 to 30 minutes.
Meanwhile, prepare the pineapple.
Open one 20-ounce can of crushed pineapple and pour it into a fine-mesh strainer. Allow the juice to drain completely.
Then press gently against the pineapple with a spoon to release more liquid.
If necessary, place the pineapple on several layers of paper towels and blot the surface.
Do not skip this step. Crushed pineapple can hold considerably more juice than it appears to contain, and that juice goes directly into the cream cheese mixture if you do not remove it.
Excess liquid can cause No-Bake Pineapple Dream Dessert to become loose and difficult to slice.
Drain the pineapple chunks or tidbits for the topping at the same time.
Once the crust feels firm and the pineapple has drained thoroughly, you can begin making the creamy layer.
Mixing, Layering, and Chilling
Add 8 ounces of softened cream cheese to a large mixing bowl.
Next, add 3/4 cup powdered sugar. Beat with an electric mixer until the mixture becomes smooth and fluffy.
Scrape the sides and bottom of the bowl occasionally so no lumps remain.
Add 1 teaspoon vanilla extract and mix briefly.
Next, fold in the drained crushed pineapple.
Use a rubber spatula and turn the mixture gently until the pineapple becomes evenly distributed.
Then add 2 cups thawed whipped topping.
Fold it into the pineapple mixture rather than beating it. Continue until the filling looks uniformly light and creamy.
Spread the filling evenly over the chilled graham cracker crust.
Next, add 1 1/2 cups whipped topping. Spread it carefully across the filling to create a smooth top layer.
Sprinkle 1/4 cup graham cracker crumbs over the top.
Then arrange about 1/2 cup drained pineapple chunks or tidbits over the whipped topping.
You can also add toasted coconut or maraschino cherries if desired.
Cover No-Bake Pineapple Dream Dessert carefully and transfer it to the refrigerator.
Chill for at least 4 to 6 hours. However, overnight chilling gives even better results.
During this time, the filling firms while the layers settle together.
Once thoroughly chilled, cut the dessert into 10 to 12 squares and serve it cold.
Tips for Perfect No-Bake Pineapple Dream Dessert
How to Get Firm, Clean Slices
The biggest challenge with No-Bake Pineapple Dream Dessert involves creating filling that stays fluffy while remaining firm enough to slice.
Fortunately, several simple techniques solve that problem.
First, drain the pineapple extremely well. This step makes the greatest difference. Even a few tablespoons of unwanted juice can noticeably soften the filling.
Second, use softened cream cheese rather than melted cream cheese.
The cream cheese should feel soft enough to mix easily, but it should still retain its normal structure. If you heat it until it becomes liquid, the finished filling may stay too soft.
Third, use completely thawed whipped topping. Partially frozen pieces make the mixture uneven, while overly warm topping may lose some of its structure.
Next, fold gently.
Whipped topping contains trapped air that creates the fluffy texture. Vigorous stirring pushes out that air.
Chill the finished No-Bake Pineapple Dream Dessert for the full recommended time as well.
Four to six hours works, but overnight refrigeration produces the cleanest slices.
When cutting, use a sharp knife. Run the blade through one section at a time, then wipe it clean before making the next cut.
For even neater squares, refrigerate the dessert overnight before slicing.
Finally, keep the dessert chilled until serving. Warm temperatures soften the filling, particularly during summer gatherings.
Easy Flavor and Topping Variations
No-Bake Pineapple Dream Dessert tastes great with the original toppings, but you can personalize it easily.
Toasted coconut creates one of the simplest variations. Coconut adds a nutty tropical flavor while giving the creamy dessert a slight textural contrast.
To toast coconut, spread it in a dry skillet over medium-low heat and stir constantly until lightly golden. Then let it cool completely before sprinkling it over the whipped topping.
Maraschino cherries create a colorful retro presentation. Drain and blot them before adding them so red syrup does not spread across the whipped topping.
Chopped pecans also work well. Their crunch contrasts nicely with the soft pineapple filling.
For even more tropical flavor, use chopped macadamia nuts instead.
Fresh lime zest provides another variation. Add a small amount to the cream cheese mixture for a brighter flavor. However, avoid adding too much lime juice because additional liquid can loosen the filling.
You can also serve No-Bake Pineapple Dream Dessert with sliced strawberries or raspberries. Their slight tartness balances the sweetness beautifully.
For individual portions, press small amounts of crust into dessert cups or jars. Add the pineapple mixture and whipped topping in layers.
Individual servings make a convenient party presentation because guests do not need to cut pieces from a larger pan.
Regardless of the variation, keep pineapple as the main flavor so the dessert retains its fresh tropical character.
Make-Ahead, Storage, and Serving Ideas
The Perfect Dessert to Prepare Ahead
No-Bake Pineapple Dream Dessert works exceptionally well when you want to prepare dessert before guests arrive.
In fact, making it one day ahead usually improves the final texture.
Prepare the graham cracker crust, filling, and whipped topping as directed. Then cover the dish tightly and refrigerate it overnight.
The extended chill time helps the filling firm and allows the layers to settle.
If you use toasted coconut, pineapple chunks, or cherries as decoration, you can add them just before serving for the freshest appearance.
This method makes No-Bake Pineapple Dream Dessert especially practical for holidays and parties. You can finish dessert the night before and focus on other food the following day.
If you need to transport the dessert, keep it cold.
Place the covered dish inside a cooler with ice packs, especially during warm weather. Once you arrive, transfer it to a refrigerator until serving.
Avoid leaving the dessert sitting on a warm table for an extended period because the creamy layers soften as their temperature rises.
For buffet-style gatherings, serve smaller squares and keep the remaining pan refrigerated. You can bring out additional portions as needed.
You can also make the crust earlier in the day, refrigerate it, and prepare the filling later.
However, once you assemble everything, allow enough time for the complete dessert to chill.
The refrigerator does most of the final work, so patience becomes one of the most useful ingredients.
How to Store Leftovers
Store leftover No-Bake Pineapple Dream Dessert covered in the refrigerator.
A tight cover helps prevent the whipped topping from drying out and keeps the dessert from absorbing refrigerator odors.
For the best quality, enjoy leftovers within about three to four days.
The dessert remains flavorful during that period, although the graham cracker crust gradually becomes softer as it absorbs moisture from the filling.
Some people actually prefer the crust after a day because it develops a tender, cake-like texture. However, if you like more contrast, serve the dessert within the first couple of days.
Keep decorative garnishes in mind as well.
Maraschino cherries may slowly release color onto the whipped topping. Therefore, if appearance matters, add them only to pieces you plan to serve immediately.
The same applies to fresh fruit.
Freezing No-Bake Pineapple Dream Dessert is possible, but the texture can change during thawing. Cream cheese and whipped topping sometimes lose some of their original smoothness.
For that reason, refrigeration gives the most consistent result.
Serve leftovers directly from the refrigerator. The colder the filling remains, the cleaner the slices will look.
You can also refresh each piece with a small spoonful of whipped topping, fresh pineapple, or graham cracker crumbs before serving.
Frequently Asked Questions
Why is my No-Bake Pineapple Dream Dessert runny?
The most common cause is excess pineapple juice. Drain the crushed pineapple thoroughly and press out extra liquid before adding it to the cream cheese mixture. Additionally, chill the completed dessert for at least 4 to 6 hours.
Can I make No-Bake Pineapple Dream Dessert overnight?
Yes. Overnight refrigeration works especially well because it gives the filling plenty of time to firm. Prepare and cover the dessert, then refrigerate it until the next day.
Can I use fresh pineapple?
Yes, but chop it finely and remove as much juice as possible. Canned crushed pineapple usually provides a more consistent texture because it distributes evenly throughout the filling.
Can I replace whipped topping with whipped cream?
Yes. However, stabilized whipped cream works better if you plan to refrigerate the dessert for several hours or overnight. Regular homemade whipped cream may soften more quickly.
How long does No-Bake Pineapple Dream Dessert stay fresh?
Store it tightly covered in the refrigerator and enjoy it within about three to four days for the best texture and flavor.
Conclusion
No-Bake Pineapple Dream Dessert delivers creamy texture, tropical fruit flavor, and easy preparation in one chilled dessert.
A buttery graham cracker crust forms the base. Then a fluffy mixture of cream cheese, powdered sugar, vanilla, pineapple, and whipped topping creates the soft center. Finally, another layer of whipped topping and simple garnishes completes the dessert.
Because No-Bake Pineapple Dream Dessert requires no oven, it works wonderfully for hot days, busy holidays, family meals, and potluck gatherings.
The most important step remains simple: drain the pineapple very thoroughly. Keeping extra juice out of the filling helps it stay thick and sliceable.
Then give the completed dessert enough time in the refrigerator. Four to six hours works well, although overnight chilling provides an even firmer texture.
Serve it cold, add toasted coconut or cherries if desired, and enjoy the combination of creamy filling, bright pineapple, and buttery graham cracker crumbs in every bite.