Chocolate Peanut Butter Rice Krispie Bars combine crispy rice cereal, creamy peanut butter, sweet syrup, and a thick layer of melted chocolate into one irresistible no-bake dessert.
These homemade cereal bars feature a chewy, crunchy peanut butter base topped with smooth, rich chocolate. Every bite delivers the perfect balance of sweet chocolate, nutty peanut butter, and light, crispy cereal.
Best of all, you don’t need to turn on the oven.
With approximately 15 minutes of preparation and a little time for the chocolate to set, you can make 24 delicious dessert bars using just six simple ingredients.
The recipe starts with crispy rice cereal and a warm peanut butter syrup mixture. Once you press the coated cereal into a baking pan, you add a smooth chocolate and peanut butter topping.
After the bars cool, simply slice them into squares or rectangles.
Chocolate Peanut Butter Rice Krispie Bars make a wonderful choice for birthday parties, holiday dessert trays, bake sales, potlucks, and after-school treats.
You can also prepare them ahead of time, making them especially convenient for busy schedules.
Prep time: 15 minutes | Setting time: 1–2 hours at cool room temperature or 30–60 minutes refrigerated | Total time: approximately 45 minutes–2 hours 15 minutes | Yield: 24 bars
I first made these chocolate peanut butter cereal bars when I needed a simple dessert for a weekend family gathering. I wanted something sweet and homemade, but I didn’t feel like turning on the oven. I had crispy rice cereal, peanut butter, chocolate chips, and a few pantry staples, so I decided to make a batch of no-bake bars. The peanut butter mixture came together quickly, and the melted chocolate spread beautifully over the cereal base. Once the bars set, I cut them into squares and arranged them on a platter. Everyone loved the chewy, crunchy texture, and I appreciated how little effort the recipe required.
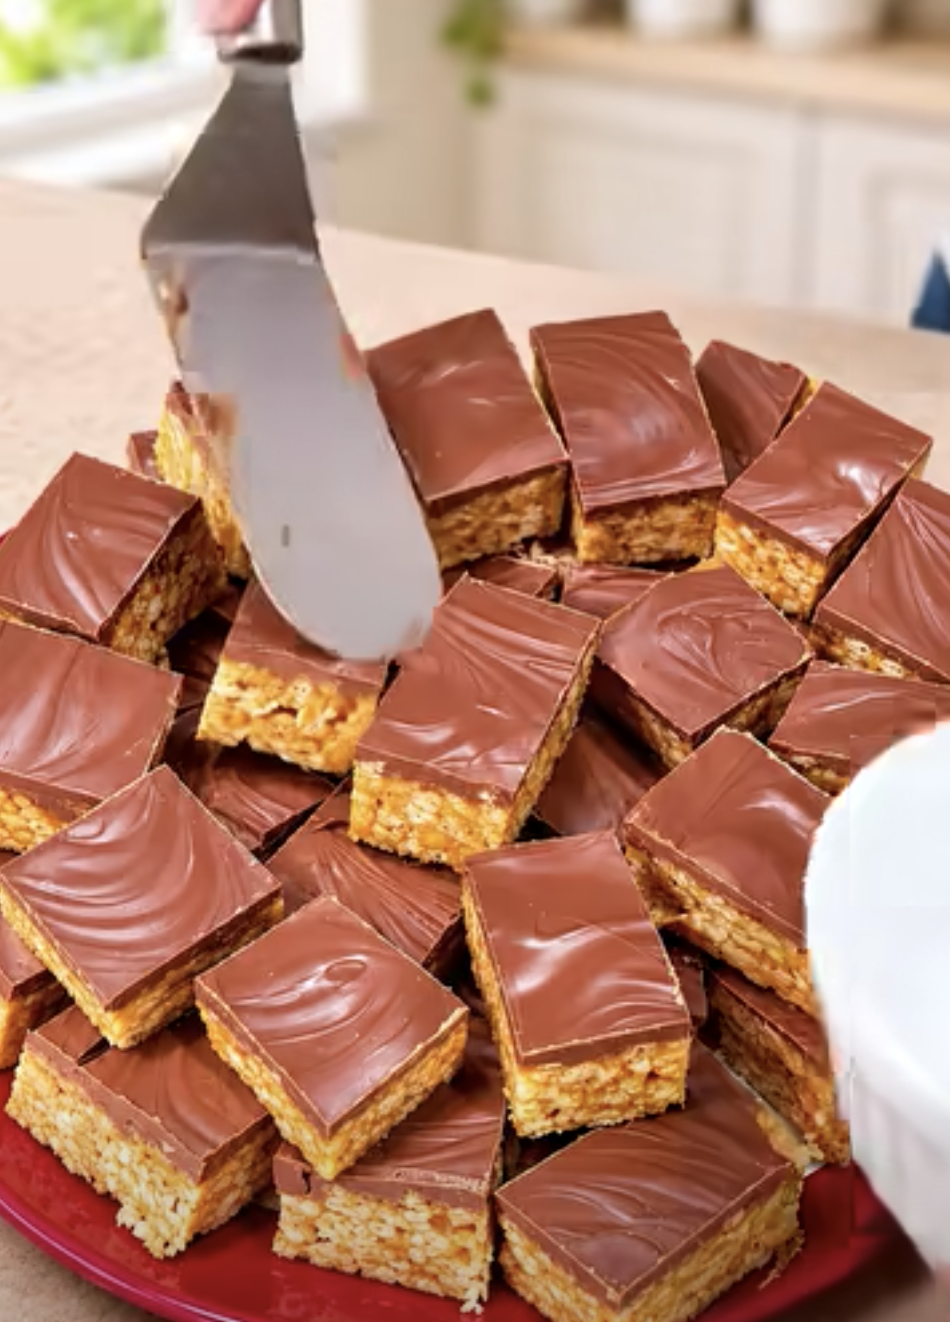
Chocolate Peanut Butter Rice Krispie Bars – Easy No-Bake Dessert Recipe
Ingredients
Equipment
Method
- Line 9-by-13-inch baking pan with parchment paper, leaving some overhang on sides for easy removal.
- Pour 6 cups crispy rice cereal into large heatproof mixing bowl. Set aside.
- In medium saucepan, combine 1 cup light corn syrup and 1 cup granulated sugar over medium-low heat.
- Stir continuously until sugar dissolves and small bubbles begin forming around edges. Remove from heat immediately to prevent hard bars.
- Stir 1 cup creamy peanut butter into warm syrup mixture until completely smooth.
- Pour warm peanut butter mixture over crispy rice cereal. Fold gently with spatula until cereal is evenly coated.
- Transfer cereal mixture into prepared baking pan. Press gently into even layer using lightly greased spatula. Avoid packing too firmly.
- In microwave-safe bowl, combine 2 cups chocolate chips and 2 tablespoons peanut butter. Microwave in 20–30-second intervals, stirring between each, until melted and smooth.
- Pour melted chocolate over cereal base and spread evenly. Allow bars to set at cool room temperature for 1–2 hours or refrigerate for 30–60 minutes until firm.
- Lift bars from pan using parchment paper. Cut into 24 squares or rectangles with sharp knife and serve.
Notes
Why You’ll Love Chocolate Peanut Butter Rice Krispie Bars
Crispy Cereal, Creamy Peanut Butter, and Rich Chocolate
One of the biggest reasons to love Chocolate Peanut Butter Rice Krispie Bars is the delicious combination of textures.
The crispy rice cereal provides a light, crunchy foundation.
Meanwhile, creamy peanut butter adds richness and a smooth, nutty flavor.
The sweet syrup mixture holds everything together.
Finally, melted chocolate creates a rich, creamy topping.
Together, these ingredients produce a dessert that feels indulgent without requiring complicated preparation.
Another advantage is the contrast between the cereal base and chocolate layer.
The cereal mixture stays pleasantly chewy.
Meanwhile, the chocolate firms into a smooth topping.
When you bite into a bar, you experience both textures at once.
For the best results, use fresh crispy rice cereal.
Stale cereal can make the bars taste less appealing.
Next, choose creamy, no-stir peanut butter.
This variety provides a consistent texture.
It also blends smoothly with the warm syrup mixture.
Natural peanut butter can separate.
Therefore, it may create a different consistency.
Another important ingredient is the chocolate.
You can use milk chocolate chips for a sweeter topping.
Alternatively, semisweet chocolate chips create a slightly richer, less sweet flavor.
Both options work beautifully.
Another benefit is the small amount of peanut butter in the topping.
Two tablespoons help create a smooth chocolate mixture.
They also reinforce the peanut butter flavor.
For an extra delicious finish, you can sprinkle a little flaky sea salt over the chocolate.
However, this addition is optional.
The original recipe already provides plenty of flavor.
Whether you enjoy chocolate desserts, peanut butter treats, or crispy cereal bars, this recipe combines all three into one satisfying sweet.
Easy No-Bake Preparation and Perfect Make-Ahead Treats
Chocolate Peanut Butter Rice Krispie Bars are especially convenient because they require no baking.
You only need a saucepan, mixing bowl, baking pan, and microwave-safe bowl.
The preparation takes approximately 15 minutes.
Then the bars need time to set.
You can allow them to cool at room temperature for one to two hours.
Alternatively, refrigerate them for approximately 30–60 minutes.
This makes the recipe easy to fit into a busy schedule.
Another advantage is the generous yield.
One 9-by-13-inch pan makes approximately 24 bars.
You can cut them into squares or rectangles.
For parties, smaller squares work especially well.
They allow guests to enjoy a sweet treat without needing a large portion.
Another benefit is the simple ingredient list.
You don’t need flour, eggs, butter, or baking powder.
Instead, the recipe uses pantry staples.
Another advantage is the easy cleanup.
Line the baking pan with parchment paper before adding the cereal mixture.
Leave some parchment hanging over the sides.
Once the chocolate sets, use the parchment to lift the entire slab from the pan.
Then transfer it to a cutting board.
This makes slicing easier.
For the best results, use a sharp knife.
If the chocolate cracks while cutting, allow the bars to sit at room temperature briefly.
You can also warm the knife slightly and wipe it dry before slicing.
Another reason to love this recipe is its make-ahead convenience.
You can prepare the bars a day before a gathering.
Store them in an airtight container.
Then serve when needed.
Whether you’re planning a holiday dessert tray or a simple family treat, these no-bake bars offer delicious results with minimal effort.
Choosing the Best Ingredients for Peanut Butter Rice Krispie Bars
Crispy Rice Cereal, Peanut Butter, Sugar, and Corn Syrup
The foundation of Chocolate Peanut Butter Rice Krispie Bars starts with six cups of crispy rice cereal.
Crispy rice cereal provides the light, airy crunch that makes these bars so enjoyable.
For the best results, use fresh cereal.
Measure the cereal into a large heatproof mixing bowl before preparing the syrup.
This allows you to work quickly once the peanut butter mixture becomes warm.
Next, prepare one cup of creamy, no-stir peanut butter.
Choose a smooth variety with a consistent texture.
No-stir peanut butter blends easily with warm syrup.
It also helps the cereal mixture hold together.
Next, measure one cup of light corn syrup.
Light corn syrup adds sweetness and helps bind the cereal.
It also contributes to the chewy texture.
However, avoid confusing light corn syrup with dark corn syrup.
Dark corn syrup has a stronger flavor and may change the color of the bars.
Next, prepare one cup of granulated sugar.
The sugar works with the corn syrup to create a sweet binding mixture.
However, temperature control matters.
If you cook the syrup too long, the finished bars may become hard.
Therefore, heat the sugar and corn syrup gently.
Stir continuously until the sugar dissolves and small bubbles appear around the edges.
Then remove the saucepan from the heat.
You don’t need a rolling boil.
Next, add the peanut butter.
Stir until the mixture becomes smooth.
Finally, pour the warm mixture over the cereal.
Use a spatula to coat everything evenly.
For the best results, fold gently.
Avoid crushing the cereal.
This helps preserve the light, crispy texture.
Milk Chocolate, Semisweet Chocolate, and Topping Variations
The chocolate topping gives Chocolate Peanut Butter Rice Krispie Bars their rich, delicious finish.
You’ll need two cups of chocolate chips.
You can choose milk chocolate or semisweet chocolate.
Milk chocolate creates a sweeter, creamier topping.
Meanwhile, semisweet chocolate provides a deeper chocolate flavor.
Both options work well with peanut butter.
For the best results, use good-quality chocolate chips.
They should melt smoothly.
Next, prepare two tablespoons of creamy peanut butter.
Adding peanut butter to the chocolate helps create a softer topping.
It also enhances the nutty flavor.
Next, place the chocolate chips and peanut butter in a microwave-safe bowl.
Heat in short intervals.
Use approximately 20–30 seconds per interval.
Stir thoroughly between each interval.
This helps prevent overheating.
Chocolate can scorch when exposed to excessive heat.
Therefore, avoid microwaving it continuously for several minutes.
Once the mixture becomes smooth, stop heating.
Next, pour the melted chocolate over the prepared cereal base.
Use an offset spatula or ordinary spatula to spread it evenly.
Try to reach all four corners of the pan.
This creates a consistent chocolate layer.
Another useful tip is to avoid pressing the cereal base too firmly.
A tightly packed base can become hard.
Instead, press gently until the mixture forms an even layer.
For a classic variation, replace one cup of chocolate chips with one cup of butterscotch chips.
This creates a topping similar to traditional Scotcheroos.
You can also sprinkle flaky sea salt over the melted chocolate.
The salt adds a delicious contrast to the sweetness.
However, these additions are optional.
The original chocolate and peanut butter topping already tastes wonderful.
How to Make Chocolate Peanut Butter Rice Krispie Bars
Preparing the Chewy Peanut Butter Cereal Base
Making Chocolate Peanut Butter Rice Krispie Bars begins with preparing a 9-by-13-inch baking pan.
Line the pan with parchment paper.
Leave some parchment hanging over the sides.
This creates convenient handles for lifting the bars later.
Next, measure six cups of crispy rice cereal.
Place the cereal in a large heatproof mixing bowl.
Set it aside.
Then place a medium saucepan over medium-low heat.
Add one cup of light corn syrup.
Next, add one cup of granulated sugar.
Stir continuously as the mixture heats.
The sugar should gradually dissolve.
Watch for small bubbles around the edges.
However, avoid allowing the mixture to boil vigorously.
Excessive boiling can create hard cereal bars.
Once the sugar dissolves and the first small bubbles appear, remove the saucepan from the heat.
Next, add one cup of creamy peanut butter.
Stir until the mixture becomes smooth.
The warm syrup should blend easily with the peanut butter.
Then pour the mixture over the crispy rice cereal.
Use a large spatula to fold everything together.
Continue until the cereal has an even coating.
However, work gently.
You want to preserve the cereal’s crunchy texture.
Next, transfer the coated cereal mixture into the prepared baking pan.
Spread it evenly.
Then use a lightly greased spatula to press the mixture into a level layer.
Avoid pressing too firmly.
The goal is a chewy bar rather than a dense, hard one.
Once the cereal base looks even, set the pan aside.
You’re now ready to prepare the chocolate topping.
Melting the Chocolate and Setting the Bars
After preparing the cereal base, measure two cups of chocolate chips.
Place them in a microwave-safe bowl.
Next, add two tablespoons of creamy peanut butter.
Microwave the mixture for approximately 20–30 seconds.
Then remove the bowl and stir.
Continue heating in short intervals.
Stir thoroughly between each interval.
The chocolate should gradually melt.
However, avoid overheating.
Once the mixture becomes smooth and glossy, stop microwaving.
Next, pour the melted chocolate over the cereal base.
Use a spatula to spread the topping evenly.
Try to cover the entire surface.
For a decorative finish, create gentle swirls with the back of a spoon.
However, avoid pressing into the cereal layer.
Next, allow the chocolate to set.
You can leave the pan at cool room temperature for approximately one to two hours.
Alternatively, refrigerate the bars for 30–60 minutes.
The exact setting time depends on room temperature and chocolate type.
For the best results, wait until the chocolate feels firm.
Next, lift the bars from the pan using the parchment paper.
Place the slab on a cutting board.
Then use a sharp knife to cut it into 24 squares or rectangles.
If the chocolate feels too firm, allow the bars to sit at room temperature briefly.
This can help prevent cracking.
Another useful tip is to wipe the knife between cuts.
This creates cleaner edges.
Finally, arrange the bars on a serving platter.
The chocolate topping should look smooth.
Meanwhile, the cereal base should remain chewy and crunchy.
Serve immediately or store in an airtight container.
Serving, Storing, and Customizing Your No-Bake Cereal Bars
Party Desserts, Holiday Treats, and Delicious Serving Ideas
Chocolate Peanut Butter Rice Krispie Bars make a wonderful dessert for many occasions.
Their rich flavor and convenient shape make them especially suitable for parties.
For birthday celebrations, arrange the bars on a large dessert platter.
You can also cut them into smaller squares.
This creates bite-sized portions for guests.
Another excellent option is a holiday dessert tray.
Place the bars alongside cookies, brownies, and homemade candies.
The crispy cereal texture provides a delicious contrast to softer desserts.
You can also prepare them for bake sales.
Their sturdy shape makes them easy to package.
For the best results, wrap individual bars in food-safe packaging.
However, make sure the chocolate sets completely before wrapping.
Another serving idea is an after-school snack.
The combination of chocolate and peanut butter makes the bars especially satisfying.
However, they are a rich dessert, so smaller portions work well.
You can also serve them with a glass of cold milk.
The milk balances the sweet chocolate topping.
Another delicious option is coffee.
The slightly bitter flavor complements the chocolate.
For a more decorative presentation, sprinkle flaky sea salt over the melted chocolate before it sets.
You can also drizzle a small amount of melted white chocolate over the top.
However, these additions are optional.
For a classic presentation, keep the topping smooth and simple.
Another advantage is the make-ahead convenience.
You can prepare the bars the day before a gathering.
Then store them in an airtight container until serving.
Because the recipe contains peanuts, clearly label the bars when serving guests.
This helps people with peanut allergies identify the ingredients.
Storage, Freezing, Troubleshooting, and Easy Variations
Proper storage helps Chocolate Peanut Butter Rice Krispie Bars maintain their chewy, crunchy texture.
After the chocolate sets, transfer the bars to an airtight container.
Place parchment paper between layers.
Store them at cool room temperature for up to five days.
However, avoid warm storage areas.
High temperatures can soften the chocolate topping.
You can also refrigerate the bars.
Store them in an airtight container for up to one week.
For the best texture, allow refrigerated bars to sit at room temperature briefly before serving.
Another option is freezing.
Arrange the bars in layers separated by parchment paper.
Then place them in a freezer-safe container.
Freeze for up to two months.
When ready to serve, thaw them while wrapped or inside the closed container.
This helps reduce moisture buildup.
Another important consideration is troubleshooting.
If the bars become too hard, the sugar mixture may have cooked too long.
For the best results, remove the syrup from the heat as soon as the sugar dissolves and small bubbles appear.
Avoid a prolonged boil.
Another common problem is a crumbly cereal base.
This may happen when the cereal doesn’t receive an even coating.
Therefore, fold the peanut butter mixture thoroughly through the cereal.
However, avoid crushing the cereal.
If the chocolate topping cracks during slicing, it may be too cold.
Allow the bars to warm slightly before cutting.
You can also use a warm, dry knife.
For variations, replace one cup of chocolate chips with butterscotch chips.
This creates a classic sweet-and-nutty topping.
Another option is to use dark chocolate chips.
Dark chocolate creates a richer, less sweet flavor.
You can also add a sprinkle of flaky sea salt.
For the original recipe, use milk chocolate or semisweet chocolate with creamy peanut butter.
Ingredients
Yield: 24 bars | Prep time: 15 minutes | Setting time: 1–2 hours at cool room temperature or 30–60 minutes refrigerated
For the Cereal Base
- 6 cups crispy rice cereal
- 1 cup creamy, no-stir peanut butter
- 1 cup light corn syrup
- 1 cup granulated sugar
For the Chocolate Topping
- 2 cups milk chocolate or semisweet chocolate chips
- 2 tablespoons creamy peanut butter
Instructions
- Prepare the pan. Line a 9-by-13-inch baking pan with parchment paper, leaving some overhang on the sides for easy removal.
- Measure the cereal. Pour six cups of crispy rice cereal into a large heatproof mixing bowl. Set aside.
- Heat the syrup. In a medium saucepan, combine one cup of light corn syrup and one cup of granulated sugar over medium-low heat.
- Dissolve the sugar. Stir continuously until the sugar dissolves and small bubbles begin forming around the edges. Remove from the heat immediately to prevent hard bars.
- Add the peanut butter. Stir one cup of creamy peanut butter into the warm syrup mixture until smooth.
- Coat the cereal. Pour the warm peanut butter mixture over the crispy rice cereal. Fold gently with a spatula until evenly coated.
- Press into the pan. Transfer the cereal mixture into the prepared baking pan. Press gently into an even layer with a lightly greased spatula. Avoid packing too firmly.
- Melt the chocolate topping. In a microwave-safe bowl, combine two cups of chocolate chips and two tablespoons of peanut butter. Microwave in 20–30-second intervals, stirring between each, until smooth.
- Spread and set. Pour the melted chocolate over the cereal base and spread evenly. Allow the bars to set at cool room temperature for one to two hours or refrigerate for 30–60 minutes until firm.
- Slice and serve. Lift the bars from the pan using the parchment paper. Cut into 24 squares or rectangles with a sharp knife and serve.
Frequently Asked Questions
1. Why are my Chocolate Peanut Butter Rice Krispie Bars hard?
The sugar and corn syrup mixture may have boiled too long. For the best results, heat gently until the sugar dissolves and small bubbles appear. Remove the saucepan from the heat before the mixture reaches a vigorous boil.
2. Can I use natural peanut butter for these cereal bars?
You can, but creamy no-stir peanut butter provides more consistent results. Natural peanut butter often separates, which can affect the texture and binding of the cereal base.
3. Can I make Chocolate Peanut Butter Rice Krispie Bars ahead of time?
Yes. Prepare the bars one day before serving and store them in an airtight container. They also keep well at cool room temperature for up to five days.
4. Can I freeze chocolate peanut butter cereal bars?
Absolutely. Place parchment paper between layers and store the bars in an airtight freezer-safe container for up to two months. Thaw while wrapped to help prevent condensation.
5. Can I use butterscotch chips instead of chocolate chips?
Yes. Replace one cup of chocolate chips with one cup of butterscotch chips for a classic Scotcheroos-style topping. You can also use all semisweet chocolate for a richer flavor.
Conclusion
Chocolate Peanut Butter Rice Krispie Bars are an easy no-bake dessert that combines crispy rice cereal, creamy peanut butter, sweet syrup, and a smooth chocolate topping.
The cereal provides a light, crunchy texture.
Meanwhile, peanut butter adds richness and nutty flavor.
The sugar and corn syrup mixture holds everything together.
Finally, melted chocolate creates a delicious finishing layer.
For the best results, heat the sugar mixture gently.
Then remove it from the heat as soon as the sugar dissolves and small bubbles appear.
Next, stir in the peanut butter and coat the cereal evenly.
Press the mixture gently into the prepared pan.
Finally, spread the melted chocolate over the top and allow the bars to set.
Whether you’re preparing a birthday party dessert, holiday treat, bake-sale favorite, or simple family snack, these chocolate peanut butter cereal bars deliver delicious flavor with minimal effort.