No-Bake Banana Pudding Cheesecake combines three nostalgic desserts in one creamy, chilled treat. A buttery vanilla wafer crust supports a fluffy banana cheesecake filling, while fresh banana slices, whipped topping, and crushed vanilla wafers create the classic banana pudding finish.
This dessert requires no oven, which makes preparation especially simple. Instead, refrigeration gives the crust time to firm and allows the cheesecake filling to set. The banana cream pudding mix adds plenty of banana flavor while also helping create a thick, sliceable filling.
No-Bake Banana Pudding Cheesecake works beautifully for family gatherings, potlucks, holidays, summer parties, or anytime you need a make-ahead dessert. Since it tastes best after several hours in the refrigerator, you can prepare the entire dessert the night before and serve it well chilled the next day.
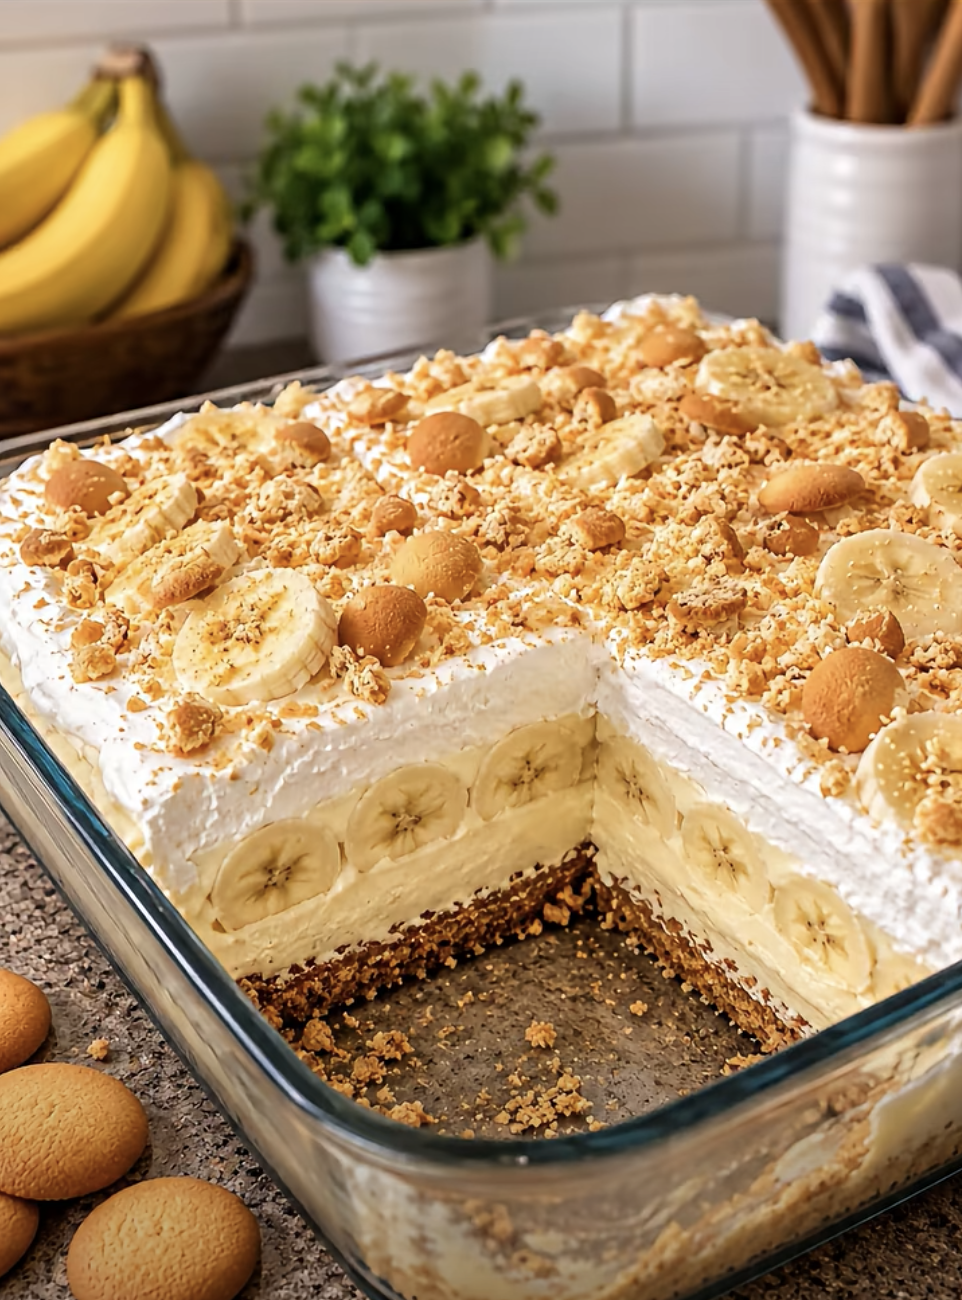
I first appreciated this type of dessert when I needed something I could completely finish before guests arrived. I didn’t want to worry about baking, cooling, frosting, or assembling anything at the last minute. The combination of banana pudding and cheesecake turned out to be perfect. The vanilla wafer crust adds just enough crunch, while the filling stays creamy and light rather than feeling overly dense. I especially like preparing it the evening before serving. By the next day, the layers feel settled and the dessert cuts much more cleanly. Keeping the banana slices underneath the whipped topping also makes the finished squares look much nicer.
No-Bake Banana Pudding Cheesecake
Ingredients
Equipment
Method
- Combine the vanilla wafer cookie crumbs and melted butter until all the crumbs are evenly coated and the mixture resembles wet sand.
- Press the crumb mixture firmly and evenly into the bottom of a 9×13-inch baking dish and refrigerate for 20 minutes.
- Beat the softened cream cheese, powdered sugar, and vanilla extract until completely smooth and creamy.
- In a separate bowl, whisk the instant banana cream pudding mix and cold milk for about 2 minutes, or until the pudding begins to thicken.
- Add the thickened banana pudding to the cream cheese mixture and mix until smooth and completely combined.
- Gently fold 2 cups of thawed whipped topping into the banana cheesecake mixture until light, fluffy, and evenly combined.
- Spread the banana cheesecake filling evenly over the chilled vanilla wafer crust and smooth the surface.
- Arrange the sliced bananas evenly over the cheesecake filling and completely cover them with 1 cup of whipped topping.
- Sprinkle the crushed vanilla wafers over the top, cover tightly, and refrigerate for at least 6 hours or preferably overnight.
- Slice the chilled cheesecake into squares and serve well chilled.
Notes
Making the Vanilla Wafer Crust
Combine the Cookie Crumbs and Butter
Start with 2 cups vanilla wafer cookie crumbs.
For the best crust texture, crush the cookies into relatively fine crumbs. Large pieces can make the base more difficult to press evenly into the baking dish.
Transfer the crumbs to a medium mixing bowl.
Next, pour in ½ cup melted unsalted butter.
Stir until the butter evenly coats the crumbs. The finished mixture should resemble wet sand and hold together when gently pressed.
This simple combination creates the sweet, buttery foundation for No-Bake Banana Pudding Cheesecake.
Vanilla wafers work particularly well because their familiar flavor complements both banana pudding and cheesecake.
Press and Chill the Crust
Transfer the crumb mixture to a 9×13-inch baking dish.
Spread the crumbs evenly across the bottom.
Then use the bottom of a measuring cup, glass, or your fingers to firmly press the mixture into a compact layer.
Pay particular attention to the corners and edges so the crust has a consistent thickness.
Once the crust looks even, place the baking dish in the refrigerator.
Chill it for approximately 20 minutes.
This short chilling period allows the melted butter to firm again, which helps the crust stay together when you spread the creamy filling over it.
Meanwhile, you can prepare the banana cheesecake mixture.
Preparing the Banana Cheesecake Filling
Beat the Cream Cheese Until Smooth
Place 16 ounces softened cream cheese in a large mixing bowl.
Add ¾ cup powdered sugar and 1 teaspoon vanilla extract.
Using an electric mixer, beat the ingredients until completely smooth and creamy.
Softened cream cheese makes this step much easier. Cold cream cheese can leave small lumps throughout the filling.
Therefore, allow it enough time to soften before mixing.
Scrape down the sides and bottom of the bowl as needed so everything combines evenly.
This sweetened cream cheese mixture creates the rich cheesecake component of No-Bake Banana Pudding Cheesecake.
Add Banana Pudding and Whipped Topping
In a separate bowl, combine one 3.4-ounce package instant banana cream pudding mix with 1 cup cold milk.
Whisk for approximately 2 minutes, or until the pudding begins to thicken.
Add the thickened banana pudding to the cream cheese mixture.
Mix until smooth and evenly combined.
Next, add 2 cups thawed whipped topping.
Instead of beating aggressively, use a spatula to gently fold the whipped topping into the banana cheesecake mixture.
Continue folding only until the filling looks light, fluffy, and uniform.
The whipped topping softens the dense cream cheese base and gives the No-Bake Banana Pudding Cheesecake a lighter texture.
Layering and Chilling the Cheesecake
Assemble the Banana Layers
Remove the chilled vanilla wafer crust from the refrigerator.
Spoon the banana cheesecake filling over the crust.
Using a spatula, spread it carefully into an even layer and smooth the surface.
Next, slice 2 bananas.
Arrange the banana slices over the cheesecake filling in a single layer.
Try to distribute them evenly so each finished square contains fresh banana.
Then spread 1 cup whipped topping over the bananas.
Cover the banana slices completely rather than leaving portions exposed.
The whipped topping creates the creamy final layer while helping shield the sliced bananas from direct exposure to air during chilling.
Chill Until Completely Set
Sprinkle crushed vanilla wafers generously over the whipped topping.
About ½ cup crushed wafers provides a good amount of crunchy garnish without overwhelming the creamy layers.
Cover the baking dish tightly with plastic wrap or a fitted lid.
Then refrigerate the No-Bake Banana Pudding Cheesecake for at least 6 hours.
For an especially convenient make-ahead dessert, chill it overnight.
The long refrigeration period gives the filling time to become firm enough for serving while allowing the crust to settle beneath it.
Avoid rushing this stage. Although the filling looks thick immediately after assembly, several hours of chilling produce much cleaner portions.
Serving No-Bake Banana Pudding Cheesecake
Slice the Dessert Into Squares
Keep the cheesecake refrigerated until you’re ready to serve it.
When serving time arrives, remove the cover and cut the chilled dessert into squares.
For cleaner portions, wipe the knife between cuts.
A 9×13-inch dish can comfortably provide approximately 12 generous servings, although you can make smaller portions for a larger gathering.
Use a thin dessert spatula to lift each square from the pan.
The finished No-Bake Banana Pudding Cheesecake should reveal a buttery vanilla wafer base underneath a thick banana cheesecake layer, followed by fresh bananas and whipped topping.
Keep the Dessert Cold
Serve the cheesecake well chilled for the best texture.
Because the recipe contains cream cheese, milk, whipped topping, and fresh bananas, keep it refrigerated rather than leaving it sitting out unnecessarily.
If you’re preparing the dessert for a gathering, the overnight method makes serving especially convenient.
Simply assemble everything the previous evening, cover the baking dish, and refrigerate it until needed.
The combination of creamy banana filling, fresh fruit, whipped topping, and crunchy vanilla wafers makes this dessert rich enough that each square feels satisfying without needing an additional topping.
Ingredients
- 2 cups vanilla wafer cookie crumbs
- ½ cup unsalted butter, melted
- 16 ounces cream cheese, softened
- ¾ cup powdered sugar
- 1 teaspoon vanilla extract
- 1 package (3.4 ounces) instant banana cream pudding mix
- 1 cup cold milk
- 2 cups whipped topping, thawed, for the filling
- 2 bananas, sliced
- 1 cup whipped topping, for the topping
- ½ cup crushed vanilla wafers, for garnish
Instructions
- Combine the vanilla wafer crumbs and melted butter until the mixture resembles wet sand.
- Firmly press the crumbs into an even layer in the bottom of a 9×13-inch baking dish. Refrigerate for 20 minutes.
- Beat the softened cream cheese, powdered sugar, and vanilla until completely smooth and creamy.
- In a separate bowl, whisk the instant banana cream pudding mix with the cold milk for about 2 minutes, until it begins to thicken.
- Add the banana pudding to the cream cheese mixture and mix until smooth.
- Gently fold 2 cups thawed whipped topping into the filling until light and evenly combined.
- Spread the banana cheesecake filling evenly over the chilled crust.
- Arrange the sliced bananas over the filling, then completely cover them with 1 cup whipped topping.
- Sprinkle the crushed vanilla wafers over the top. Cover tightly and refrigerate for at least 6 hours or preferably overnight.
- Slice into squares and serve well chilled.
Frequently Asked Questions
How long does No-Bake Banana Pudding Cheesecake need to chill?
Refrigerate the assembled dessert for at least 6 hours. However, overnight chilling works particularly well because it gives the cheesecake filling plenty of time to become firm and easy to slice.
Can I make No-Bake Banana Pudding Cheesecake the night before?
Yes. In fact, this dessert works especially well as a make-ahead recipe. Assemble it completely, cover the baking dish tightly, and refrigerate overnight.
How can I keep the banana slices from being exposed to air?
Arrange the banana slices over the cheesecake filling and completely cover them with the whipped topping. Keeping the slices beneath the topping helps limit their direct exposure to air while the dessert chills.
Why is my banana cheesecake filling lumpy?
Cold cream cheese can create lumps. Start with properly softened cream cheese and beat it with the powdered sugar and vanilla until completely smooth before adding the prepared banana pudding.
Can I use vanilla wafers for both the crust and topping?
Yes. Vanilla wafer crumbs create the crust, while additional crushed vanilla wafers make a simple crunchy garnish that reinforces the classic banana pudding flavor.
Conclusion
No-Bake Banana Pudding Cheesecake brings together the creamy richness of cheesecake and the familiar flavors of banana pudding in an easy make-ahead dessert.
The buttery vanilla wafer crust requires no baking. Meanwhile, instant banana cream pudding, cream cheese, powdered sugar, and whipped topping create a light yet rich filling.
Fresh banana slices add another layer of banana flavor, while whipped topping and crushed vanilla wafers complete the dessert.
Most importantly, refrigeration does the final work. Give No-Bake Banana Pudding Cheesecake at least 6 hours to set, or prepare it the night before for an especially convenient dessert.
Serve it well chilled and enjoy the combination of creamy banana filling, fresh fruit, fluffy topping, and buttery vanilla wafer crunch in every slice.