Cherry Cheesecake Tacos combine everything you love about classic cheesecake with the irresistible crunch of cinnamon-sugar taco shells. Each sweet dessert taco features a golden, crispy flour tortilla filled with smooth vanilla cheesecake cream and topped with juicy, glossy cherry pie filling.
These delightful handheld desserts offer a delicious combination of textures. The cinnamon-sugar shell adds a buttery crunch, while the cream cheese filling creates a rich, velvety contrast. Meanwhile, the sweet-tart cherry topping brings a bright fruity flavor that makes every bite satisfying.
Unlike traditional cheesecake, Cherry Cheesecake Tacos require no water bath, springform pan, or lengthy baking process. You only bake the tortilla shells. Then you prepare the no-bake cheesecake filling, assemble the tacos, and chill them briefly before serving.
This easy dessert works beautifully for birthday parties, family gatherings, holiday celebrations, summer cookouts, and weekend treats.
You can also customize the toppings with strawberries, blueberries, chocolate, or caramel. However, the classic cherry version remains especially appealing because the vibrant red cherries look beautiful against the creamy white filling and golden shells.
Best of all, you only need a handful of familiar ingredients and about 20 minutes of hands-on preparation.
I first tried making cheesecake tacos when I wanted a fun dessert for a family gathering but didn’t have time to bake an entire cheesecake. I already had cream cheese, flour tortillas, and cherry pie filling in the kitchen, so I decided to turn those simple ingredients into individual desserts. The cinnamon-sugar tortillas became wonderfully crisp in the oven, and the fluffy cheesecake filling came together in minutes. Once I added the cherries, the tacos looked almost too pretty to eat. Everyone enjoyed the contrast between the crunchy shells and creamy filling. Since then, these little dessert tacos have become a favorite for celebrations and casual weekends.
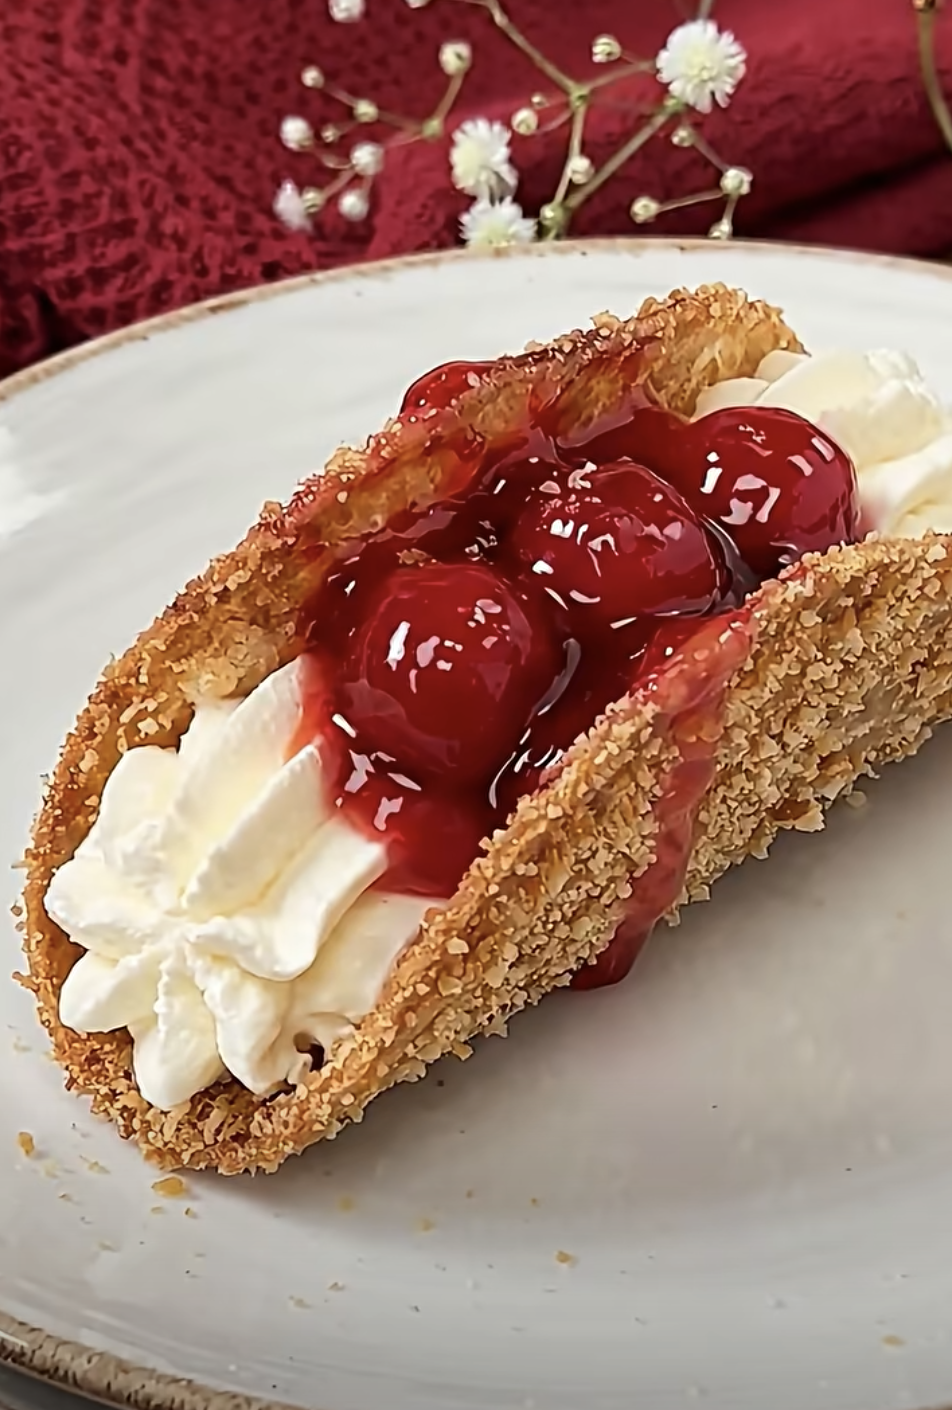
Cherry Cheesecake Tacos – Easy, Crispy, Creamy Dessert Recipe
Equipment
- Oven
- Muffin tin or oven-safe taco rack
- Baking sheet
- Pastry brush
- small mixing bowl
- Medium mixing bowl
- electric hand mixer
- Rubber spatula
- Measuring cups and spoons
- Wire cooling rack
- Piping bag or zip-top bag, optional
- Serving platter
Ingredients
- 6 small flour tortillas, approximately 6 inches each
- 2 tbsp unsalted butter, melted
- 0.25 cup granulated sugar
- 0.5 tsp ground cinnamon
- 8 oz cream cheese, softened
- 0.5 cup powdered sugar
- 1 tsp vanilla extract
- 0.5 cup whipped topping, thawed
- 1 tbsp fresh lemon juice
- 21 oz cherry pie filling
- 2 tbsp melted white chocolate, optional garnish
- 1 tsp powdered sugar, optional garnish
Instructions
- Preheat the oven to 375°F (190°C). Position a muffin tin upside down on a sturdy baking sheet or prepare an oven-safe taco rack.
- In a small bowl, combine the granulated sugar and ground cinnamon. Stir until evenly mixed.
- Brush both sides of each flour tortilla lightly with melted butter. Sprinkle the cinnamon-sugar mixture over both sides.
- Gently fold each tortilla in half. Position the tortillas between the raised cups of the upside-down muffin tin, leaving enough room for the filling.
- Bake for 8 to 10 minutes, or until the shells become lightly golden and crisp. Remove from the oven and cool completely.
- In a medium bowl, beat the softened cream cheese and powdered sugar until smooth. Add the vanilla extract and lemon juice, then mix until creamy.
- Gently fold the thawed whipped topping into the cheesecake mixture until light and fluffy.
- Spoon or pipe the cheesecake filling evenly into the cooled cinnamon-sugar taco shells.
- Spoon the cherry pie filling generously over each cheesecake-filled taco. Refrigerate for approximately 30 minutes.
- Add an optional drizzle of melted white chocolate or a light dusting of powdered sugar. Serve chilled while the shells still have a pleasant crunch.
Notes
Nutrition
RECIPE AT A GLANCE
Prep Time: 15 minutes
Cook Time: 10 minutes
Chill Time: 30 minutes
Total Time: 55 minutes
Servings: 6 dessert tacos
Difficulty: Easy
Why Cherry Cheesecake Tacos Are the Perfect Easy Dessert
The Irresistible Combination of Crunchy Shells and Creamy Cheesecake
One of the biggest reasons to love Cherry Cheesecake Tacos is their wonderful contrast of textures.
Traditional cheesecake usually features a soft filling and a crumbly graham cracker crust. This creative version transforms those familiar flavors into a crispy, handheld dessert.
The taco shells begin with small flour tortillas.
A light coating of melted butter helps the tortillas turn golden in the oven. Meanwhile, cinnamon and granulated sugar create a sweet, lightly caramelized exterior.
As the tortillas bake, they develop a crisp texture that resembles a delicate pastry shell.
However, the filling provides an entirely different experience.
Softened cream cheese creates a rich, smooth base. Powdered sugar adds sweetness without introducing a grainy texture, while vanilla extract enhances the familiar cheesecake flavor.
Fresh lemon juice contributes a gentle tanginess that balances the sweetness.
Finally, whipped topping makes the filling lighter and fluffier.
The result tastes creamy and indulgent without requiring a traditional cheesecake baking process.
Then comes the cherry topping.
Cherry pie filling adds juicy fruit, glossy red color, and a delicious sweet-tart finish.
Together, these elements create a dessert that feels both familiar and exciting.
Every bite combines crisp cinnamon-sugar pastry, smooth cheesecake cream, and tender cherries.
Additionally, the individual taco shape makes the dessert easy to serve at parties.
Guests can enjoy their own portion without cutting slices or using a cake server.
A Fun Dessert for Parties, Holidays, and Family Gatherings
Cherry Cheesecake Tacos make a wonderful addition to almost any dessert table.
Their playful shape immediately catches attention, while the colorful cherry topping gives them an attractive presentation.
For birthday parties, arrange the tacos upright on a serving platter.
You can also place them in a taco holder to keep them stable.
For Valentine’s Day, the bright red cherries create a festive appearance.
Meanwhile, the creamy white filling adds a beautiful contrast.
During summer gatherings, these dessert tacos offer a refreshing alternative to heavier baked desserts.
They also work well for family movie nights, weekend celebrations, and potlucks.
Another advantage involves portion control.
Because the recipe makes six individual tacos, you can easily divide the dessert among guests.
For larger gatherings, simply double the ingredients.
You can also prepare several different toppings and allow guests to customize their desserts.
Cherry pie filling, strawberry sauce, blueberry topping, and chocolate drizzle all pair well with the cheesecake cream.
However, assemble the tacos close to serving time if you want the crispest shells.
The filling gradually softens the tortillas after assembly.
Therefore, preparing the components separately gives you more flexibility.
With simple preparation and an attractive presentation, these cheesecake tacos turn everyday ingredients into a memorable dessert.
Essential Ingredients for the Best Cherry Cheesecake Tacos
Choosing the Right Tortillas, Butter, Cinnamon, and Sugar
The foundation of delicious Cherry Cheesecake Tacos starts with the shells.
For this recipe, use six small flour tortillas.
Choose tortillas approximately six inches in diameter.
Small tortillas create individual dessert portions that guests can comfortably hold.
Flour tortillas work better than corn tortillas for this sweet recipe because they have a mild flavor and develop a pleasant pastry-like texture when baked.
Next, use two tablespoons of melted butter.
Butter helps the tortillas brown evenly and gives them a rich flavor.
It also helps the cinnamon-sugar mixture adhere to the surface.
For the sweet coating, combine ¼ cup of granulated sugar with ½ teaspoon of ground cinnamon.
The sugar adds sweetness and helps create a delicate crunch.
Meanwhile, cinnamon provides warmth and complements the creamy cheesecake filling.
Brush both sides of each tortilla with melted butter.
Then sprinkle the cinnamon-sugar mixture evenly over both sides.
For the best results, avoid applying too much butter.
Excess butter can collect on the baking pan and prevent the shells from crisping evenly.
Next, fold the tortillas into taco shapes.
An upside-down muffin tin provides a convenient way to support the folded tortillas while they bake.
You can also use an oven-safe taco rack.
Bake the shells until they become lightly golden and crisp.
Finally, allow them to cool completely before adding the cheesecake filling.
This cooling step helps preserve their crunchy texture.
Making a Smooth Cheesecake Filling and Choosing Cherry Topping
The cheesecake filling gives Cherry Cheesecake Tacos their rich, creamy flavor.
Start with eight ounces of softened cream cheese.
Full-fat block cream cheese creates a thick, smooth filling that holds its shape inside the taco shells.
For the best texture, let the cream cheese soften at room temperature for approximately 30 minutes.
However, avoid leaving it out for extended periods.
Next, add ½ cup of powdered sugar.
Powdered sugar blends easily with cream cheese and creates a smooth sweetness.
Then add one teaspoon of vanilla extract.
Vanilla enhances the cheesecake flavor and complements the cherry topping.
For a bright, tangy note, include one tablespoon of fresh lemon juice.
The lemon juice balances the richness of the cream cheese.
Next, add ½ cup of whipped topping.
Fold it gently into the cream cheese mixture to maintain a fluffy consistency.
Avoid vigorous mixing after adding the whipped topping because excessive stirring can reduce its volume.
Finally, use one 21-ounce can of cherry pie filling.
Canned cherry pie filling provides a convenient topping with a glossy texture and sweet-tart flavor.
Choose a filling with plenty of whole cherries for an attractive presentation.
If you prefer a less sweet dessert, look for a reduced-sugar variety.
You can also make homemade cherry topping, although canned filling keeps the recipe quick and beginner-friendly.
How to Make Cherry Cheesecake Tacos Step by Step
Baking Perfectly Crispy Cinnamon-Sugar Taco Shells
Making Cherry Cheesecake Tacos begins with preparing the cinnamon-sugar tortilla shells.
First, preheat your oven to 375°F.
Then place a muffin tin upside down on a sturdy baking sheet or use an oven-safe taco rack.
The spaces between the muffin cups can support the folded tortillas while they bake.
However, muffin tin shapes vary, so check that your tortillas fit securely before placing them in the oven.
Next, melt two tablespoons of butter in a small microwave-safe bowl.
In a separate shallow dish, combine the granulated sugar and cinnamon.
Stir until the cinnamon distributes evenly throughout the sugar.
Place the flour tortillas on a clean work surface.
Brush both sides of each tortilla lightly with melted butter.
Then sprinkle the cinnamon-sugar mixture over both sides.
Try to coat the tortillas evenly without leaving thick patches of sugar.
Next, fold each tortilla gently in half.
Position the folded tortillas between the raised cups of the upside-down muffin tin.
Leave enough space inside each shell for the cheesecake filling.
Bake for approximately eight to ten minutes.
Watch the shells carefully during the final minutes.
They should develop a light golden color and crisp edges.
However, avoid overbaking because the sugar can brown quickly.
Remove the pan from the oven.
Allow the shells to cool in their taco shapes for several minutes.
Then transfer them to a wire rack and let them cool completely.
The shells will continue to firm as they cool.
Preparing the Cheesecake Cream and Assembling the Tacos
While the shells cool, prepare the cheesecake filling.
First, place the softened cream cheese in a medium mixing bowl.
Use an electric hand mixer to beat the cream cheese until smooth.
Next, add the powdered sugar.
Continue mixing until the mixture becomes creamy and free of lumps.
Then add the vanilla extract and lemon juice.
Beat briefly until everything combines.
Use a spatula to scrape the sides of the bowl.
Next, add the whipped topping.
Gently fold it into the cream cheese mixture until the filling looks smooth and fluffy.
Avoid overmixing.
Once the taco shells cool completely, prepare your serving platter.
Transfer the cheesecake filling into a piping bag fitted with a large round or star tip.
Alternatively, use a zip-top bag with one corner snipped off.
You can also spoon the filling directly into the shells.
Pipe or spoon approximately one-sixth of the cheesecake mixture into each taco shell.
Then open the cherry pie filling.
Spoon a generous portion of cherries over each cheesecake-filled taco.
Try to distribute the fruit evenly.
Next, place the assembled tacos in the refrigerator for approximately 30 minutes.
This brief chilling period helps the cheesecake filling firm slightly.
However, longer chilling after assembly can soften the shells.
For the best combination of creamy filling and crisp pastry, serve the tacos shortly after chilling.
If desired, finish with a light dusting of powdered sugar or a drizzle of melted white chocolate.
Helpful Tips, Delicious Variations, and Storage Ideas
Creative Ways to Customize Your Cheesecake Dessert Tacos
Cherry Cheesecake Tacos offer plenty of opportunities for creative variations.
Although cherry pie filling creates a beautiful classic dessert, you can experiment with different fruit toppings.
For example, strawberry pie filling produces a sweet, fruity variation.
Blueberry pie filling also works beautifully with the vanilla cheesecake cream.
For a tropical version, add a spoonful of pineapple topping.
You can also use fresh berries for a lighter, less syrupy finish.
If you enjoy chocolate, drizzle melted white chocolate over the cherry topping.
White chocolate adds sweetness and creates an elegant decorative effect.
Alternatively, use a small drizzle of dark chocolate for a richer flavor.
For extra crunch, sprinkle crushed graham crackers over the filling.
This addition recreates the flavor of a traditional cheesecake crust.
You can also add finely chopped toasted pecans.
Pecans provide a pleasant nutty contrast to the soft filling.
For a stronger cinnamon flavor, add a small pinch of cinnamon directly to the cheesecake mixture.
However, avoid adding too much because the shells already contain cinnamon sugar.
Another delicious variation involves using orange zest instead of lemon juice.
Orange zest complements cherries and adds a fragrant citrus note.
For special occasions, arrange several different toppings in small bowls.
Then allow guests to assemble their own dessert tacos.
This approach creates a fun dessert station while helping the shells stay crisp.
Make-Ahead Preparation and Proper Storage
One of the easiest ways to prepare Cherry Cheesecake Tacos for a gathering is to make the components separately.
You can bake the cinnamon-sugar tortilla shells earlier in the day.
After cooling them completely, store them in an airtight container at room temperature.
Keep them away from moisture to preserve their crisp texture.
For the best results, use the shells within one to two days.
Meanwhile, prepare the cheesecake filling up to 24 hours ahead.
Transfer it to an airtight container and refrigerate at 40°F or below.
Before assembling the tacos, stir the filling gently if necessary.
You can also transfer it directly into a piping bag.
Store the cherry pie filling separately in a covered refrigerator-safe container after opening the can.
When you’re ready to serve, fill the taco shells with cheesecake cream and add the cherries.
Then refrigerate the assembled tacos for approximately 30 minutes.
However, avoid assembling them too far in advance.
The moisture from the cheesecake filling and cherry topping gradually softens the cinnamon-sugar shells.
If you have leftovers, store them in an airtight container in the refrigerator.
Enjoy assembled tacos within one to two days for the best quality, although their shells will lose much of their crunch.
Keep cream cheese desserts refrigerated and avoid leaving them at room temperature for more than two hours.
Finally, avoid freezing assembled tacos because thawing can damage the shell texture and affect the creamy filling.
Ingredients
Servings: 6 dessert tacos Prep Time: 15 minutes Cook Time: 10 minutes Chill Time: 30 minutes Total Time: 55 minutes
For the Cinnamon-Sugar Taco Shells
- 6 small flour tortillas, approximately 6 inches each
- 2 tablespoons unsalted butter, melted
- ¼ cup granulated sugar
- ½ teaspoon ground cinnamon
For the Cheesecake Filling
- 8 ounces cream cheese, softened
- ½ cup powdered sugar
- 1 teaspoon vanilla extract
- ½ cup whipped topping, thawed
- 1 tablespoon fresh lemon juice
For the Cherry Topping
– 1 can (21 ounces) cherry pie filling
Optional Garnishes
- 2 tablespoons melted white chocolate
- 1 teaspoon powdered sugar, for dusting
Instructions
1. Preheat the oven. Preheat your oven to 375°F (190°C). Position a muffin tin upside down on a sturdy baking sheet or prepare an oven-safe taco rack.
2. Prepare the cinnamon sugar. In a small bowl, combine the granulated sugar and ground cinnamon. Stir until evenly mixed.
3. Coat the tortillas. Brush both sides of each flour tortilla lightly with melted butter. Sprinkle the cinnamon-sugar mixture over both sides.
4. Shape the taco shells. Gently fold each tortilla in half. Position the tortillas between the raised cups of the upside-down muffin tin, leaving enough room for the filling.
5. Bake until crispy. Bake for 8–10 minutes, or until the shells become lightly golden and crisp. Remove them from the oven and let them cool completely.
6. Make the cheesecake filling. In a medium bowl, beat the softened cream cheese and powdered sugar until smooth. Add the vanilla extract and lemon juice, then mix until creamy.
7. Fold in the whipped topping. Gently fold the thawed whipped topping into the cheesecake mixture until light and fluffy.
8. Fill the taco shells. Spoon or pipe the cheesecake filling evenly into the cooled cinnamon-sugar taco shells.
9. Add the cherry topping. Spoon the cherry pie filling generously over each cheesecake-filled taco. Refrigerate for approximately 30 minutes.
10. Garnish and serve. Add an optional drizzle of melted white chocolate or a light dusting of powdered sugar. Serve chilled while the shells still have a pleasant crunch.
Frequently Asked Questions
1. Can I make Cherry Cheesecake Tacos ahead of time?
Yes. Prepare the taco shells and cheesecake filling separately ahead of time. Store the cooled shells in an airtight container at room temperature and refrigerate the filling. Assemble the tacos shortly before serving to maintain the crisp texture.
2. How do I keep cheesecake taco shells from getting soggy?
Allow the shells to cool completely before adding the filling. Additionally, avoid filling them too far in advance. The cheesecake cream and cherry topping contain moisture that gradually softens the tortillas. For maximum crunch, assemble the tacos shortly before serving.
3. Can I use fresh cherries instead of canned cherry pie filling?
Yes. You can prepare a homemade cherry topping using pitted cherries, a little sugar, lemon juice, and cornstarch. Cook the mixture until it thickens, then cool it completely before adding it to the cheesecake tacos. Fresh cherries alone also work, although they create a less saucy topping.
4. Can I make Cherry Cheesecake Tacos without an upside-down muffin tin?
Yes. An oven-safe taco rack works well. You can also create supports with tightly shaped aluminum foil placed on a baking sheet. Make sure the tortillas remain upright and maintain their folded shape while baking.
5. How long do Cherry Cheesecake Tacos last in the refrigerator?
Assembled tacos taste best on the day you make them. You can refrigerate leftovers in an airtight container for one to two days, but the shells will soften. For better texture, store the shells, cheesecake filling, and cherry topping separately until serving.
Conclusion
Cherry Cheesecake Tacos combine crispy cinnamon-sugar tortilla shells, smooth vanilla cheesecake filling, and sweet cherry pie topping into one delightful handheld dessert.
The golden shells provide a satisfying crunch, while the fluffy cream cheese mixture delivers the rich flavor of traditional cheesecake.
Meanwhile, the glossy cherry topping adds fruity sweetness and a beautiful pop of color.
This easy recipe requires only a short baking time for the shells and no baking for the cheesecake filling.
Additionally, you can prepare the components ahead of time, making the dessert convenient for parties, holidays, and family gatherings.
For the best results, use softened cream cheese, bake the shells until golden, and allow them to cool completely before filling.
Then add the cherry topping and chill briefly.
Finally, finish with a drizzle of white chocolate or a dusting of powdered sugar for an attractive presentation.
Whether you’re preparing a fun weekend treat or a dessert table for a special celebration, these crispy, creamy cherry cheesecake tacos offer a delicious twist on a classic favorite.