Mini Apple Pies bring everything you love about classic homemade apple pie into adorable, individual-sized desserts. With flaky golden crusts, tender cinnamon-spiced apples, and a sweet, buttery filling, these little treats deliver delicious comfort in every bite.
The best part? You don’t need to make pie dough from scratch. Refrigerated pie crusts make preparation quick and simple, while a standard muffin tin helps you create perfectly portioned desserts.
Whether you’re planning a holiday gathering, baking for your family, or craving a cozy fall treat, these Mini Apple Pies make a wonderful choice. They’re easy to prepare, beautiful to serve, and delicious warm or at room temperature.
I first started making these little apple pies when I wanted to serve homemade pie at a family gathering without worrying about cutting perfect slices. I had a couple of apples in the kitchen and refrigerated pie dough in the fridge, so I decided to try individual pies in a muffin tin. The smell of cinnamon and warm apples filled the kitchen as they baked. Everyone loved having their own little dessert, especially with a scoop of vanilla ice cream. Since then, I’ve enjoyed making these mini treats whenever I want something homemade, comforting, and easy to share.
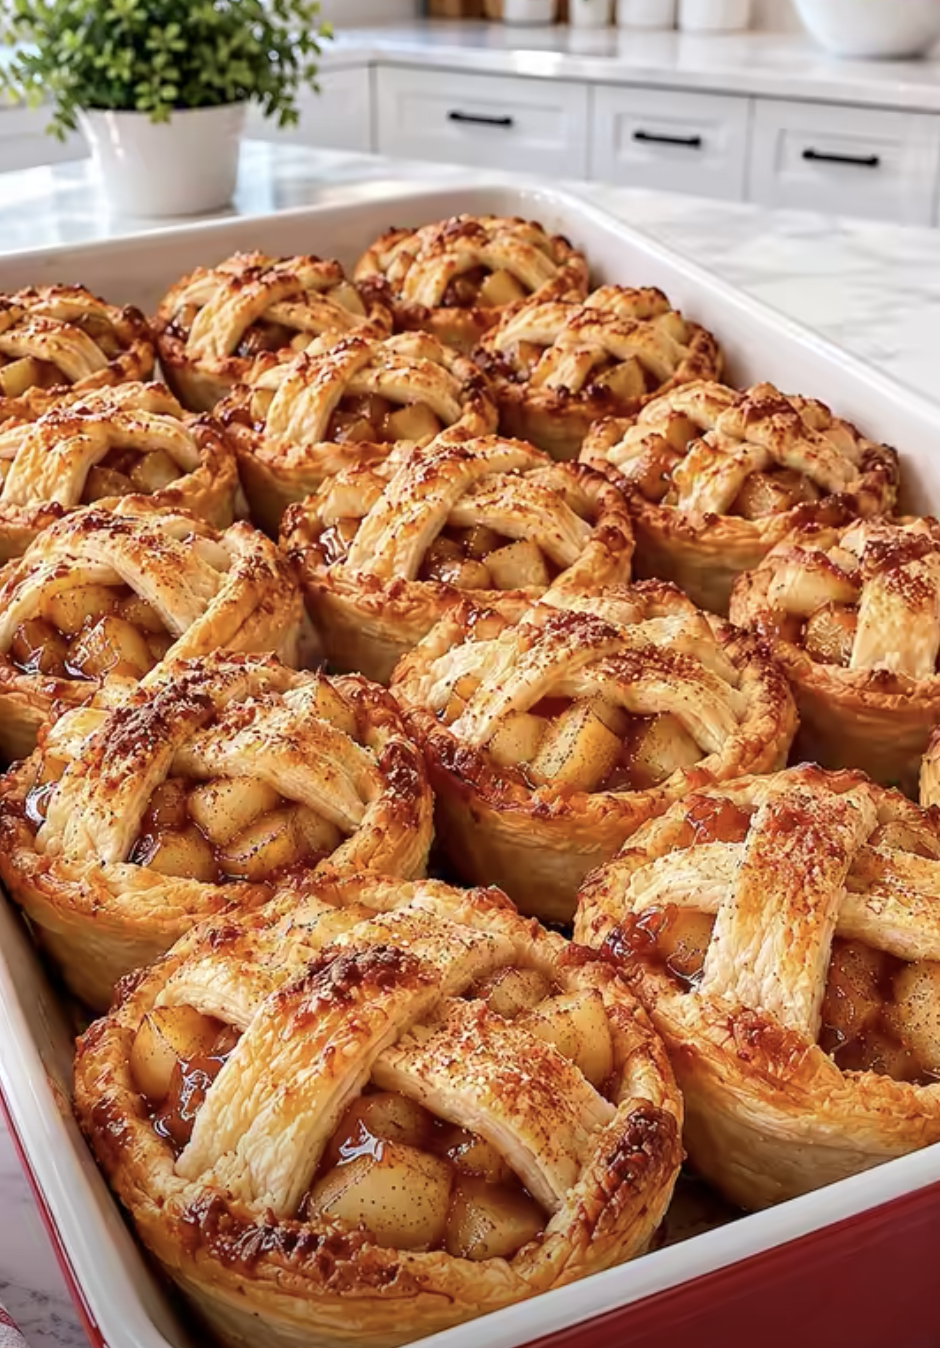
Mini Apple Pies – Easy Homemade Muffin Tin Apple Pie Recipe
Ingredients
Equipment
Method
- Preheat the oven to 375°F (190°C). Lightly grease a standard 12-cup muffin tin.
- In a medium bowl, combine the diced apples, granulated sugar, brown sugar, cinnamon, flour, and lemon juice. Stir until evenly coated.
- Unroll the refrigerated pie crusts on a lightly floured surface. Cut approximately 4-inch circles for the bottom crusts, gently rerolling scraps as necessary. Reserve enough pastry for the tops.
- Gently press the pastry circles into the prepared muffin cups, covering the bottoms and sides.
- Divide the apple filling evenly among the pastry shells. Drizzle a small amount of melted butter over each portion.
- Cut the remaining dough into strips or small circles. Arrange over the filling, gently seal the edges, and cut steam vents in solid top crusts.
- Brush the pastry tops lightly with beaten egg and sprinkle with coarse sugar if desired.
- Bake for 20–25 minutes, or until the pastry becomes golden brown and the apple filling is tender.
- Cool the mini pies in the muffin tin for 5–10 minutes. Carefully remove and serve warm or at room temperature.
Notes
Why You’ll Love These Mini Apple Pies
All the Flavor of Classic Apple Pie in a Smaller Size
Traditional apple pie offers a wonderful combination of sweet fruit, warm spices, and buttery pastry. However, baking a full-sized pie requires more preparation and a longer cooking time.
Mini Apple Pies simplify the process without sacrificing the flavors that make apple pie so popular.
Each individual pie features a crisp, golden crust filled with tender apple pieces. Cinnamon adds warmth, while brown sugar creates a subtle caramel-like sweetness.
Additionally, a small amount of lemon juice brightens the filling and balances the sugar.
Because the apples are finely diced, they cook more quickly than the larger slices you typically find in traditional apple pie.
The smaller portions also make serving easier. Instead of slicing a large pie, you can simply place one or two mini pies on each dessert plate.
This convenience makes them especially useful for holiday parties, family dinners, bake sales, and special occasions.
Furthermore, you can decorate the tops with pastry strips, small cutout shapes, or simple round crusts.
These finishing touches give each pie a charming homemade appearance.
Even beginner bakers can achieve beautiful results with a little patience and a few basic kitchen tools.
Perfect for Holidays, Parties, and Everyday Treats
One of the greatest advantages of Mini Apple Pies comes from their versatility.
They work beautifully for Thanksgiving, Christmas, fall celebrations, birthday parties, and casual weekend baking.
For example, you can arrange them on a serving platter for a holiday dessert table. Their individual size makes them easy for guests to pick up and enjoy.
Alternatively, serve them warm with vanilla ice cream for a comforting family dessert.
These little pies also make thoughtful homemade treats for neighbors, friends, and coworkers.
Because each pie has its own crust, you don’t need to worry about cutting uneven slices or creating a messy presentation.
Another benefit comes from portion control. You can enjoy one small pie when you want something sweet without serving a large dessert.
Additionally, the recipe uses simple ingredients that you may already have in your kitchen.
Apples, cinnamon, sugar, butter, and refrigerated pie dough create a delicious dessert without requiring complicated techniques.
You can even prepare the pies ahead of time and reheat them shortly before serving.
For busy home bakers, that flexibility makes these Mini Apple Pies especially appealing.
Essential Ingredients for the Best Mini Apple Pies
Choosing the Right Apples and Pie Crust
The quality of your apples plays an important role in the flavor and texture of Mini Apple Pies.
For this recipe, Granny Smith apples make an excellent choice. Their tart flavor balances the sweetness of the filling, and their firm texture helps them hold their shape during baking.
However, you can also use Honeycrisp, Pink Lady, Braeburn, or Fuji apples.
Honeycrisp apples offer a naturally sweet flavor and a pleasant texture. Meanwhile, Pink Lady apples provide a nice combination of sweetness and tartness.
For a more complex filling, try combining one tart apple with one sweet apple.
Regardless of the variety, peel the apples and dice them into small, even pieces.
Aim for pieces approximately 1/4 inch wide. Smaller pieces soften more quickly and fit comfortably inside the miniature crusts.
Next, choose two refrigerated pie crusts.
Store-bought crusts save time and produce a flaky, buttery pastry when you handle them carefully.
Allow the dough to soften according to the package directions before unrolling it. This step helps prevent cracking.
When cutting the bottom crusts, choose circles large enough to cover the bottoms and sides of your muffin cups.
A round cookie cutter, wide drinking glass, or small bowl can help you create even circles.
For standard muffin tins, circles approximately 4 inches across usually work well.
However, check the size of your muffin cups before cutting.
How Sugar, Cinnamon, and Butter Create the Perfect Filling
The apple filling gives Mini Apple Pies their signature sweet and comforting flavor.
Granulated sugar provides the main sweetness, while brown sugar adds a richer, slightly caramel-like taste.
Together, these sugars complement the natural flavor of the apples.
Ground cinnamon creates the warm aroma that makes apple desserts especially inviting.
Although this recipe uses one teaspoon of cinnamon, you can adjust the amount slightly to suit your preferences.
For a more complex spice blend, add a small pinch of nutmeg or allspice.
All-purpose flour helps thicken the juices that the apples release during baking. Without a thickener, the filling may become too watery and soften the bottom crust.
Lemon juice provides acidity and balances the sweetness.
It also helps slow browning while you prepare the filling.
Melted butter adds richness and helps the apples develop a smooth, flavorful sauce as they bake.
Finally, beaten egg creates a beautiful golden finish on the pastry.
Brush the egg wash lightly over the tops before baking. Then, sprinkle coarse sugar over the crusts if you want a little extra sweetness and crunch.
These simple ingredients work together to create tender apple filling inside crisp, golden pastry.
How to Make Mini Apple Pies with Perfect Results
Preparing the Apple Filling and Muffin Tin Crusts
Making Mini Apple Pies becomes much easier when you organize your ingredients before starting.
First, preheat your oven to 375°F (190°C).
Lightly grease a standard 12-cup muffin tin with butter or nonstick cooking spray. This step helps you remove the baked pies without breaking their delicate crusts.
Next, peel and finely dice two medium apples.
Place the diced apples in a mixing bowl. Add the granulated sugar, brown sugar, cinnamon, flour, and lemon juice.
Stir until the apples have an even coating of sugar and spices.
Meanwhile, unroll the refrigerated pie crusts onto a lightly floured work surface.
Cut approximately 4-inch circles for the bottom crusts.
Press each circle gently into a muffin cup, making sure the dough covers the bottom and sides.
Avoid stretching the dough too much because stretched pastry may shrink during baking.
Gather the remaining dough scraps and gently roll them together for additional crusts or decorative toppings.
Next, spoon the apple mixture into the prepared pastry shells.
Divide the filling evenly among the cups. Fill each crust generously without packing the apples too tightly.
Drizzle a small amount of melted butter over each portion.
At this point, your pies are ready for their decorative top crusts.
Baking Golden, Flaky Mini Apple Pies
The baking stage transforms the simple ingredients into delicious Mini Apple Pies with tender fruit and crisp pastry.
Use the remaining pie dough to create your preferred topping.
For a traditional appearance, cut thin strips and arrange them in a lattice pattern over each pie.
Alternatively, cut small pastry circles and place them over the filling.
If you choose full pastry circles, cut small slits in the tops so steam can escape during baking.
Press the edges gently to help secure the top crusts.
Next, brush the exposed pastry with beaten egg.
Use a light coating rather than soaking the dough. Too much egg wash can collect around the edges.
Sprinkle coarse sugar over the tops if desired.
Then, place the muffin tin on the middle oven rack.
Bake for approximately 20–25 minutes, or until the crusts turn golden brown and the apple filling becomes tender.
Because ovens vary, begin checking the pies around the 20-minute mark.
If the crust browns before the apples soften, loosely cover the tops with aluminum foil and continue baking briefly.
Once the pies finish baking, remove the muffin tin from the oven.
Allow the pies to cool for 5–10 minutes.
Then, carefully loosen the edges with a small offset spatula or butter knife and transfer the pies to a cooling rack.
This short cooling period helps the filling settle and makes the pies easier to handle.
Delicious Variations, Serving Ideas, and Storage Tips
Creative Ways to Customize Your Mini Apple Pies
Although classic cinnamon apple filling tastes wonderful, you can easily customize Mini Apple Pies with different flavors and toppings.
For caramel apple pies, drizzle a little caramel sauce over the baked pies just before serving.
The caramel adds sweetness and pairs beautifully with the tart apples.
If you love warm spices, add a pinch of nutmeg, ginger, or allspice to the filling.
These spices create a deeper flavor that works especially well during fall and winter.
For extra texture, mix a tablespoon or two of finely chopped pecans or walnuts into the apples.
You can also create a crumb topping instead of a pastry top.
Combine a little flour, brown sugar, cold butter, and cinnamon until the mixture forms crumbs. Then, sprinkle it over the apple filling before baking.
This variation creates a delicious combination of tender apples and buttery streusel.
For a festive appearance, use small cookie cutters to make pastry stars, hearts, or leaves.
Place the shapes over the filling and brush them with egg wash.
These decorations make the pies especially attractive for holiday gatherings.
You can also experiment with different apple combinations.
For example, Granny Smith and Honeycrisp apples create a filling that balances tartness and natural sweetness.
No matter which variation you choose, keep the apple pieces small and avoid adding too much extra liquid.
How to Serve, Store, Freeze, and Reheat
Mini Apple Pies taste delicious on their own, but simple toppings can make them feel extra special.
For a classic dessert, serve one warm pie with a scoop of vanilla ice cream.
The cold ice cream melts slightly against the warm pastry and creates a wonderful contrast.
You can also add whipped cream, caramel sauce, or a light dusting of powdered sugar.
For holiday dinners, arrange the pies on a large serving platter with cinnamon sticks and fresh apple slices for decoration.
If you have leftovers, allow the pies to cool before storing them.
Place them in an airtight container and refrigerate for up to 4 days.
For longer storage, freeze the fully baked and cooled pies in a single layer until firm.
Then, transfer them to a freezer-safe container or bag.
For the best texture and flavor, enjoy frozen pies within approximately 2–3 months.
When you’re ready to serve, thaw the pies in the refrigerator.
Reheat them in a 325°F oven for approximately 8–12 minutes, or until warmed through.
The oven helps restore the pastry’s crisp texture.
Although you can use a microwave, it may soften the crust.
Therefore, oven reheating usually produces better results.
You can also prepare the apple filling and cut the pastry circles ahead of time. Store them separately in the refrigerator and assemble the pies when you’re ready to bake.
Ingredients
Prep: 20 minutes
Cook: 20–25 minutes
Yield: 12 mini pies
- 2 refrigerated pie crusts (standard 9-inch crusts)
- 2 medium apples, peeled and finely diced
- 1/4 cup granulated sugar
- 1 tablespoon brown sugar
- 1 teaspoon ground cinnamon
- 1 tablespoon all-purpose flour
- 1 teaspoon lemon juice
- 1 tablespoon butter, melted
- 1 large egg, beaten, for egg wash
- 1 tablespoon coarse sugar, optional
Instructions
1. Preheat the oven. Set your oven to 375°F (190°C). Lightly grease a standard 12-cup muffin tin with butter or nonstick cooking spray.
2. Prepare the apple filling. In a medium mixing bowl, combine the finely diced apples, granulated sugar, brown sugar, cinnamon, flour, and lemon juice. Stir until the apples have an even coating.
3. Cut the pie crusts. Unroll the refrigerated pie crusts on a lightly floured surface. Cut approximately 4-inch circles for the muffin cups, gently rerolling scraps as needed. Reserve enough dough for the tops.
4. Shape the bottom crusts. Press the dough circles gently into the prepared muffin cups, covering the bottoms and sides without stretching the pastry.
5. Add the filling. Divide the apple mixture evenly among the crusts. Drizzle a little melted butter over each portion.
6. Decorate the tops. Cut the remaining dough into thin strips or small circles. Arrange the pastry over the filling and gently secure the edges. Cut steam vents if using solid top crusts.
7. Apply the egg wash. Brush the tops lightly with beaten egg. Sprinkle with coarse sugar if desired.
8. Bake until golden. Place the muffin tin in the preheated oven and bake for 20–25 minutes, until the pastry turns golden brown and the apples become tender. Add a few minutes if necessary.
9. Cool and serve. Allow the pies to cool in the muffin tin for 5–10 minutes. Carefully remove them and serve warm or at room temperature.
Helpful tip: Granny Smith apples provide a wonderful balance of tartness and sweetness. For an extra-special dessert, serve these Mini Apple Pies warm with vanilla ice cream or a drizzle of caramel sauce.
Frequently Asked Questions
1. What are the best apples for Mini Apple Pies?
Granny Smith apples make an excellent choice because their tart flavor balances the sugar and their firm texture holds up during baking.
However, Honeycrisp, Pink Lady, and Braeburn apples also work well.
For a balanced flavor, combine one tart apple with one naturally sweet apple.
2. Can I make Mini Apple Pies ahead of time?
Yes. You can bake Mini Apple Pies one day before serving and refrigerate them in an airtight container.
When you’re ready to enjoy them, warm the pies in a 325°F oven for approximately 8–12 minutes.
You can also prepare the filling and pastry separately ahead of time, then assemble and bake the pies when needed.
3. How do I keep the bottom crust from getting soggy?
Start by cutting the apples into small, even pieces and using the recommended amount of flour to thicken the filling.
Additionally, avoid adding extra liquid to the apple mixture.
Bake the pies until the bottom pastry cooks through and the tops turn golden.
For an extra-crisp bottom crust, you can briefly pre-bake the empty pastry shells for approximately 5 minutes before adding the filling, although this step isn’t usually necessary.
4. Can I freeze Mini Apple Pies?
Absolutely. Allow the baked pies to cool completely, then freeze them in a single layer.
Once firm, transfer them to an airtight freezer-safe container.
Store them for approximately 2–3 months for the best quality.
Thaw them in the refrigerator and reheat in the oven to restore their crisp texture.
5. Can I use homemade pie crust instead of refrigerated dough?
Yes. Homemade pie crust works beautifully in this recipe.
Prepare enough dough for two standard 9-inch pie crusts, then roll it to approximately 1/8-inch thickness.
Cut circles for the muffin cups and use the remaining pastry for the tops.
Homemade dough may require slightly different baking times, so watch the pies closely as they bake.
Conclusion
Mini Apple Pies offer a simple and delicious way to enjoy the classic flavors of homemade apple pie without preparing a large dessert.
With flaky golden pastry, tender cinnamon-spiced apples, and just the right amount of sweetness, these individual treats bring warmth and comfort to any occasion.
The recipe also makes baking easier. Refrigerated pie crusts save preparation time, while a muffin tin creates convenient portions that are perfect for sharing.
Whether you’re preparing Thanksgiving desserts, hosting a family gathering, or baking something sweet for the weekend, these little pies make a delightful addition to your table.
You can customize them with caramel, warm spices, crumb toppings, or decorative pastry shapes. Plus, they store and freeze well, making them convenient for planning ahead.
Serve your Mini Apple Pies warm with vanilla ice cream, add a drizzle of caramel sauce, or enjoy them just as they are.
With their beautiful golden crusts and comforting apple filling, these bite-sized desserts may quickly become a favorite homemade treat.