No-Bake Banana Pudding Cheesecake combines everything people love about classic banana pudding with the rich, creamy texture of cheesecake. A buttery vanilla-wafer crust holds a fluffy banana cheesecake filling, while fresh banana slices tucked inside add real fruit flavor. Whipped cream and extra vanilla wafers finish the top for a nostalgic dessert that looks beautiful without requiring an oven.
Because No-Bake Banana Pudding Cheesecake needs only about 25 minutes of active preparation, it works especially well for holidays, potlucks, birthdays, family dinners, and warm-weather gatherings. The refrigerator handles the rest. After at least six hours of chilling, the filling becomes firm enough to slice while staying soft and creamy.
The recipe also keeps the flavor familiar. Instant banana cream pudding provides dependable banana flavor and helps the cheesecake set, while cream cheese adds richness and a gentle tang. Meanwhile, freshly whipped cream makes the filling lighter than a traditional baked cheesecake.
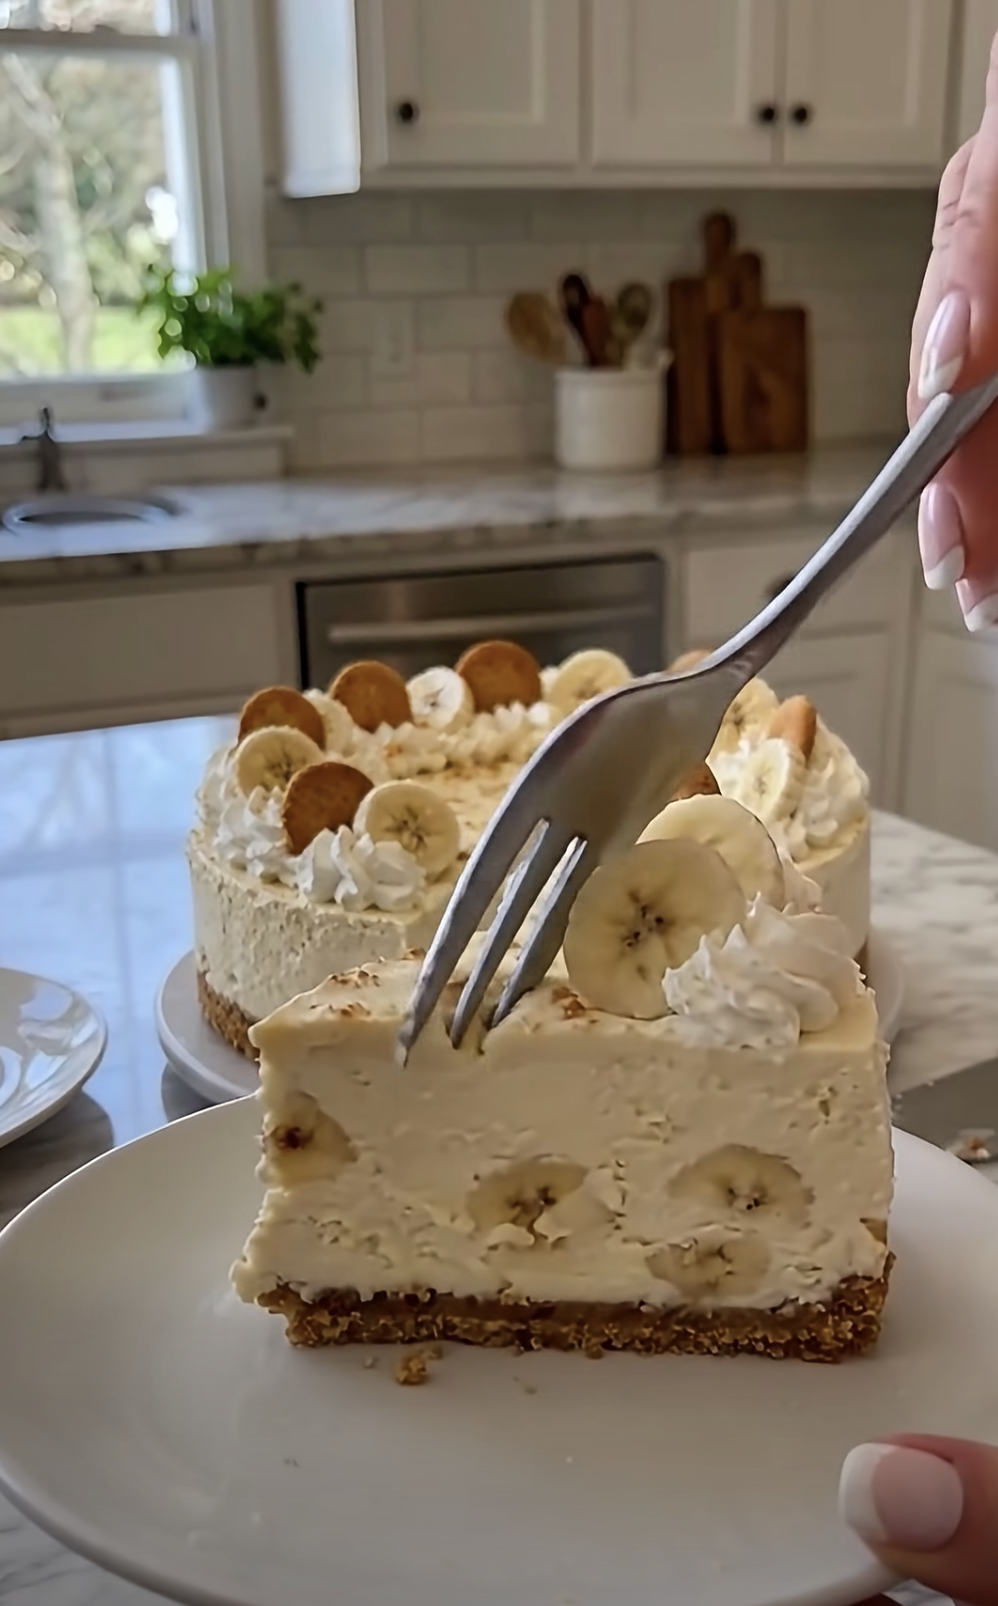
I first made a banana pudding cheesecake when I wanted the nostalgic flavor of banana pudding but needed something that looked a little more special on a dessert table. I crushed vanilla wafers for the crust, layered fresh bananas inside the creamy filling, and left the cheesecake in the refrigerator overnight. The next day, I added whipped cream, extra wafers, and fresh banana slices just before serving. The first slice showed a thick creamy center with bananas hidden inside, and everyone immediately recognized the familiar banana-pudding flavor. Since then, I have appreciated how such a simple no-bake dessert can feel both comforting and impressive.
Building the Perfect Vanilla-Wafer Cheesecake Base
Make a Firm Buttery Vanilla-Wafer Crust
The crust gives No-Bake Banana Pudding Cheesecake its first layer of classic banana-pudding flavor.
Start with 2½ cups vanilla wafer crumbs. You can make them in a food processor by pulsing the cookies until they become fine crumbs. Alternatively, place the wafers in a sturdy zip-top bag and crush them with a rolling pin.
Fine crumbs produce the most stable crust. However, a few slightly larger pieces add a pleasant bit of texture.
Transfer the crumbs to a medium bowl.
Add ½ cup melted unsalted butter and 2 tablespoons granulated sugar.
Stir until the crumbs resemble wet sand.
Every portion should look evenly coated with butter because the butter helps the crust stay together after chilling.
Next, transfer the crumb mixture to a 9-inch springform pan.
Spread it evenly across the bottom.
Then press the crumbs down firmly.
A flat-bottomed measuring cup works especially well because it creates an even surface and compresses the crumbs without making a mess.
Pay extra attention around the outer edge. A well-compacted crust makes each slice of No-Bake Banana Pudding Cheesecake easier to lift from the pan.
Once the crust feels firm, place the springform pan in the refrigerator.
Chill it for 20 to 30 minutes while you prepare the filling.
Ingredients
Equipment
Method
- Combine the vanilla wafer crumbs, melted butter, and granulated sugar until the mixture resembles wet sand.
- Press the crumb mixture firmly and evenly into the bottom of a 9-inch springform pan.
- Refrigerate the crust for 20 to 30 minutes while preparing the filling.
- Whisk the instant banana cream pudding mix with 1 cup cold whole milk for about 2 minutes, then let it stand for 5 minutes to thicken.
- Beat the softened cream cheese and powdered sugar for 2 to 3 minutes until completely smooth, then mix in the vanilla extract.
- Beat the prepared banana pudding into the cream cheese mixture until smooth and evenly combined.
- In a separate bowl, beat the cold heavy whipping cream until stiff peaks form.
- Gently fold the whipped cream into the banana cheesecake mixture until fluffy and evenly combined.
- Toss the two sliced bananas gently with fresh lemon juice to help slow browning.
- Spread approximately half of the cheesecake filling evenly over the chilled vanilla-wafer crust.
- Arrange the lemon-coated banana slices over the filling, keeping them slightly away from the outer edge.
- Spread the remaining cheesecake filling over the banana layer and smooth the top.
- Cover and refrigerate for at least 6 hours, preferably overnight, until firm enough to slice.
- Before serving, top with whipped cream or whipped topping, fresh banana slices, whole vanilla wafers, and crushed vanilla-wafer crumbs.
- Release the cheesecake carefully from the springform pan, slice while thoroughly chilled, and serve.
Notes
Why Chilling the Crust Matters
Because this cheesecake never goes into the oven, refrigeration provides the structure that baking would normally create.
As the crust chills, the melted butter becomes firm again. Consequently, the vanilla wafer crumbs bind together into a sturdy base.
If you add the cheesecake filling immediately after pressing the crumbs into the pan, the crust can shift or mix into the creamy layer.
Instead, that short 20-to-30-minute chill makes assembly much easier.
You can prepare the pudding and cheesecake filling during this time, so the chilling step does not add much extra work.
Avoid placing a warm springform pan in the freezer to speed things up. Although brief freezer chilling can work, ordinary refrigeration gives the crust plenty of time to firm without making it excessively hard.
The vanilla-wafer crust also contributes more than structure.
Its buttery sweetness complements both the banana filling and the fresh banana slices. Meanwhile, its slightly crisp texture contrasts with the soft cheesecake.
That combination gives No-Bake Banana Pudding Cheesecake the same comforting flavor profile as banana pudding while still feeling like a cheesecake.
Making the Fluffy Banana Cheesecake Filling
Combine the Pudding and Cream Cheese Smoothly
Start the filling by preparing the banana pudding.
Add one 3.4-ounce box of instant banana cream pudding mix to a bowl.
Pour in 1 cup cold whole milk.
Whisk for about 2 minutes.
Then let the mixture stand for approximately 5 minutes.
During this short rest, the pudding becomes noticeably thicker.
Cold milk matters because instant pudding sets most effectively when the liquid stays cold.
While the pudding thickens, place 16 ounces softened cream cheese in a large mixing bowl.
Beat it for 2 to 3 minutes until completely smooth.
Then add ¾ cup powdered sugar and continue beating.
Add 1 teaspoon vanilla extract.
The mixture should look creamy and free of lumps.
Properly softened cream cheese makes a major difference here. Cold cream cheese can leave small pieces throughout the filling, while softened cream cheese blends easily with the pudding.
Once the cream cheese mixture feels smooth, add the prepared banana pudding.
Beat until everything becomes evenly combined.
At this point, the filling for No-Bake Banana Pudding Cheesecake will taste rich and strongly flavored with banana, but it will still feel fairly dense.
The whipped cream added next creates the lighter texture that makes this no-bake cheesecake so appealing.
Fold in Freshly Whipped Cream
Pour 1½ cups cold heavy whipping cream into a separate mixing bowl.
Beat the cream until stiff peaks form.
When you lift the beaters, the whipped cream should hold its shape instead of immediately collapsing.
However, stop once you reach stiff peaks.
Overbeating can make the cream grainy.
Add about one-third of the whipped cream to the banana cheesecake mixture.
Fold it in gently with a rubber spatula.
This first addition loosens the cream cheese mixture and makes the remaining cream easier to incorporate.
Next, fold in the remaining whipped cream in two additions.
Use slow, broad movements.
Rather than stirring rapidly, lift the mixture from the bottom and fold it over the top.
Continue only until everything looks evenly combined.
The finished filling should feel fluffy, thick, and smooth.
This texture makes No-Bake Banana Pudding Cheesecake lighter than many traditional cheesecakes while still providing enough structure to hold a slice after chilling.
Avoid using an electric mixer for this final folding step.
Although the mixer would combine the ingredients quickly, it could also knock too much air from the whipped cream.
Once the filling looks uniform, keep it cool while you prepare the fresh bananas.
Layering Fresh Bananas and Chilling the Cheesecake
Add Bananas Without Making the Filling Watery
Slice two medium ripe bananas.
Choose bananas that taste sweet and ripe but still feel firm enough to hold their shape.
Very soft bananas can become mushy inside the cheesecake.
Place the banana slices in a bowl.
Add 1 tablespoon fresh lemon juice.
Toss gently until the slices receive a light coating.
The lemon juice helps slow browning, although it will not stop oxidation permanently.
Therefore, keep the amount modest.
Too much lemon juice could add unnecessary liquid and tartness.
Remove the chilled crust from the refrigerator.
Spread approximately half of the banana cheesecake filling across the crust.
Smooth it into an even layer.
Then arrange the sliced bananas over the filling.
Keep them slightly away from the outer edge of the springform pan.
This approach helps prevent visible banana slices from discoloring along the sides and creates cleaner-looking servings.
Arrange the bananas in a single layer rather than piling them.
That way, every slice of No-Bake Banana Pudding Cheesecake contains fresh banana without developing an overly soft center.
Spoon the remaining cheesecake mixture over the bananas.
Spread it gently so you do not disturb the fruit underneath.
Then smooth the surface with an offset spatula.
Chill for at Least Six Hours
Once assembled, cover the springform pan carefully.
Make sure the covering does not touch the surface of the cheesecake.
Refrigerate No-Bake Banana Pudding Cheesecake for at least 6 hours.
For the cleanest slices, chill it overnight.
This extended resting period allows the pudding, cream cheese, and whipped cream mixture to firm.
Meanwhile, the crust becomes more cohesive and slightly softer, creating a pleasant texture that cuts cleanly with the cheesecake.
Do not rush this step.
After only a couple of hours, the filling may still taste delicious, but it can slump when you remove the springform ring or cut a slice.
Overnight chilling provides the most dependable structure.
Keep the cheesecake on a flat refrigerator shelf throughout the chilling period.
Once fully chilled, gently run a thin knife around the inside edge of the springform pan if needed.
Then release the outer ring carefully.
If the sides look slightly soft, place the cheesecake back in the refrigerator for a little longer before decorating.
No-Bake Banana Pudding Cheesecake should remain cold until shortly before serving because the creamy filling softens as it warms.
Decorating, Serving, and Storing the Cheesecake
Add Fresh Toppings Just Before Serving
Once the cheesecake has fully chilled, add the final decorations.
Spread or pipe 1½ cups whipped cream or whipped topping across the surface.
You can cover the entire top or create decorative swirls around the edge.
Next, add 8 to 10 vanilla wafers.
Arrange the cookies whole, break them into halves, or stand them upright around the outside edge.
Sprinkle crushed vanilla wafers over the remaining surface.
Finally, slice one fresh banana and arrange the pieces on top.
Add those final banana slices shortly before serving.
Even though lemon juice can slow browning, exposed banana slices will eventually darken.
Waiting until serving time gives No-Bake Banana Pudding Cheesecake the freshest appearance.
For extra texture, leave a few larger wafer pieces mixed with the crumbs.
You can also place one vanilla wafer beside each piped whipped cream swirl.
The decorating style can stay simple.
The creamy filling, golden wafers, and fresh bananas already create an attractive combination.
Most importantly, keep the finished cheesecake refrigerated until you are ready to cut it.
Slice Cleanly and Store Leftovers Properly
For the neatest servings, use a sharp knife.
You can dip the blade in warm water, wipe it completely dry, and then make the first cut.
Clean the knife between every slice.
This technique prevents cheesecake filling and crumbs from dragging across the next piece.
No-Bake Banana Pudding Cheesecake makes about 10 to 12 servings, depending on how generously you cut it.
Because the dessert feels rich and creamy, moderate slices work well.
Serve it directly from the refrigerator.
If you plan to keep it on a buffet, avoid leaving it at room temperature longer than necessary.
Store leftovers covered in the refrigerator for up to 3 days.
The cheesecake itself holds well, although the fresh bananas gradually soften and darken over time.
For that reason, add only as many fresh banana slices to the top as you expect to serve immediately.
You can always add more before serving leftovers later.
The vanilla wafers on top will also become softer after extended refrigeration.
If you prefer them crisp, add fresh wafers to individual servings instead of decorating the entire cheesecake far in advance.
Frequently Asked Questions
Can I make No-Bake Banana Pudding Cheesecake the day before?
Yes. In fact, overnight chilling produces the firmest texture and cleanest slices. Assemble the cheesecake the previous day, then add the whipped cream, fresh banana slices, and decorative vanilla wafers shortly before serving.
Why does the recipe use instant banana cream pudding?
Instant pudding provides banana flavor while also helping the filling become thick and stable without baking. Use instant pudding rather than cook-and-serve pudding because the two products set differently.
How can I keep the bananas from turning brown?
Toss the banana slices used inside the cheesecake with a small amount of fresh lemon juice. For the decorative banana slices on top, cut and add them shortly before serving.
Can I use whipped topping instead of homemade whipped cream?
Yes. The topping can use whipped topping or freshly whipped cream. However, the cheesecake filling specifically uses 1½ cups heavy whipping cream whipped to stiff peaks for its light, fluffy texture.
How long does No-Bake Banana Pudding Cheesecake keep?
Keep it covered in the refrigerator for up to 3 days. For the best appearance, add fresh banana garnish and extra vanilla wafers only shortly before serving.
Conclusion
No-Bake Banana Pudding Cheesecake combines two familiar desserts in one creamy, make-ahead treat.
The vanilla-wafer crust provides a buttery foundation and instantly brings classic banana pudding to mind.
Meanwhile, softened cream cheese, powdered sugar, vanilla, banana cream pudding, and freshly whipped cream create a thick but fluffy cheesecake filling.
Fresh banana slices hidden in the center add real fruit flavor, while the final whipped cream, wafers, and banana garnish make the dessert look ready for a special occasion.
Best of all, No-Bake Banana Pudding Cheesecake requires no oven.
You need about 25 minutes to prepare the components and assemble the layers. Then the refrigerator takes over.
Allow at least 6 hours of chilling, although overnight refrigeration gives the cheesecake its best structure.
For clean slices, keep it cold and wipe the knife between cuts.
Whether you serve it for a birthday, holiday, potluck, cookout, Sunday dinner, or simple family dessert, No-Bake Banana Pudding Cheesecake delivers the nostalgic sweetness of banana pudding with the rich, creamy texture of cheesecake.