Before we dive in, I just want to say—thank you for being here. Whether you’re a fellow crafter, a parent looking for a fun project with the kids, or just someone who’s curious about trying something new, I’m truly glad you’ve stopped by. This DIY melted bead suncatcher tutorial is a joyful, colorful craft that brings light (literally!) into your home or garden—and I’m so excited to share it with you!
💌 Want this craft tutorial delivered straight to your inbox? Don’t miss a thing—subscribe now to get creative inspiration, crafts, and recipes sent directly to you!
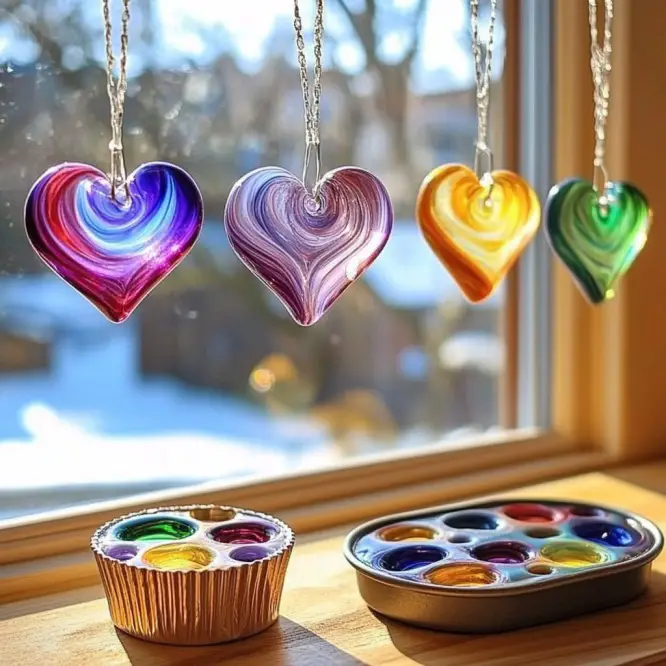
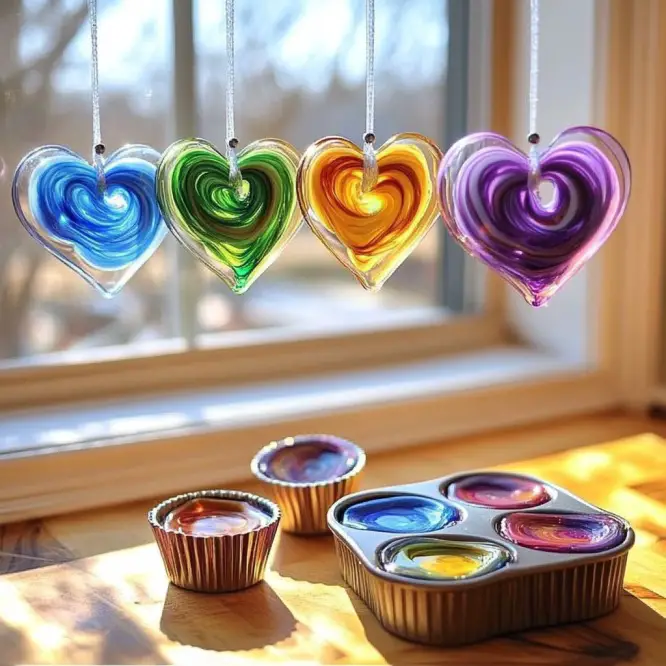
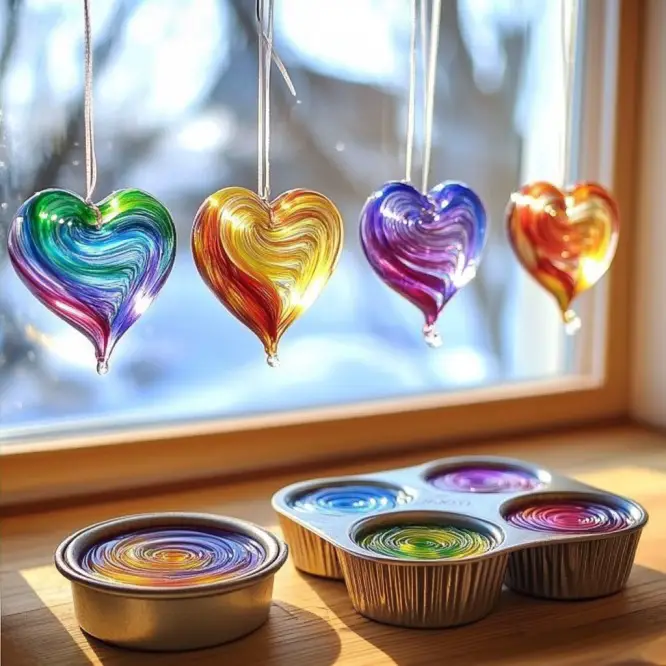
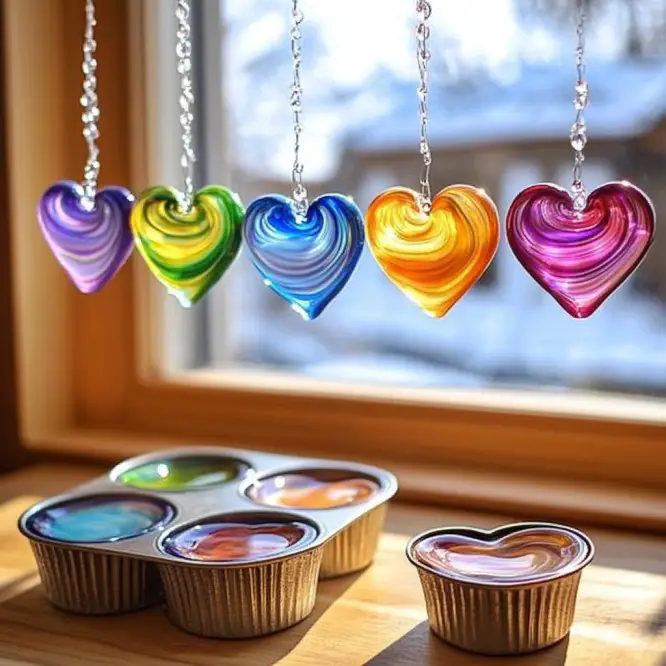
What Are Melted Bead Suncatchers?
Melted bead suncatchers are vibrant, glass-like ornaments made by melting translucent pony beads in metal molds. They’re stunning in windows, gardens, or hanging from trees—wherever sunlight can beam through and set them aglow.
Whether you’re making them for summer fun, seasonal decorations, or sweet handmade gifts, these suncatchers are a cheerful, beginner-friendly craft that feels like magic as it transforms simple plastic beads into something beautiful!
Why You’ll Love This Craft
✨ Easy and quick – Great for all ages (yes, adults too!).
🎨 Creative expression – Mix and match colors and shapes.
🌞 Light-catching beauty – They literally sparkle in the sun!
🎁 Gifting gold – Handmade gifts with personal flair.
📆 Perfect for seasonal décor – Just switch up the mold shapes!
What Do Melted Bead Suncatchers Look and Feel Like?
Imagine sunbeams dancing through vibrant, candy-colored gems—that’s what these look like! The beads melt into a smooth, glassy disc that feels sturdy and looks like stained glass, without the fuss or tools.
And the smell? Don’t worry, we bake them quick and safe with plenty of ventilation—it’s a little plasticky while baking, but that fades fast, leaving only the beauty behind!
Benefits of Making These Suncatchers
- Unleash your creativity – no two designs are the same.
- Kids LOVE them – an ideal rainy day or summer activity.
- Minimal mess and tools – easy to clean up and reuse.
- Budget-friendly – uses inexpensive, accessible materials.
🧺 What You’ll Need
Ingredients & Tools:
- Translucent plastic pony beads – assorted colors
- Metal baking molds, muffin tins, or cookie cutters
- Baking tray
- Parchment paper or foil
- Optional: Nonstick spray (just a light coat)
- Drill or heated skewer – for the hanging hole
- Fishing line, string, or ribbon – for hanging
🛠️ Tip: Cookie cutters are perfect for custom shapes! Hearts, stars, butterflies—anything goes.
🎨 Optional Add-Ons & Substitutions
- Try glitter beads or glow-in-the-dark beads for added flair!
- Use cookie cutters inside muffin tins for layered shapes.
- No drill? Use a hot metal skewer (adult-only task!) to make holes.
🧑🍳 Step-by-Step Instructions
1. Prep Your Tray
Preheat your oven to 400°F (204°C). Line a baking tray with parchment paper or foil. Lightly spray molds with nonstick spray if desired.
2. Create Your Design
Arrange translucent pony beads in a single, flat layer in each mold. Beads should be touching for the best melt. Don’t stack!
3. Bake the Magic
Place the molds on your tray and bake for 15–25 minutes, checking around the 15-minute mark. Beads should be fully melted but not brown.
🌬️ Ventilation matters! Melted plastic can give off fumes—crack a window or use a fan.
4. Cool Completely
Remove from the oven and let cool fully before removing from molds. This prevents cracking and ensures a perfect finish.
5. Make a Hanging Hole
Using a drill or heated skewer, gently create a hole near the top of your design once it’s cooled.
6. String It Up
Thread a piece of fishing line, ribbon, or string through the hole. Tie a loop and hang it somewhere bright and sunny!
🖼️ How to Display Your Suncatcher
- Hang in a sunny window
- Drape from tree branches
- Use as a mobile or wind chime accent
- Add to gift wrap for a personal touch

💡 Tips for Stunning Suncatchers
- Let kids design their own color combos—endless fun!
- For cleaner shapes, use metal molds with smooth edges.
- Avoid beads that are opaque—they won’t catch the light well.
- Test a few beads first to understand their melting behavior.
🧊 Storage Tips
Not that you’ll be putting them away for long! But if you do:
- Store in a cool, dry place
- Wrap in tissue to avoid scratches
- Avoid direct pressure—they’re sturdy, but not unbreakable
📚 FAQ – Let’s Clear Up the Curious Questions
Can I use silicone molds instead of metal?
Silicone is not recommended—it doesn’t hold its shape under high heat. Stick to metal molds or cookie cutters.
Do all pony beads melt the same?
Nope! Use translucent plastic pony beads, not opaque or glitter-filled ones (unless labeled safe for melting).
Is this safe to do with kids?
Yes—with supervision! Kids can arrange the beads, but adults should handle the baking and drilling steps.
Can I make these outside?
Yes! If you have a toaster oven or grill, this can be a great outdoor project to avoid indoor fumes.
💖 In Conclusion…
Melted bead suncatchers are the kind of project that just makes you smile. They’re vibrant, easy to make, and so satisfying to watch as sunlight filters through your handmade creation. Whether you’re crafting with kids, decorating for the season, or making gifts with heart, these suncatchers are anything but ordinary.
I hope this tutorial brings a little extra color and joy into your day. 💫
🍑 More Fun (and Colorful!) Projects to Try
- Stained Glass Tissue Paper Art
- DIY Painted Garden Rocks
- Homemade Window Clings with Gelatin
📸 Share Your Suncatchers!
Made this project? I love seeing your creations!
👉 Tag me on Pinterest or Instagram and show off your sparkling suncatchers!
💬 Leave a comment below and tell me how yours turned out!
🥣 Approximate Materials & Craft Time Info
| Item | Quantity Needed |
|---|---|
| Pony Beads | 1-2 cups depending on size |
| Bake Time | 15–25 minutes |
| Craft Time (Start to Hang) | ~45 minutes |
| Difficulty | Easy/Beginner-Friendly |
Stay crafty, stay bright—and keep chasing the light 🌈
With love and glue fingers,
Melted Bead Suncatchers
Ingredients
Method
- Preheat your oven to 400°F (204°C). Line a baking tray with parchment paper or foil.
- Lightly spray molds with nonstick spray if desired.
- Arrange translucent pony beads in a single, flat layer in each mold. Beads should be touching for the best melt. Don’t stack!
- Place the molds on your tray and bake for 15–25 minutes, checking around the 15-minute mark. Beads should be fully melted but not brown.
- Ensure proper ventilation while baking to avoid fumes.
- Remove from the oven and let cool completely before removing from molds to prevent cracking.
- Using a drill or heated skewer, gently create a hole near the top of your design once it’s cooled.
- Thread a piece of fishing line, ribbon, or string through the hole, tie a loop, and hang it somewhere bright and sunny!


