First of all—thank you for being here. If you’re reading this, chances are you’re either a fellow lover of sea-themed crafts, a parent looking for a fun afternoon activity, or just someone craving a little creative escape. Whichever it is, I’m so glad you found your way here! This Jellyfish Salt Painting project is one of those whimsical, hands-on experiences that invites color, texture, and imagination to come to life—all with just a few everyday supplies.
Want more creative activities like this one delivered straight to your inbox? Subscribe to get new project ideas, recipes, and DIY delights right when they drop.
What Is Jellyfish Salt Painting?
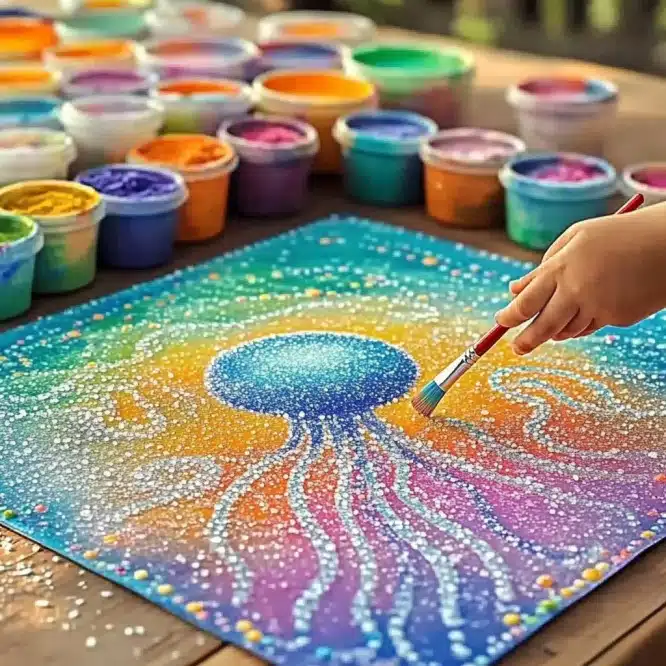
This delightful art activity combines glue, salt, and watercolor to create a textured, shimmering jellyfish that seems to float right off the paper. It’s equal parts science and creativity—the way the paint travels along the salt lines is nothing short of mesmerizing.
It’s perfect for all skill levels (yes, even if your last artistic endeavor was a stick figure in third grade). Whether you’re crafting with kids or indulging in a little solo art therapy, this project has something for everyone.
Why You’ll Love This Craft
- Sensory delight! From squeezing glue to watching color bloom along salty paths, it’s a treat for the senses.
- Minimal materials, maximum magic. You likely have most of these items on hand.
- Teaches basic art principles. Kids learn about absorption, diffusion, and texture.
- Completely customizable. Make it bold and vibrant or soft and dreamy—the jellyfish is your canvas!
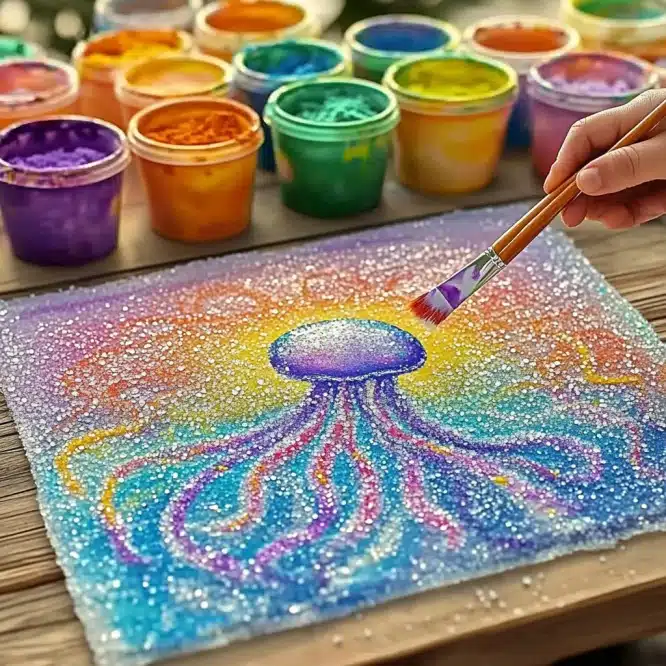
What Does Jellyfish Salt Painting Look and Feel Like?
The final result is part painting, part sculpture. The salt gives the artwork a crystalline texture that sparkles under the light, while the colors blend and diffuse in surprising, beautiful ways. No two pieces will ever be alike, and that’s half the fun!
Benefits of This Art Project
- Promotes fine motor skills and hand-eye coordination in younger artists.
- Provides a calming, mindful experience (great for both kids and adults).
- Encourages creativity and self-expression with color choices and design.
- A perfect rainy day or weekend activity for indoor entertainment.
Ingredients & Materials You’ll Need
- White cardstock or watercolor paper
- White school glue (the good ol’ Elmer’s kind works perfectly)
- Table salt (regular granulated)
- Watercolor paints or liquid food coloring
- Paintbrushes or droppers
- Small cups or a paint palette
- A tray or baking sheet to contain the mess
Optional Additions & Substitutions
- Swap out white glue for clear glue if you want a slightly different visual effect.
- Use textured watercolor paper for more dramatic salt spread.
- Don’t stop at jellyfish! Try seahorses, coral, or even underwater treasure chests.
- Want a touch of glitter? Add some while the glue is still wet (before the salt).
Step-by-Step Instructions
1. Prepare Your Workspace
Lay your cardstock or watercolor paper flat on a tray or baking sheet. This makes cleanup easy and keeps your project stable.
2. Draw With Glue
Use your white glue to draw the outline of a jellyfish. Make sure to create a dome-shaped top and flowing tentacles—this is where the magic will happen!
3. Sprinkle the Salt
While the glue is still wet, generously coat it with salt. Shake off any excess salt gently, leaving a textured salt outline.
4. Mix Your Colors
In small cups or a paint palette, mix your watercolors or food coloring with a touch of water. Choose colors that make you smile.
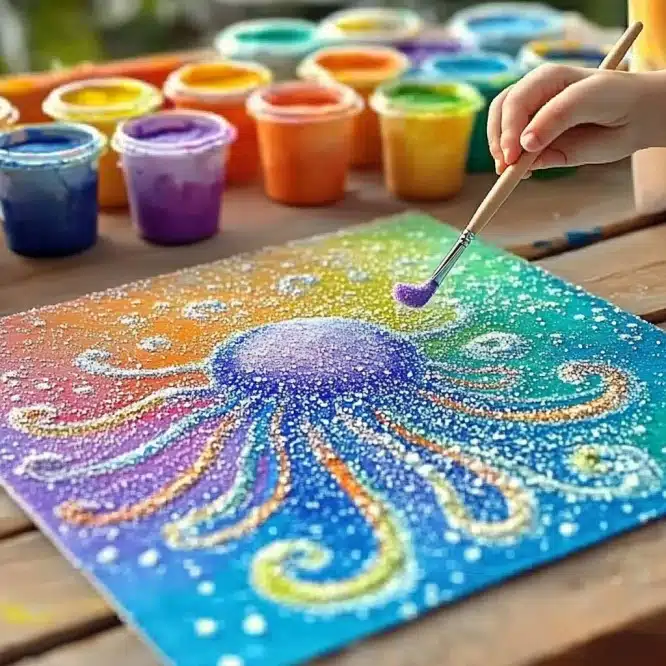
5. Add Color With a Brush or Dropper
Dip your paintbrush or dropper into the color and gently touch it to the salted glue. Watch the color bloom and travel along the lines like magic!
6. Experiment & Enjoy
Play with different colors and let them blend naturally. Each jellyfish will be unique, like ocean snowflakes.
7. Let It Dry
Set your masterpiece aside to dry fully. It could take several hours depending on humidity—this is the hard part, but so worth it.
8. Admire or Display
Once dry, enjoy the textured, shimmery look! Frame it, hang it on the fridge, or gift it to someone special.
What to Pair with This Craft
While your painting dries, why not:
- Make a beach-themed snack mix with goldfish crackers and pretzels.
- Read a favorite underwater-themed book.
- Watch an ocean documentary to fuel more inspiration for your next salt painting.
Tips for Best Results
- Don’t rush the drying time—patience pays off with brilliant colors!
- Avoid using too much water in your paints; a thicker pigment gives better saturation.
- Keep a paper towel nearby to dab extra moisture or clean brushes between colors.
How to Store Your Salt Painting
Once completely dry:
- Keep it flat in a cool, dry place.
- Avoid stacking heavy items on top to preserve the texture.
- If displaying, consider placing it in a shadowbox or behind glassless frames to avoid crushing the salt.
General Info
- Activity Time: ~30 minutes (plus drying time)
- Age Range: 3 and up (younger children may need help with glue and salt)
- Difficulty: Easy
- Mess Level: Moderate (but worth it!!)
Frequently Asked Questions
Can I use Epsom salt or sea salt instead of table salt?
You can experiment, but finer salt usually works best for absorbing and spreading color.
Will the salt fall off over time?
Some shedding may occur. A light spray of fixative (optional) can help preserve your artwork.
Can I frame my salt painting?
Yes! Use a shadowbox or remove the glass to avoid crushing the raised salt texture.
Is food coloring safe to use for kids?
Absolutely—as long as it’s used for art and not consumed. It’s non-toxic and vibrant!
Final Thoughts
This Jellyfish Salt Painting is more than just an art project—it’s a moment of magic, wonder, and creativity. It’s proof that with a few household items and a splash of color, you can make something beautiful and unexpected. Whether you’re crafting with your kids or diving into some solo creative time, I hope this project brings as much joy to your day as it has to mine.
More Crafts You Might Love
- Salt Painted Seahorses
- Watercolor Bubble Art
- Ocean Slime with Glitter Shells
- Paper Plate Porthole Craft
Share Your Artwork!
Did you try this craft? I’d LOVE to see what you created!
📌 Pin it on Pinterest, tag your photos with #OceanSaltCrafts, or drop a comment below and let me know how it turned out!
Nutritional Information
Haha—none needed for this one (unless you’re tempted to taste the glue… please don’t 😅).
But if you want a real treat after crafting, check out my peach cobbler crumble bars or salted caramel peach hand pies for a sweet reward.
Let the ocean-inspired creativity begin!
Jellyfish Salt Painting
Ingredients
Method
- Lay your cardstock or watercolor paper flat on a tray or baking sheet.
- Use white glue to draw the outline of a jellyfish, including a dome-shaped top and flowing tentacles.
- While the glue is wet, generously coat it with salt and shake off any excess.
- In small cups or a paint palette, mix your watercolors or food coloring with a touch of water.
- Dip your paintbrush or dropper into the color and gently touch it to the salted glue.
- Play with different colors and let them blend naturally.
- Set your masterpiece aside to dry fully, which could take several hours.
- Once dry, frame it, hang it on the fridge, or gift it to someone special.