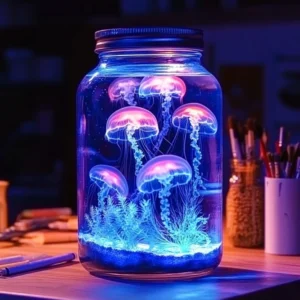
Whether you’re planning a rainy day activity, a fun science project, or a glowing surprise for your child’s room, this Glow-in-the-Dark Aquarium Jar is a perfect craft to light up any occasion. Because it’s easy, creative, and mesmerizing, this DIY project captivates kids and adults alike. Since it combines hands-on art with sensory stimulation, it doubles as both decoration and entertainment. Although it mimics a real aquarium, it requires no maintenance, which makes it ideal for busy families. Therefore, if you’re looking for an engaging activity that’s equal parts science and sparkle, this glow jar is your go-to solution.
Why You’ll Love This Glow-in-the-Dark Aquarium Jar
Although there are countless DIY projects for kids, few are as magical, mess-free, and mesmerizing as this aquarium jar. Firstly, it taps into the excitement kids naturally feel when playing with water and glowing objects. Additionally, it encourages creativity through painting, arranging, and assembling miniature sea creatures. Because the project is customizable at every step, it works well for a wide range of ages and skill levels. Even better, the glowing effect adds a mystical touch that continues to delight long after the craft is complete.
While many crafts require extensive supervision or cleanup, this one uses simple household items and minimal setup. Consequently, it’s perfect for weekend afternoons, birthday party stations, or even classroom science experiments. Moreover, it introduces basic principles of light absorption and fluorescence, making it educational as well as fun. Since the glowing magic is activated by light, kids get a built-in lesson on how energy transforms.
Ultimately, what makes this aquarium jar irresistible is the sense of ownership it offers children. Because they get to paint, decorate, and design their own underwater world, they feel proud of their final product. So, whether you’re creating one for a themed sleepover or gifting it as a nightlight alternative, this project is sure to spark joy.
Ingredients: Everything You’ll Need
Before diving into the fun, it’s important to gather all your materials so the crafting process flows smoothly. Thankfully, the list is short and budget-friendly, with many items available at dollar stores or craft shops.
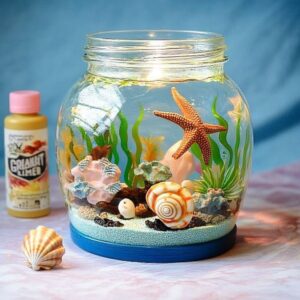
1 clear glass jar or plastic mason jar (with lid) – This forms the base of your aquarium and keeps everything sealed.
Water (enough to fill jar ¾ full) – This serves as your ocean medium and helps suspend all your decorations.
1–2 tablespoons of glow-in-the-dark or fluorescent paint (non-toxic) – This creates the magical glow effect.
Small plastic sea creatures (fish, turtles, starfish, etc.) – These bring your ocean scene to life.
Aquarium gravel or blue decorative stones (about ¼ cup) – These mimic the sea floor and provide weight.
Glitter (optional) – For an extra dose of sparkle and shimmer.
Small plastic plants or aquarium decorations (optional) – These add depth and realism to your jar.
UV blacklight or strong flashlight – Essential for activating the glow.
Optional: a drop of blue food coloring – To tint the water for a more oceanic feel.
Necessary Tools
Although this project requires only a few tools, having them ready ensures a stress-free experience from start to finish. Because preparation is half the fun, kids can help you gather and organize the items.
Small paintbrushes – For painting the sea creatures with glow-in-the-dark paint.
Paper towels or a drying tray – To lay out the creatures as they dry.
Mixing spoon or craft stick – To stir the paint and water together evenly.
Paper plate or old newspaper – To catch any messes while painting.
Funnel or measuring cup with spout – For pouring water into the jar without spilling.
Ingredient Swaps and Additions
Although the base recipe is easy and effective, it also leaves room for creative swaps and enhancements. For instance, if you don’t have aquarium gravel, you can use colored sand, marbles, or polished pebbles. Similarly, instead of plastic sea animals, you can repurpose small toys from vending machines or party favors.
Moreover, if your child prefers a specific color scheme, consider using glow paints in pinks, purples, or neon greens for a galaxy or fantasy theme. Since some glow paints react better under UV light, you can also test different brands for maximum luminescence.
Additionally, if you’re avoiding liquid paint, you can opt for glow-in-the-dark stickers or nail polish to coat the creatures. Furthermore, adding a few drops of glycerin can slow the movement of floating objects, giving your aquarium a lava-lamp effect. Ultimately, this craft adapts beautifully to your child’s imagination.
Step-by-Step Instructions
Now that you’re ready to start, follow these simple yet detailed instructions to bring your Glow-in-the-Dark Aquarium Jar to life. Because each step builds on the last, it’s important to follow the order carefully for the best results.
Step 1: Paint the Sea Creatures
To begin, lay out your plastic sea creatures on a clean, flat surface lined with paper or a tray. Then, using a small paintbrush, apply glow-in-the-dark or fluorescent paint to each creature, covering as much surface as possible. Because the paint needs time to dry fully, let the creatures rest for 30–60 minutes, depending on the paint thickness.
During this time, encourage your child to paint with patterns—like stripes, dots, or fins—to give each animal personality. Although it’s tempting to rush, ensuring the paint is completely dry prevents it from washing off later.
Step 2: Build the Ocean Floor
Next, take your clean jar and pour in the gravel or decorative stones until the bottom is fully covered. Because this adds both texture and weight, it helps keep the sea creatures anchored once the water is added. If you’re using glitter or plastic plants, sprinkle them in now so they settle naturally into the base.
Step 3: Assemble Your Aquarium
Once your sea creatures are dry, gently place them into the jar on top of the gravel. Although the pieces may shift slightly once the water is added, placing them with care helps create a balanced look. Then, slowly pour water into the jar until it is about ¾ full. Because sudden pouring can cause bubbles or splashes, use a funnel or spouted measuring cup to control the flow.
At this point, add one drop of blue food coloring if desired and stir gently to distribute the tint. Be careful not to shake the jar too vigorously, as that could disturb the layout or create foam.
Step 4: Add the Glow Paint
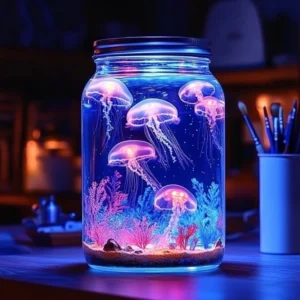
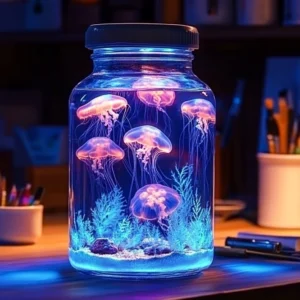
Now it’s time to infuse your underwater world with glowing magic. Stir in 1–2 tablespoons of glow-in-the-dark paint, mixing it thoroughly with a craft stick or spoon. Although the paint may appear slightly cloudy in daylight, it will glow brilliantly once charged under light. Once mixed, seal the jar tightly with its lid to prevent leaks.
Step 5: Charge and Display
Finally, activate the glow by placing your jar in bright sunlight, near a lamp, or under a blacklight for several minutes. Because glow-in-the-dark materials absorb light and release it slowly, this charging step is crucial. Once charged, turn off the lights and watch the jar transform into a glowing ocean dreamscape!
Pro Tips for Success
Because crafting with kids can be unpredictable, these expert tips will help you avoid common pitfalls and make the process even more enjoyable:
Use non-toxic glow paint: Always check the label to ensure your paint is safe for children and water exposure.
Don’t overfill the jar: Leaving room at the top helps prevent leaks and gives decorations space to float gently.
Secure the lid tightly: Especially if the jar will be handled frequently, a firm seal prevents spills and keeps the display intact.
Charge regularly: For a consistent glow, recharge the jar by placing it under light daily.
Test in the dark: Before sealing everything, test your paint and lighting effect in a dark room to ensure you’re satisfied.
Serving Suggestions (Creative Display Ideas)
Although this aquarium jar isn’t edible, it serves as a beautiful display piece in multiple contexts. For example, place it on a windowsill during the day to absorb sunlight and glow at night. Alternatively, use it as a gentle nightlight in your child’s bedroom for a calming bedtime routine.
Because it’s fully sealed, you can also take it on the go—to birthday parties, school presentations, or sleepovers. Additionally, group several jars with different themes (jungle, galaxy, or dinosaurs) to create a glowing collection. Since each jar can reflect a child’s unique taste, it makes an excellent personalized gift.
Storing and Reheating (Glow Maintenance)
While this jar doesn’t require traditional storage, there are ways to keep it glowing long-term. First, store it in a cool, dry place away from direct moisture to protect the materials inside. Although the water will stay clear for weeks, replace it if it becomes cloudy or if paint starts to flake.
Because glow effects diminish without light exposure, recharge the jar daily with UV light or direct sunlight. If the glow fades significantly, simply add a bit more glow paint and stir. Since the decorations remain intact, refreshing the water or paint extends the life of your jar.
Nutritional Information
Although this project isn’t food-related, here’s a “nutritional” breakdown of what it feeds your child’s mind and senses:
Creativity Boost: High
Fine Motor Skills: Excellent
STEM Learning: Moderate
Sensory Engagement: High
Parental Stress: Low
Screen-Free Entertainment: Excellent
FAQs
1. Can I use real fish or water animals in the jar?
No, this jar is strictly decorative and not designed to support live animals. Because it includes paint and non-edible items, it’s unsafe for living creatures.
2. How long will the glow last?
Depending on the paint used and charging time, the glow can last 30 minutes to several hours. However, you can recharge it as often as needed.
3. Can I use a plastic water bottle instead of a jar?
Yes, as long as it’s clear and has a secure lid, plastic bottles can work. However, jars offer more space and a better view of the decorations.
4. Will the paint mix into the water completely?
Some paints may remain slightly suspended or settle at the bottom, but this won’t affect the glow. Stir well before sealing for best results.
5. Is it okay to shake the jar for a snow globe effect?
While you can gently shake the jar, vigorous movement may loosen paint or decorations. Use glitter for a sparkly swirl instead.
Conclusion
Because this craft combines glow, creativity, and water play, the Glow-in-the-Dark Aquarium Jar offers an unforgettable DIY experience. Whether you’re planning a quiet afternoon or a glowing celebration, this easy project adds color, science, and joy to any setting. Since kids can customize it endlessly, every jar becomes a personal ocean in a bottle. So gather your supplies, activate the glow, and dive into a world of underwater wonder today.