Christmas Ornament Oreo Balls are creamy, chocolatey, and beautifully decorated no-bake holiday treats that look just like miniature Christmas ornaments. Each bite combines crushed Oreo cookies, smooth cream cheese, and a sweet chocolate coating.
These colorful Christmas desserts make a wonderful addition to holiday parties, cookie exchanges, dessert platters, and homemade gift boxes.
The best part? You don’t need an oven.
Instead, you mix Oreo cookie crumbs with cream cheese, roll the mixture into balls, and chill them until firm. Then you dip the balls in white, red, and green chocolate coatings.
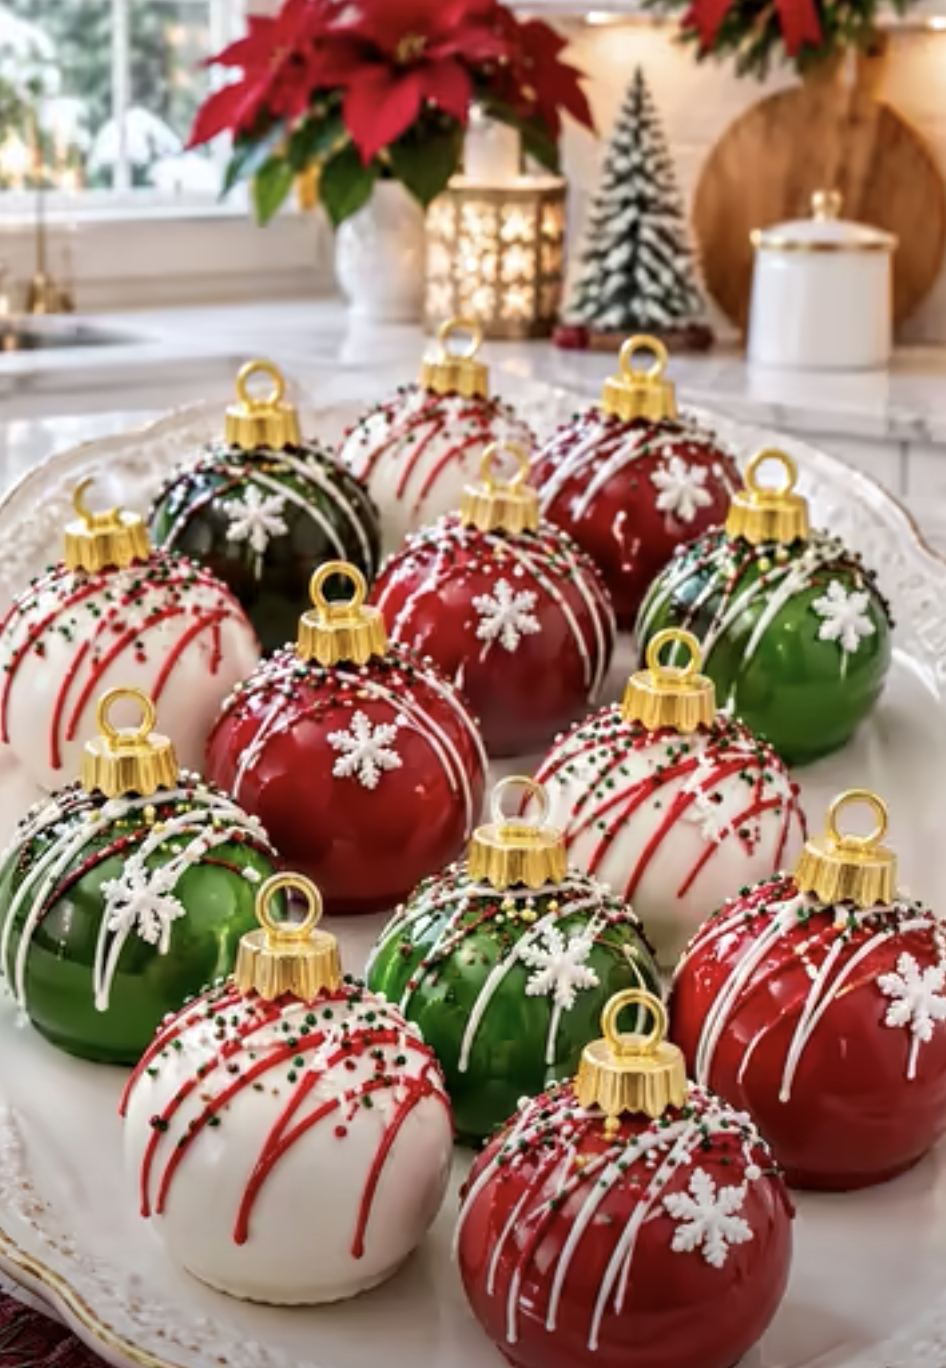
Finally, edible gold ornament toppers, colorful chocolate drizzles, and festive sprinkles transform the simple truffles into beautiful Christmas decorations.
The finished treats look impressive, but the preparation remains beginner-friendly.
You only need a food processor, a few mixing bowls, parchment paper, and some basic decorating supplies.
Another advantage is the make-ahead convenience. You can prepare these Christmas Ornament Oreo Balls before a holiday gathering and keep them refrigerated until serving.
Their rich chocolate flavor and creamy texture make them especially appealing to anyone who loves Oreo desserts.
Meanwhile, the festive colors create a cheerful presentation that looks beautiful on a Christmas dessert table.
30 minActive prep
50 minTotal chilling
24Oreo balls
Plan for approximately 1 hour 20 minutes or longer, including both chilling stages and decorating time.
I first made these ornament-style Oreo balls when I wanted a Christmas dessert that looked festive without spending hours baking cookies. I had Oreo cookies and cream cheese in the kitchen, so I decided to turn a simple truffle recipe into colorful holiday ornaments. I dipped some in white chocolate and coated the others in red and green candy melts. The little gold toppers made the biggest difference. Suddenly, the truffles looked like tiny Christmas decorations. I arranged them on a rectangular platter, alternating the colors, and they became one of the most popular treats at our family gathering. Now I love making them whenever I need a festive homemade gift.
Christmas Ornament Oreo Balls: Delightful Festive Treats!
Ingredients
Equipment
Method
- Place all 36 Oreo cookies, including cream filling, in food processor. Process until fine crumbs form.
- Add softened cream cheese and vanilla extract to Oreo crumbs. Process until smooth, thick dough forms.
- Divide mixture into 24 equal portions and roll each into smooth ball. Arrange on parchment-lined baking sheet.
- Refrigerate Oreo balls approximately 30 minutes or freeze 15–20 minutes until firm.
- Place white chocolate melting wafers, red candy melts, and green candy melts in three separate microwave-safe bowls. Heat each in 20-second intervals, stirring between intervals until smooth. Add up to 1 teaspoon coconut oil per bowl only if needed.
- Dip 8 Oreo balls into white chocolate, 8 into red candy melts, and 8 into green candy melts. Allow excess coating to drip off and return balls to parchment paper.
- While coating remains slightly soft, attach 1 small edible gold ornament topper to each ball. Allow coating to set.
- Melt additional white, red, and green candy melts separately. Transfer each color to small piping bag.
- Drizzle contrasting chocolate lines over coated Oreo balls. Immediately add Christmas sprinkles and edible white snowflake sprinkles before drizzle hardens.
- Refrigerate decorated Oreo balls approximately 20 minutes until firm. Arrange on rectangular serving platter, alternating red, green, and white ornaments. Keep chilled until serving.
Notes
Why You’ll Love Christmas Ornament Oreo Balls
Creamy Oreo Centers with Sweet Chocolate Coatings
One of the biggest reasons to love Christmas Ornament Oreo Balls is their rich, creamy texture.
The filling combines crushed Oreo cookies with softened cream cheese.
Together, these ingredients create a thick chocolate mixture that tastes similar to a cookies-and-cream truffle.
Meanwhile, vanilla extract adds a subtle sweetness and rounds out the flavor.
Another advantage is the smooth chocolate coating.
White chocolate melting wafers create a sweet, creamy shell.
Red and green candy melts add festive color without requiring complicated food coloring techniques.
As the coating sets, it creates a delicate outer layer around the soft Oreo filling.
The contrast between the firm shell and creamy center makes every bite satisfying.
Another important detail is the chilling step.
Cold Oreo balls hold their shape better during dipping.
Therefore, refrigerate the rolled filling before coating.
This also helps prevent crumbs from mixing into the melted chocolate.
Another benefit is the no-bake preparation.
You don’t need to preheat an oven or prepare cookie dough from scratch.
Instead, the food processor handles most of the mixing.
Another useful tip is to use the entire Oreo cookie, including the cream filling.
The cookie cream contributes sweetness and helps create the proper texture.
Removing it would change the consistency.
Another advantage is the flexible coating.
You can make eight white ornaments, eight red ornaments, and eight green ornaments.
This creates a balanced holiday color palette.
Finally, finish the treats with contrasting chocolate drizzles and festive sprinkles.
The combination of creamy Oreo filling, colorful coatings, and decorative details creates a beautiful homemade Christmas dessert.
Beautiful No-Bake Treats for Christmas Parties and Gifts
Christmas Ornament Oreo Balls are especially appealing because they look like miniature holiday decorations.
Their round shape resembles classic Christmas tree ornaments.
Meanwhile, the red, green, and white coatings create a traditional festive color scheme.
The edible gold toppers complete the ornament appearance.
Another advantage is the individual serving size.
The recipe makes approximately twenty-four Oreo balls.
Therefore, you can easily arrange them on a dessert platter or divide them into small gift boxes.
Another benefit is the simple presentation.
You don’t need elaborate cake stands or complicated decorations.
A rectangular serving platter works beautifully.
Arrange the finished ornaments in alternating colors.
Then place them in neat rows for a polished appearance.
Another useful tip is to choose small edible ornament toppers that match the size of the truffles.
Oversized decorations can overwhelm the treats.
Another important detail is the topping material.
Use decorations specifically labeled as edible.
Avoid plastic ornament hooks, metallic craft decorations, or nonfood embellishments.
Another reason to love this recipe is the make-ahead convenience.
You can prepare the Oreo balls before your holiday gathering.
Then refrigerate them until serving.
This reduces last-minute dessert preparation.
Another advantage is the flexible decorating process.
You can create simple drizzled ornaments.
Alternatively, add snowflake sprinkles and colorful sugar decorations.
Both styles look festive.
Another useful tip is to decorate while the chocolate drizzle remains soft.
This helps the sprinkles adhere.
Finally, serve the treats slightly chilled.
The filling stays creamy, while the chocolate coating maintains its shape.
Whether you’re preparing a Christmas cookie exchange, family party, or homemade holiday gift, these festive Oreo balls deliver delicious flavor and a beautiful presentation.
Choosing the Best Ingredients for Holiday Oreo Balls
Oreo Cookies, Cream Cheese, and Vanilla Extract
The foundation of Christmas Ornament Oreo Balls starts with thirty-six Oreo cookies.
Use the entire cookies, including their cream filling.
The chocolate cookies provide rich flavor.
Meanwhile, the cream filling contributes sweetness and helps create a smooth mixture.
For the best results, crush the cookies into very fine crumbs.
A food processor makes this process quick and easy.
However, you can also place the cookies in a sturdy resealable bag and crush them with a rolling pin.
Another important detail is the crumb texture.
The crumbs should resemble damp sand.
Large cookie pieces can make the truffles difficult to shape.
Therefore, process the cookies until the mixture looks uniform.
Next, prepare eight ounces of cream cheese.
Use full-fat block cream cheese for the most reliable texture.
Allow it to soften before mixing.
Softened cream cheese blends more easily with the Oreo crumbs.
Meanwhile, cold cream cheese may leave small lumps.
Another useful tip is to avoid whipped cream cheese.
Whipped varieties contain more air and can create a softer filling.
Next, add one teaspoon of vanilla extract.
Vanilla complements the chocolate cookies and cream cheese.
It also adds a pleasant aroma.
Another advantage is the short ingredient list.
The filling requires only three ingredients.
You don’t need flour, eggs, or baking powder.
Another important detail is the mixture’s consistency.
After combining the ingredients, the filling should feel thick and slightly sticky.
It should hold together when you press it.
If the mixture feels too soft, refrigerate it briefly before rolling.
Next, scoop the mixture into approximately twenty-four portions.
Roll each portion between your palms.
Try to create smooth, evenly sized balls.
Finally, arrange the balls on a parchment-lined baking sheet.
Chill until firm before dipping.
White Chocolate, Candy Melts, and Edible Decorations
The coating gives Christmas Ornament Oreo Balls their beautiful holiday appearance.
You’ll need twelve ounces of white chocolate melting wafers.
White chocolate creates a creamy, sweet shell.
Next, prepare six ounces of red candy melts and six ounces of green candy melts.
These colorful coatings make it easy to create festive ornaments.
Another advantage is the convenience.
Candy melts already contain color.
Therefore, you don’t need to add food coloring.
For the best results, melt each color separately.
Use microwave-safe bowls.
Heat in short intervals, stirring frequently.
Another important detail is temperature.
Overheated candy melts can become thick or grainy.
Therefore, use twenty-second microwave intervals and stir between each one.
Next, prepare three teaspoons of coconut oil.
Use it only if the melted coatings need thinning.
Add up to one teaspoon per bowl.
Stir until the coating becomes smooth and easy to dip.
Another useful tip is to add the coconut oil gradually.
Too much oil can affect the coating’s texture.
Next, prepare the decorating ingredients.
You’ll need one-quarter cup of white candy melts for drizzling.
Also prepare two tablespoons of red candy melts and two tablespoons of green candy melts.
These extra coatings create contrasting decorative lines.
Another essential ingredient is Christmas sprinkles.
Use approximately three tablespoons of red, green, and white sprinkles.
Next, prepare one tablespoon of edible white snowflake sprinkles.
These add a delicate winter-themed detail.
Finally, prepare twenty-four small edible gold ornament toppers.
Choose food-safe decorations that resemble the caps of Christmas ornaments.
Another important detail is the size.
Small toppers look more natural on round Oreo truffles.
Together, the colorful coatings, chocolate drizzles, sprinkles, and gold toppers transform simple Oreo balls into festive Christmas treats.
How to Make Christmas Ornament Oreo Balls Step by Step
Crushing the Cookies and Shaping the Oreo Filling
Making Christmas Ornament Oreo Balls begins with preparing the cookie filling.
First, place thirty-six Oreo cookies in a food processor.
Include the chocolate cookies and cream centers.
Process until fine crumbs form.
The mixture should resemble damp sand.
Another useful tip is to pulse the food processor several times.
This helps break down the cookies evenly.
Next, add eight ounces of softened cream cheese.
Then add one teaspoon of vanilla extract.
Process again until the ingredients form a thick, smooth dough.
Another important detail is the filling texture.
The mixture should hold together when pressed.
However, it shouldn’t feel excessively wet.
Next, transfer the mixture to a mixing bowl if necessary.
Use a cookie scoop or tablespoon to divide it into approximately twenty-four portions.
Roll each portion into a smooth ball.
Aim for similar sizes.
This helps the ornaments look consistent.
Another useful tip is to use slightly damp hands if the mixture sticks.
However, avoid adding excess water.
Next, line a baking sheet with parchment paper.
Arrange the Oreo balls in neat rows.
Leave a little space between them.
Another important detail is chilling.
Place the baking sheet in the refrigerator for approximately thirty minutes.
Alternatively, freeze the balls for fifteen to twenty minutes.
The filling should become firm enough to dip without falling apart.
However, avoid freezing the balls solid for an extended period.
Very cold centers can cause condensation or cracking in the coating as they warm.
Next, prepare three microwave-safe bowls.
You’ll use one for white chocolate, one for red candy melts, and one for green candy melts.
Finally, organize the sprinkles and edible gold toppers.
Having everything ready makes decorating much easier.
Dipping, Decorating, and Chilling the Christmas Ornaments
After chilling the Oreo balls, prepare the chocolate coatings.
Place twelve ounces of white chocolate melting wafers in one microwave-safe bowl.
Place six ounces of red candy melts in another.
Then place six ounces of green candy melts in a third bowl.
Melt each coating separately.
Use twenty-second microwave intervals.
Stir between intervals until smooth.
Another important detail is the consistency.
The melted coating should flow easily from a spoon.
If necessary, add up to one teaspoon of coconut oil to each bowl.
Stir until smooth.
Next, remove the chilled Oreo balls from the refrigerator.
Work with a few at a time.
Dip eight balls into the white chocolate.
Then dip eight into the red coating.
Finally, dip the remaining eight into the green coating.
Another useful tip is to use a fork or dipping tool.
Lower each ball into the coating.
Then lift it carefully.
Allow excess chocolate to drip back into the bowl.
Next, return the coated balls to the parchment-lined baking sheet.
While the coating remains slightly soft, attach one edible gold ornament topper to each ball.
Another important detail is the topper placement.
Position it near the top center so the truffle resembles a hanging ornament.
Next, allow the coating to set.
Meanwhile, melt the remaining white, red, and green candy melts separately.
Transfer them to small piping bags.
Snip a tiny opening in each bag.
Then drizzle thin lines across the ornaments.
Another useful tip is to use contrasting colors.
White drizzle looks beautiful on red and green ornaments.
Meanwhile, red and green lines create festive patterns on white ornaments.
Next, immediately add Christmas sprinkles and edible snowflakes.
Work before the drizzle hardens.
Finally, refrigerate the decorated Oreo balls for approximately twenty minutes.
This helps the coatings and decorations set firmly.
Arrange the finished ornaments on a rectangular platter, alternating red, green, and white.
Serve chilled or after a short rest at cool room temperature.
Serving, Storing, and Customizing Your Christmas Oreo Balls
Holiday Dessert Platters, Cookie Exchanges, and Homemade Gifts
Christmas Ornament Oreo Balls make a beautiful centerpiece for a festive dessert table.
Their colorful coatings and decorative toppers create a cheerful holiday appearance.
One of the best serving options is a rectangular platter.
Arrange the ornaments in alternating rows of red, green, and white.
This creates a balanced presentation.
Another advantage is the individual size.
Guests can easily pick up one or two Oreo balls.
Therefore, you don’t need to cut or portion the dessert.
Another useful tip is to place the ornaments in small paper candy cups.
This makes them easier to handle.
It also helps protect the decorations.
Another excellent occasion is a Christmas cookie exchange.
Although these treats aren’t traditional baked cookies, their rich Oreo filling and chocolate coating make them a delicious addition.
Another wonderful option is homemade holiday gifting.
Place several ornaments in a food-safe gift box.
Use small paper cups to separate them.
Then keep the box refrigerated until gifting.
Another important detail is temperature.
Because the filling contains cream cheese, keep the treats chilled during storage and transportation.
For a party, serve smaller batches and replenish the platter from the refrigerator.
Another advantage is the flexible presentation.
You can create a simple red-and-green arrangement.
Alternatively, include all three colors for a classic Christmas look.
Another useful tip is to keep the decorative patterns varied.
Some ornaments can feature diagonal chocolate drizzles.
Others can include snowflake sprinkles.
Meanwhile, a few can have simple colorful sugar decorations.
Finally, place the edible gold toppers facing upward.
This makes the ornaments look more realistic.
The finished platter will showcase creamy chocolate truffles that resemble miniature Christmas decorations.
Make-Ahead Tips, Refrigeration, Freezing, and Decorating Variations
Proper storage helps Christmas Ornament Oreo Balls maintain their flavor and appearance.
Because the filling contains cream cheese, refrigeration is important.
After decorating, place the finished balls in an airtight container.
Separate layers with parchment paper.
This helps protect the chocolate coating and delicate decorations.
For the best quality, refrigerate the treats for up to five days.
Another advantage is the make-ahead convenience.
You can prepare the Oreo filling a day before decorating.
Roll the balls and refrigerate them in a covered container.
Then dip and decorate them the following day.
Another useful tip is to keep the filling cold during dipping.
If the balls begin softening, return them to the refrigerator briefly.
Another important detail is freezing.
You can freeze undecorated Oreo balls for longer storage.
Place them on a parchment-lined tray.
Freeze until firm.
Then transfer them to a freezer-safe container.
For the best quality, use within two months.
Thaw in the refrigerator before coating.
Another option is freezing fully decorated balls.
However, condensation may affect the chocolate finish and delicate decorations.
Therefore, freezing undecorated centers usually produces better results.
Another advantage is the flexible decorating style.
You can create simple white chocolate ornaments with red drizzle.
Alternatively, use green coating with white snowflake sprinkles.
Another variation is adding a small amount of edible shimmer.
However, use only products specifically labeled as edible.
Avoid decorative glitter that isn’t intended for food.
Another useful tip is to keep the chocolate coating smooth.
If the melted coating becomes too thick, warm it briefly and stir.
Add a small amount of coconut oil only when necessary.
Another important detail is the gold ornament topper.
Attach it while the coating remains soft.
This helps it adhere securely.
Finally, keep the finished treats refrigerated until shortly before serving.
With a little planning, these festive Oreo balls make a convenient and beautiful holiday dessert.
Ingredients
Yield: 24 Oreo balls | Active prep: approximately 30 minutes | First chill: 30 minutes | Final chill: 20 minutes | Total elapsed time: approximately 1 hour 20 minutes or longer
For the Oreo filling
- 36 Oreo cookies, including the cream filling
- 8 ounces cream cheese, softened
- 1 teaspoon vanilla extract
For the chocolate coating
- 12 ounces white chocolate melting wafers
- 6 ounces red candy melts
- 6 ounces green candy melts
- Up to 3 teaspoons coconut oil, divided, only if needed for thinning
For drizzling and decorating
- ¼ cup white candy melts, for drizzling
- 2 tablespoons red candy melts, for drizzling
- 2 tablespoons green candy melts, for drizzling
- 3 tablespoons Christmas sprinkles, red, green, and white
- 1 tablespoon edible white snowflake sprinkles
- 24 small edible gold ornament toppers
Instructions
- Crush the Oreos. Place all 36 Oreo cookies, including their cream filling, in a food processor. Process until fine crumbs form.
- Make the filling. Add the softened cream cheese and vanilla extract. Process until the mixture becomes a smooth, thick dough.
- Shape the balls. Divide the mixture into 24 equal portions and roll each into a smooth ball. Arrange on a parchment-lined baking sheet.
- Chill the filling. Refrigerate for approximately 30 minutes, or freeze for 15–20 minutes, until the balls become firm.
- Melt the coatings. Place the white chocolate melting wafers, red candy melts, and green candy melts in three separate microwave-safe bowls. Heat each in 20-second intervals, stirring between intervals until smooth. Add up to 1 teaspoon coconut oil per bowl if needed.
- Dip the Oreo balls. Coat 8 balls in white chocolate, 8 in red candy melts, and 8 in green candy melts. Let excess coating drip off, then return the balls to parchment paper.
- Attach the ornament toppers. While the coating remains slightly soft, attach one small edible gold ornament topper to each ball. Allow the coating to set.
- Prepare the decorative drizzle. Melt the remaining white, red, and green candy melts separately. Transfer each color to a small piping bag.
- Decorate the ornaments. Drizzle contrasting chocolate lines over the coated balls. Immediately add Christmas sprinkles and edible snowflake sprinkles before the drizzle hardens.
- Chill and serve. Refrigerate the decorated Oreo balls for approximately 20 minutes, until firm. Arrange on a rectangular platter, alternating red, green, and white ornaments. Keep chilled until serving.
Frequently Asked Questions
1. Can I make Christmas Ornament Oreo Balls ahead of time?
Yes. You can prepare the Oreo balls one or two days before your holiday gathering. Store them in an airtight container in the refrigerator. For the best appearance, separate layers with parchment paper to protect the decorations.
2. Why are my Oreo balls falling apart when I dip them?
The filling may be too warm or soft. Refrigerate the rolled balls for approximately thirty minutes before dipping. Also, use full-fat block cream cheese and process the cookies into fine crumbs for a firm, smooth mixture.
3. Can I use regular chocolate instead of candy melts?
Yes. You can use suitable melting chocolate or chocolate coating. However, candy melts make it easier to create bright red and green colors. If using real chocolate, you may need to temper it for a firm, glossy finish.
4. How long do Christmas Oreo balls last in the refrigerator?
Store the finished treats in an airtight container in the refrigerator for up to five days for best quality. Keep them chilled because the filling contains cream cheese.
5. Can I freeze Christmas Ornament Oreo Balls?
Yes. For the best results, freeze the undecorated Oreo centers for up to two months. Thaw them in the refrigerator before dipping. You can also freeze decorated balls, but condensation may affect the chocolate coating and sprinkles.
Conclusion
Christmas Ornament Oreo Balls are a fun, delicious, and festive no-bake dessert that combines creamy Oreo filling with colorful chocolate coatings.
The crushed Oreo cookies create a rich chocolate base.
Meanwhile, softened cream cheese gives the filling a smooth, truffle-like texture.
Vanilla adds warmth and sweetness.
Finally, white chocolate, red candy melts, and green candy melts create beautiful holiday colors.
For the best results, crush the cookies finely and mix them thoroughly with the cream cheese.
Then roll the filling into twenty-four equal balls.
Chill until firm.
Next, dip the balls into the colorful coatings.
Attach edible gold ornament toppers while the chocolate remains soft.
Finally, decorate with contrasting chocolate drizzles, festive sprinkles, and edible snowflakes.
After a final chilling period, arrange the ornaments on a platter for a beautiful Christmas presentation.
Whether you’re preparing a holiday party, cookie exchange, family celebration, or homemade gift box, these creamy, chocolatey Oreo ornaments bring festive color and delicious flavor to the occasion.