Introduction
Are you looking for a fun and aromatic way to enhance your home’s atmosphere? DIY aroma stones are a fantastic and easy-to-make craft that not only infuses your space with delightful scents but also doubles as a creative project. Whether you’re a seasoned crafter or a beginner, this simple tutorial will guide you through making your very own aroma stones using just a few ingredients. These stones act as a passive diffuser, gradually releasing fragrance into your home for a continuous, natural scent experience. Best of all, they make great homemade gifts and add a personalized touch to any room.
Why You’ll Love This Recipe
Aroma stones bring together the best of both worlds: a fun, hands-on craft and a simple way to enhance the atmosphere of your home. Not only are these stones beautiful and customizable, but they also serve a functional purpose as air fresheners. Unlike typical store-bought diffusers that require electricity or heat, aroma stones work naturally by absorbing essential oils and slowly releasing the fragrance into the air. The best part? You can create them in any shape or color you desire, so your home will be filled with both lovely scents and a touch of creativity.
Ingredients
To make your own DIY aroma stones, you’ll need the following ingredients:
1 1/2 cups white all-purpose flour – This forms the base of your dough, giving it structure.
1/3 cup salt – Salt helps to harden the stones as they dry, making them durable.
1 teaspoon cornstarch – Cornstarch adds smoothness and helps the dough hold together.
2/3 cup cooled boiled water – The water activates the dough, allowing the ingredients to blend.
1 tablespoon essential oils – Choose your favorite essential oil or create your own blend to give the stones a pleasant scent.
2 teaspoons mica powder or food coloring – These add color to your stones, giving them a decorative look that suits your style.
Necessary Tools
Before you begin, make sure you have these tools on hand:
A large mixing bowl
A spoon or your hands (wear gloves for easier cleanup)
A rolling pin (optional)
Cookie cutters or molds (optional, but great for shaping)
A baking tray or a flat surface for drying
Parchment paper or a silicone mat (to prevent sticking)
An airtight container or plastic wrap for storing
Ingredient Swaps and Additions
While this recipe is simple and versatile, there are several ways to customize it to suit your needs or preferences:
Essential oils: Feel free to experiment with different essential oils like lavender for relaxation, eucalyptus for clarity, or citrus for an energizing aroma. You can also blend oils together to create a unique fragrance.
Mica powder/food coloring: If you prefer natural colors, consider using spices like turmeric or beetroot powder for a more earthy, chemical-free approach.
Other additions: Some people add dried flowers or herbs, such as lavender buds or rose petals, to the dough for a decorative touch. Just be sure to mix them in well to avoid breaking the stone’s structure.
Step-by-Step Instructions
Mix the dry ingredients
Start by combining 1 1/2 cups of all-purpose flour, 1/3 cup of salt, and 1 teaspoon of cornstarch in a large mixing bowl. Stir the dry ingredients together until they are well incorporated. This ensures that the dough will have a smooth texture when mixed with the liquids.Add the liquid ingredients
Next, slowly pour 2/3 cup of cooled boiled water and 1 tablespoon of your favorite essential oils into the bowl with the dry ingredients. Stir using a spoon or, if you prefer, your hands (just be sure to wear gloves to keep things clean). Keep mixing until the dough begins to come together and starts forming a cohesive ball.Add color
Once the dough is combined, it’s time to add color. Choose either 2 teaspoons of mica powder or food coloring, depending on your aesthetic preference. Wear gloves to knead the color into the dough evenly. If the color isn’t as vibrant as you’d like, feel free to add more, a little at a time.Adjust dough consistency
If the dough is too sticky and difficult to work with, don’t worry! Simply add more flour, a little at a time, until the dough reaches a smooth, workable consistency. It should be pliable but not overly wet.Shape your aroma stones
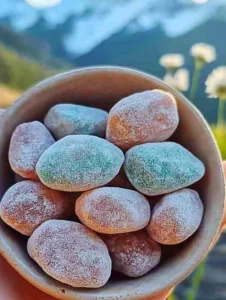
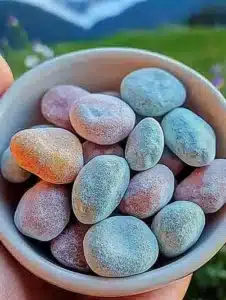
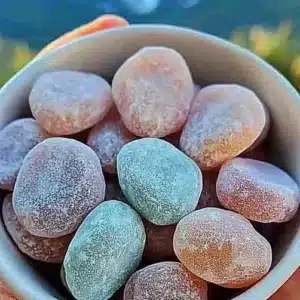
To form the stones, divide the dough into small portions. Roll each portion into a ball and then gently flatten it with your hands to create a stone shape. Alternatively, you can press the dough into molds or cookie cutters to shape the stones in different designs.Let them dry
Once all your stones are shaped, place them on a baking tray lined with parchment paper or a silicone mat. Leave the stones to air dry for several days until they are completely hardened. This step is crucial, so don’t rush it. The longer they dry, the more solid they will become.Use your aroma stones
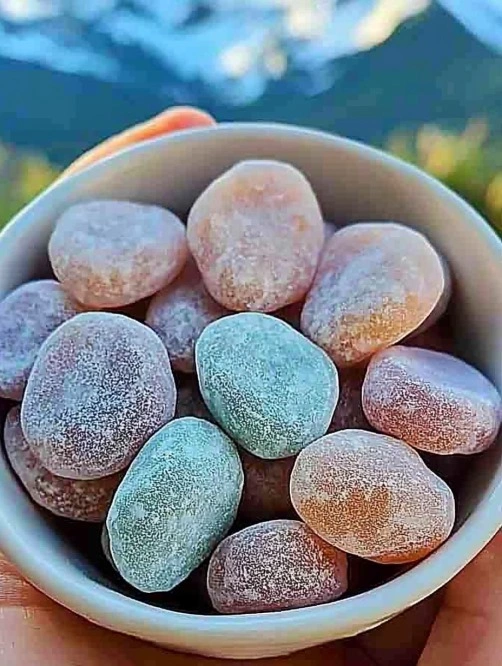
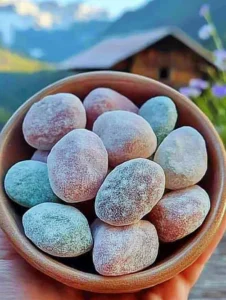
Once your stones are fully dried, they are ready to use! Simply place them in a decorative bowl or tray and enjoy the pleasant aroma as the essential oils are released slowly into the air. You can also refresh the scent by adding more essential oil when the fragrance starts to fade.
Pro Tips for Success
Drying time: Allowing the aroma stones to dry thoroughly is key to achieving a solid, durable result. The drying time can vary depending on humidity and stone thickness, but it typically takes 2–5 days.
Storage: Store the dried stones in a cool, dry place until you’re ready to use them. If you’re gifting them, package them in a decorative box with a small note about how to use them as a diffuser.
Customization: Don’t be afraid to play around with color and scent combinations. Mix calming lavender and refreshing citrus for an uplifting blend, or go for a spa-inspired eucalyptus and peppermint mix.
Serving Suggestions
While aroma stones are primarily used as passive diffusers, you can also get creative with how they’re displayed. For example:
Gift-giving: Wrap a set of aroma stones in a beautiful box or cloth bag for a personalized, handmade gift that’s perfect for birthdays, housewarmings, or special occasions.
Home décor: Place your aroma stones on a decorative tray, alongside candles and plants, to create a calming, aromatic space in any room.
Seasonal variations: Change the scents and colors of the stones to match the season—think peppermint and red for the winter holidays or lavender and light pastels for spring.
Storing and Reheating
The beauty of aroma stones lies in their longevity. Since they don’t require heating or power to work, you can store them in an airtight container for months. If the fragrance fades, simply add more essential oil to refresh the stones. If they get damaged or lose shape, you can rehydrate the dough and reshape the stones to restore their original form.
Nutritional Information
Although this recipe isn’t food-related, it’s still important to mention that these aroma stones are safe to handle but should not be ingested. If you have children or pets in your home, keep the stones out of reach to avoid any potential ingestion.
FAQs
Can I use any essential oils for this recipe?
Yes, you can use any essential oils you like, but make sure you choose oils that are safe for your environment. Some oils, like citrus, can be irritating to pets or children, so it’s always a good idea to research each oil’s properties before use.How long will the aroma stones last?
Once dried, aroma stones can last for several months. The scent may gradually fade over time, but you can easily refresh them with additional essential oils.Can I add glitter or other decorative elements to the stones?
Yes, you can add glitter, beads, or small dried flowers to your dough. Just be sure to incorporate them well into the mixture to prevent the stones from breaking apart.Can I speed up the drying process?
It’s best to let the stones air dry naturally, as heat can cause them to crack. However, if you’re in a rush, you can place them in a dry, well-ventilated area or use a fan to speed up the process.What if my dough is too dry?
If your dough becomes too dry and crumbly, simply add a small amount of water at a time to moisten it until it reaches the right consistency.
Conclusion
DIY aroma stones are a delightful and customizable way to add both fragrance and charm to your home. Whether you’re looking to create a peaceful atmosphere or give a thoughtful gift, these simple stones provide an easy and enjoyable craft project that everyone can try. With endless possibilities for scent and color combinations, you’ll never run out of ways to personalize your aroma stones.
Aroma Stones
Ingredients
Method
- Combine 1 1/2 cups of all-purpose flour, 1/3 cup of salt, and 1 teaspoon of cornstarch in a large mixing bowl.
- Slowly pour 2/3 cup of cooled boiled water and 1 tablespoon of essential oils into the dry ingredients.
- Stir until the dough begins to come together.
- Add 2 teaspoons of mica powder or food coloring and knead until the color is evenly distributed.
- Divide the dough into small portions and shape them into balls. Flatten to form stone shapes.
- Alternatively, press the dough into molds or cookie cutters.
- Place the shaped stones on a baking tray lined with parchment paper or a silicone mat.
- Allow to air dry for several days until completely hardened.
- Once dried, place stones in a decorative bowl or tray to release the aroma.
- Refresh the scent by adding more essential oil when it fades.