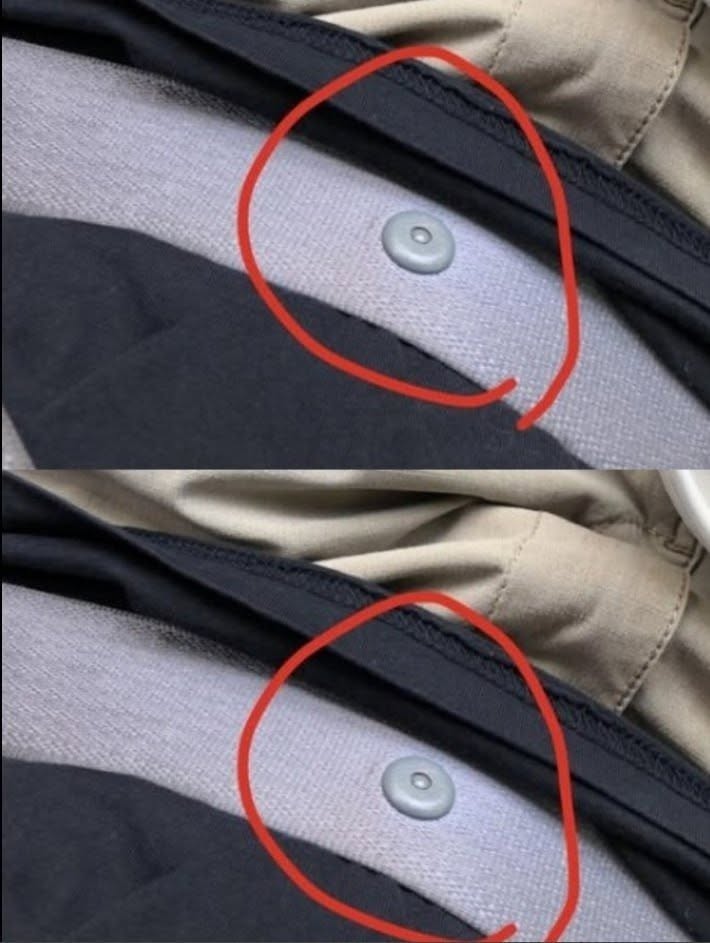
That “Button” on Your Seat Belt may look like an insignificant piece of plastic, yet online posts often attach surprising explanations to it. Some call it a hidden emergency feature. Others claim drivers can use it to change how the restraint works. However, several completely different seat-belt components can look like a “button,” and each serves a specific purpose.
In many vehicles, people who mention a button near the shoulder are actually looking at the adjustable upper anchor on the B-pillar. Meanwhile, a tiny plastic piece attached directly to the belt webbing usually serves another purpose entirely.
Knowing the difference matters because a seat belt works as a carefully designed restraint system. Therefore, drivers and passengers should adjust only the features the vehicle manufacturer designed for adjustment and avoid modifications that could interfere with protection.
I once noticed a small plastic piece on a seat belt while cleaning the inside of a car and realized I had never given it much thought. Someone suggested that it might activate a special safety feature, while another person insisted it controlled the belt’s tension. Instead of experimenting with it, I checked what the different components actually did. The answer turned out to be much simpler. One small piece merely helped position the buckle hardware, while the larger mechanism near the shoulder adjusted belt height. That experience became a useful reminder: familiar objects can attract complicated myths even when their real purpose remains surprisingly practical.
What That “Button” on Your Seat Belt Actually Is
The Shoulder-Belt Height Adjuster
If That “Button” on Your Seat Belt sits on the pillar beside your shoulder rather than directly on the belt webbing, you may be looking at the upper anchor adjustment mechanism.
Many vehicles allow occupants to move the shoulder-belt anchor vertically. Depending on the vehicle, you may press a button, squeeze a release, or move another locking mechanism before sliding the anchor upward or downward.
The goal remains straightforward: improve the position of the shoulder belt across the occupant’s upper body.
A properly positioned lap-and-shoulder belt should cross the middle of the chest and shoulder rather than the neck or face. Likewise, the lap portion should sit low and snug across the hips rather than across the stomach.
However, the exact adjustment procedure differs among vehicles. Therefore, check the owner’s manual before moving an unfamiliar component.
After adjusting the upper anchor, make sure it locks securely into its new position. Then buckle the belt and check its path.
The shoulder portion should remain across the chest and shoulder. It should not run underneath the arm or behind the back.
Moreover, changing the height does not disable the seat belt. It simply changes the location of the upper anchorage when the vehicle includes that adjustment feature.
This distinction matters because viral explanations can make ordinary hardware sound mysterious. In reality, manufacturers provide adjustable anchors primarily to help occupants achieve appropriate belt positioning.
The Tiny Plastic Stop on the Belt
There is another object that people frequently call That “Button” on Your Seat Belt. Look closely at the webbing itself, and you may find a tiny round or rectangular plastic piece attached to it.
This component commonly acts as a stop for the sliding latch plate.
When nobody uses the belt, gravity could otherwise allow the latch plate to slide farther down the webbing. The small stop helps keep it in a convenient position so an occupant can reach the latch plate more easily.
Therefore, this little piece does not normally function as an emergency-release control.
It does not secretly loosen the restraint during a collision. Likewise, pressing it does not activate a special comfort setting.
In fact, it may not operate like a button at all. Although its appearance suggests something you should press, it can simply act as a physical stopper.
That distinction explains why photographs can create confusion online. A close-up picture removes the surrounding context, and suddenly an ordinary plastic stop looks like a mysterious automotive feature.
If the piece breaks or disappears, do not automatically replace it with an improvised object that could damage the webbing. Instead, consult the vehicle manufacturer, dealership, or a qualified repair professional about the correct replacement.
Most importantly, never cut, puncture, burn, sew, or otherwise modify seat-belt webbing to attach an improvised component.
How a Seat Belt Protects You
More Than a Strap and Buckle
A modern three-point seat belt consists of several components working together. Consequently, understanding the system helps explain why modifying one component can create unnecessary risk.
The webbing runs from its anchor points through the latch plate and into the retractor mechanism. Once the latch plate clicks into the buckle, the belt creates restraint across the occupant’s pelvis and upper torso.
During ordinary driving, the retractor often allows enough movement for normal comfort. However, the system can lock the webbing when conditions trigger its locking mechanism.
Many vehicles also incorporate pretensioners. During certain crashes, a pretensioner can rapidly remove slack from the belt to help position the occupant for restraint.
Additionally, load-limiting technology may help manage forces on the occupant during a crash.
These components illustrate why That “Button” on Your Seat Belt should never become the basis for experimental modifications.
A seat belt may look mechanically simple from the passenger compartment. However, the complete restraint system can interact with crash sensors, airbags, pretensioners, seat position, and other safety technology.
Therefore, the safest approach remains simple: use the belt exactly as the manufacturer intended.
Buckle every trip, remove unnecessary slack, and keep the webbing properly positioned.
Proper Belt Position Matters
Even an advanced restraint system depends on appropriate positioning.
First, place the lap belt low across the hips and pelvis. Do not deliberately position it high across the abdomen.
Next, allow the shoulder portion to cross the center of the chest and shoulder.
If your vehicle includes an adjustable upper anchor, move it according to the owner’s manual until you achieve a comfortable and appropriate belt path.
However, never place the shoulder belt behind your back simply because it feels uncomfortable. Likewise, do not route it underneath your arm.
Those positions change how crash forces reach the body and can reduce the protection the three-point restraint was designed to provide.
The same principle applies when someone uses aftermarket clips, clamps, or other devices to create extra slack. Comfort should not come from defeating the restraint’s intended position or function.
Instead, adjust the seat itself when appropriate. Sitting upright and positioning the seat correctly may improve how the belt crosses the body.
Vehicle designs differ, though. Therefore, the owner’s manual remains the best source for instructions specific to a particular model.
For children, proper restraint requires additional consideration. Their age, size, and development determine whether they need a rear-facing car seat, forward-facing seat, booster, or standard vehicle belt.
Consequently, an adult shoulder-belt height adjustment should never substitute for an appropriate child restraint.
Dangerous Seat-Belt Myths You Should Ignore
Myth: The Button Provides an Emergency Release
One persistent claim suggests That “Button” on Your Seat Belt acts as a hidden emergency-release system.
That explanation can confuse several different components.
The ordinary buckle already contains the mechanism designed for releasing a buckled seat belt during normal operation. Meanwhile, the height adjuster changes the upper anchorage position, and the small plastic stop on the webbing commonly keeps the latch plate from sliding too far.
Neither should become a substitute for understanding the actual buckle.
Another myth claims that manipulating the belt can make a collision safer by creating extra slack.
Do not intentionally loosen a seat belt for that reason.
Seat belts work best when occupants wear them snugly and position them properly. Extra slack allows more movement before the restraint can manage the occupant’s motion.
Likewise, never use clips or other objects to prevent the belt from fitting correctly simply because a looser belt feels more comfortable.
Another dangerous idea involves placing the shoulder portion behind the body. While that position removes pressure from the shoulder, it also eliminates the intended upper-body restraint.
Similarly, routing the shoulder portion under the arm changes where forces act during a collision.
Comfort matters during everyday driving. However, you should achieve comfort through manufacturer-provided adjustments rather than defeating the restraint.
Myth: Seat Belts Trap People More Than They Save Them
Some people avoid seat belts because they fear becoming trapped after a collision.
That fear can feel intuitive, especially after seeing dramatic stories involving fires or submerged vehicles. However, those unusual scenarios should not determine everyday restraint use.
During a collision, remaining properly restrained can reduce the chance that an occupant gets thrown around the passenger compartment or ejected from the vehicle.
Additionally, remaining conscious and less seriously injured can improve a person’s ability to respond after a crash.
Another misconception suggests that airbags make seat belts unnecessary.
They do not.
Vehicle manufacturers design supplemental restraint systems to work alongside seat belts rather than replace them. Therefore, occupants should wear seat belts even in vehicles equipped with multiple airbags.
You may also hear that a short trip does not justify buckling up. Yet collision risk does not disappear simply because the destination sits nearby.
Consequently, make buckling automatic before the vehicle moves.
The simplest rule avoids complicated calculations: every appropriate occupant uses the correct restraint on every trip.
Using Seat Belts Correctly Every Day
A Simple Fit Check Before Driving
You do not need mechanical expertise to check basic seat-belt fit.
Start by sitting upright in the seat. Then buckle the latch plate into the correct buckle and allow the belt to settle naturally.
Check the lap portion first. It should sit low and snug across the hips.
Next, inspect the shoulder portion. It should cross your chest and shoulder rather than your face, neck, upper arm, or back.
If That “Button” on Your Seat Belt controls an adjustable upper anchor, use the manufacturer’s instructions to reposition the anchor when necessary. Afterward, verify that the mechanism locks securely.
Also, inspect the webbing occasionally.
Look for obvious cuts, significant fraying, melted areas, contamination, or other visible damage. If you notice a problem, arrange a professional inspection rather than attempting a home repair.
Similarly, pay attention when a buckle fails to latch normally or releases unexpectedly.
Do not spray random lubricants into the buckle or dismantle the mechanism. Instead, follow manufacturer guidance.
After a significant collision, restraint components may also require inspection or replacement even when they appear normal from the outside.
Because recommendations vary among manufacturers and vehicle designs, consult the owner’s manual or manufacturer after a crash.
A few seconds of routine attention can identify obvious problems before they become bigger concerns.
Special Considerations for Children
Children should not simply use an adult seat belt because the shoulder anchor can move lower.
A child needs a restraint appropriate for age, height, weight, development, and applicable local requirements.
A booster seat, for example, helps position the vehicle’s lap-and-shoulder belt correctly on a child who has outgrown a harnessed seat but does not yet fit the adult belt properly.
Generally, an adult belt should fit with the lap portion low across the upper thighs or hips and the shoulder portion across the chest and shoulder. The child should also maintain an appropriate seated position throughout the trip.
Do not route the shoulder belt behind a child because it touches the neck. Likewise, do not place it under the child’s arm.
Instead, determine whether the child still needs a booster or whether another approved seating arrangement provides a better fit.
Additionally, children should ride in the rear seating positions according to applicable child-passenger safety recommendations and vehicle instructions.
Every child restraint also comes with specific installation and usage requirements. Therefore, follow both the child-seat instructions and vehicle owner’s manual.
When questions remain, a certified child-passenger safety technician can provide hands-on assistance.
Frequently Asked Questions
What is the little plastic button directly on seat-belt webbing?
It commonly acts as a stop that prevents the sliding latch plate from dropping too far along the belt when nobody uses it. Despite its appearance, it generally does not function as a control you need to press.
Is the seat-belt height adjuster a safety feature?
It contributes to proper belt positioning by allowing the upper anchorage to accommodate different occupants. However, adjustment designs vary by vehicle, so follow your owner’s manual.
Should the shoulder belt touch my neck?
The shoulder portion should ideally cross the middle of your chest and shoulder rather than your neck or face. If the position feels wrong, use approved seat and anchor adjustments instead of putting the belt behind your back or under your arm.
Can I use a clip to make my seat belt less tight?
Avoid devices or modifications that introduce unnecessary slack or interfere with the belt unless the vehicle manufacturer specifically approves them. Instead, check the seat position, manufacturer-provided adjustments, and owner’s manual.
What should I do if part of my seat belt breaks?
Stop experimenting with the damaged component and arrange appropriate inspection or repair. Seat belts form part of the vehicle’s safety system, so use manufacturer-approved parts and procedures rather than improvised fixes.
Conclusion
That “Button” on Your Seat Belt probably has a much less mysterious purpose than viral posts suggest.
If you see a movable mechanism on the B-pillar near your shoulder, it may control the height of the upper seat-belt anchor. If you see a tiny plastic piece attached directly to the webbing, it may simply prevent the latch plate from sliding too far down the belt.
Neither explanation involves a secret emergency trick.
More importantly, never modify, cut, clamp, puncture, or deliberately loosen a seat belt based on an online claim. Proper restraint depends on the belt sitting snugly across strong areas of the body and working exactly as its manufacturer designed it to work.
When an unfamiliar component causes confusion, check the vehicle owner’s manual. That simple step provides model-specific information and removes the guesswork.
The humble plastic “button” may attract attention online, but the genuinely important feature remains the entire restraint system—and using it correctly every time you get in the car.