Introduction
As summer gracefully transitions into fall, indulge in the refreshing No-Bake Strawberry Cheesecake Delight. This delightful dessert, with its creamy texture and fresh strawberry flavor, is perfect for any occasion, allowing you to enjoy a hint of summer sweetness all year round. The best part? No oven required! Whether you’re a novice or an experienced baker, this recipe is straightforward and yields a delicious, crowd-pleasing treat without the hassle of baking.
Detailed Ingredients
– 1 1/2 cups graham cracker crumbs
– 1/4 cup sugar
– 1/2 cup unsalted butter, melted
– 2 cups fresh strawberries, hulled and quartered
– 3 tablespoons sugar (for the strawberries)
– 16 oz cream cheese, softened
– 1 cup powdered sugar
– 1 teaspoon vanilla extract
– 1 cup heavy whipping cream
– Extra strawberries for garnish (optional)
– Mint leaves for garnish (optional)
Prep Time, Cook Time, Total Time, Yield
Prep Time: 20 minutes
Cook Time: Not applicable
Total Time: 4 hours 20 minutes
Yield: 8 servings
Detailed Directions and Instructions
1. In a medium bowl, mix the graham cracker crumbs and 1/4 cup sugar thoroughly. Stir in the melted butter until the mixture is well combined and achieves a moist, sandy texture.
2. Press the graham cracker mixture firmly into the bottom of a 9-inch springform pan. Use the back of a spoon or a flat-bottomed glass to ensure an even layer. Place the pan in the refrigerator to chill while preparing the filling.
3. In a small bowl, combine the fresh strawberries with 3 tablespoons of sugar. Toss to coat the strawberries evenly and allow them to macerate for about 15 minutes. This process will draw out the juices and enhance their natural sweetness.
4. In a large mixing bowl, beat the softened cream cheese with the powdered sugar and vanilla extract until the mixture is smooth and creamy. Ensure there are no lumps.
5. In a separate bowl, whip the heavy cream until stiff peaks form. This may take a few minutes, so be patient and use a hand mixer or stand mixer for best results.
6. Gently fold the whipped cream into the cream cheese mixture. Use a spatula to combine the two mixtures, being careful not to deflate the whipped cream.
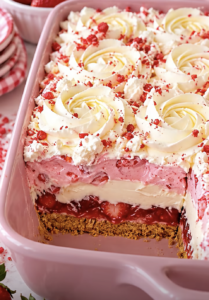
7. Spread half of the cream cheese mixture over the prepared graham cracker crust, smoothing it out with a spatula for an even layer.
8. Add a layer of the macerated strawberries over the cream cheese mixture. Distribute them evenly for a balanced flavor in every bite.
9. Top with the remaining cream cheese mixture, spreading it smoothly over the strawberry layer.
10. Refrigerate the cheesecake for a minimum of 4 hours, or until the filling is set and firm to the touch.
11. Before serving, garnish with extra strawberries and mint leaves, if desired. These garnishes add a touch of elegance and a fresh burst of color to your dessert.
Notes
For a more intense strawberry flavor, consider adding a strawberry sauce swirl on top of the cheesecake before chilling. Simply cook down some strawberries with a bit of sugar and a splash of lemon juice until thickened, then swirl it into the top layer of the cheesecake mixture. This not only adds flavor but also a visually appealing contrast.
Cook Techniques
When pressing the graham cracker crust into the pan, use a flat-bottomed glass for an even layer and compact structure. For a smooth cream cheese mixture, ensure the cream cheese is at room temperature before beating. This prevents lumps and creates a creamy texture. Fold the whipped cream gently into the cream cheese mixture to retain the light, airy texture essential for a no-bake cheesecake. Refrigerate the cheesecake for at least 4 hours to ensure it sets properly and achieves the desired consistency.
FAQ
What can I substitute for graham cracker crumbs?
You can use other crushed cookies like digestive biscuits, Oreo cookies (with the cream removed), or even crushed pretzels for a salty-sweet twist.
Can I use frozen strawberries?
Fresh strawberries are recommended for the best texture and flavor, but if using frozen, make sure to thaw and drain them thoroughly.
How long can I store this cheesecake?
The cheesecake can be stored in the refrigerator, covered, for up to 3 days. For longer storage, you can freeze it for up to 1 month. Thaw in the refrigerator before serving.
Can I make this cheesecake ahead of time?
Yes, this cheesecake is perfect for making a day or two in advance. Just keep it refrigerated until ready to serve.
Conclusion
No-Bake Strawberry Cheesecake Delight is a versatile dessert that brings the essence of summer to any season. Its easy preparation and delicious flavor make it a go-to recipe for family gatherings, potlucks, or simply a treat to enjoy at home. The fresh strawberries, creamy filling, and buttery graham cracker crust combine seamlessly to create a satisfying and delicious dessert that is bound to become a favorite.
More Recipes Suggestions and Combinations
For a variation, try making a mixed berry cheesecake using a combination of strawberries, blueberries, and raspberries. You can also experiment with different crusts like chocolate graham crackers or a nut-based crust. Adding a layer of lemon curd under the cream cheese filling can provide a tangy contrast to the sweet strawberries, creating a delightful flavor profile. Other no-bake desserts to explore include Key Lime Pie, Chocolate Mousse, or a classic Tiramisu. Each of these recipes offers a unique taste experience without the need for an oven, making them perfect for hot days or when you’re short on time.
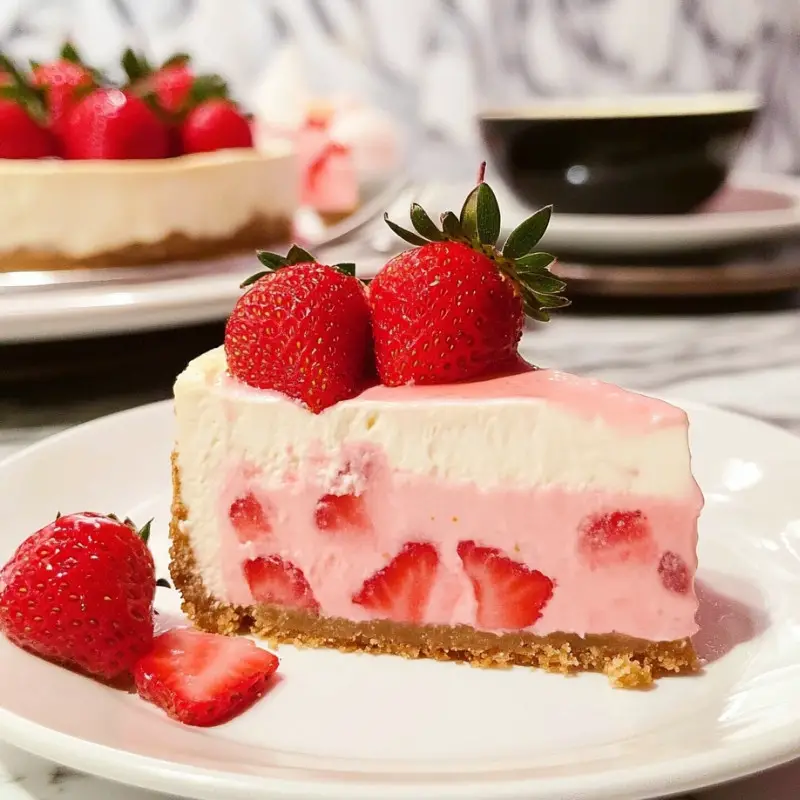
No-Bake Strawberry Cheesecake Delight
Ingredients
For the crust
- 1.5 cups 1 1/2 cups graham cracker crumbs
- 0.25 cups 1/4 cup sugar
- 0.5 cups 1/2 cup unsalted butter, melted
For the filling
- 2 cups 2 cups fresh strawberries, hulled and quartered
- 3 tablespoons 3 tablespoons sugar (for the strawberries) Used to macerate the strawberries
- 16 oz 16 oz cream cheese, softened
- 1 cups 1 cup powdered sugar
- 1 teaspoon 1 teaspoon vanilla extract
- 1 cups 1 cup heavy whipping cream
- to taste Extra strawberries for garnish (optional)
- to taste Mint leaves for garnish (optional)
Instructions
Preparation
- In a medium bowl, mix the graham cracker crumbs and 1/4 cup sugar thoroughly. Stir in the melted butter until the mixture is well combined and achieves a moist, sandy texture.
- Press the graham cracker mixture firmly into the bottom of a 9-inch springform pan. Use the back of a spoon or a flat-bottomed glass to ensure an even layer. Place the pan in the refrigerator to chill while preparing the filling.
- In a small bowl, combine the fresh strawberries with 3 tablespoons of sugar. Toss to coat the strawberries evenly and allow them to macerate for about 15 minutes.
Mixing
- In a large mixing bowl, beat the softened cream cheese with the powdered sugar and vanilla extract until the mixture is smooth and creamy.
- In a separate bowl, whip the heavy cream until stiff peaks form.
- Gently fold the whipped cream into the cream cheese mixture using a spatula.
Assembly
- Spread half of the cream cheese mixture over the prepared graham cracker crust.
- Add a layer of the macerated strawberries over the cream cheese mixture.
- Top with the remaining cream cheese mixture, spreading it smoothly over the strawberry layer.
- Refrigerate the cheesecake for a minimum of 4 hours, or until the filling is set and firm to the touch.
- Before serving, garnish with extra strawberries and mint leaves if desired.