Peanut Butter Oreo No Bake Pie brings together three dessert favorites in one rich, crowd-pleasing treat: chocolate sandwich cookies, creamy peanut butter, and a cool cheesecake-style filling. Instead of baking a traditional pie crust or fussing with complicated layers, you simply crush, mix, spread, chill, and serve.
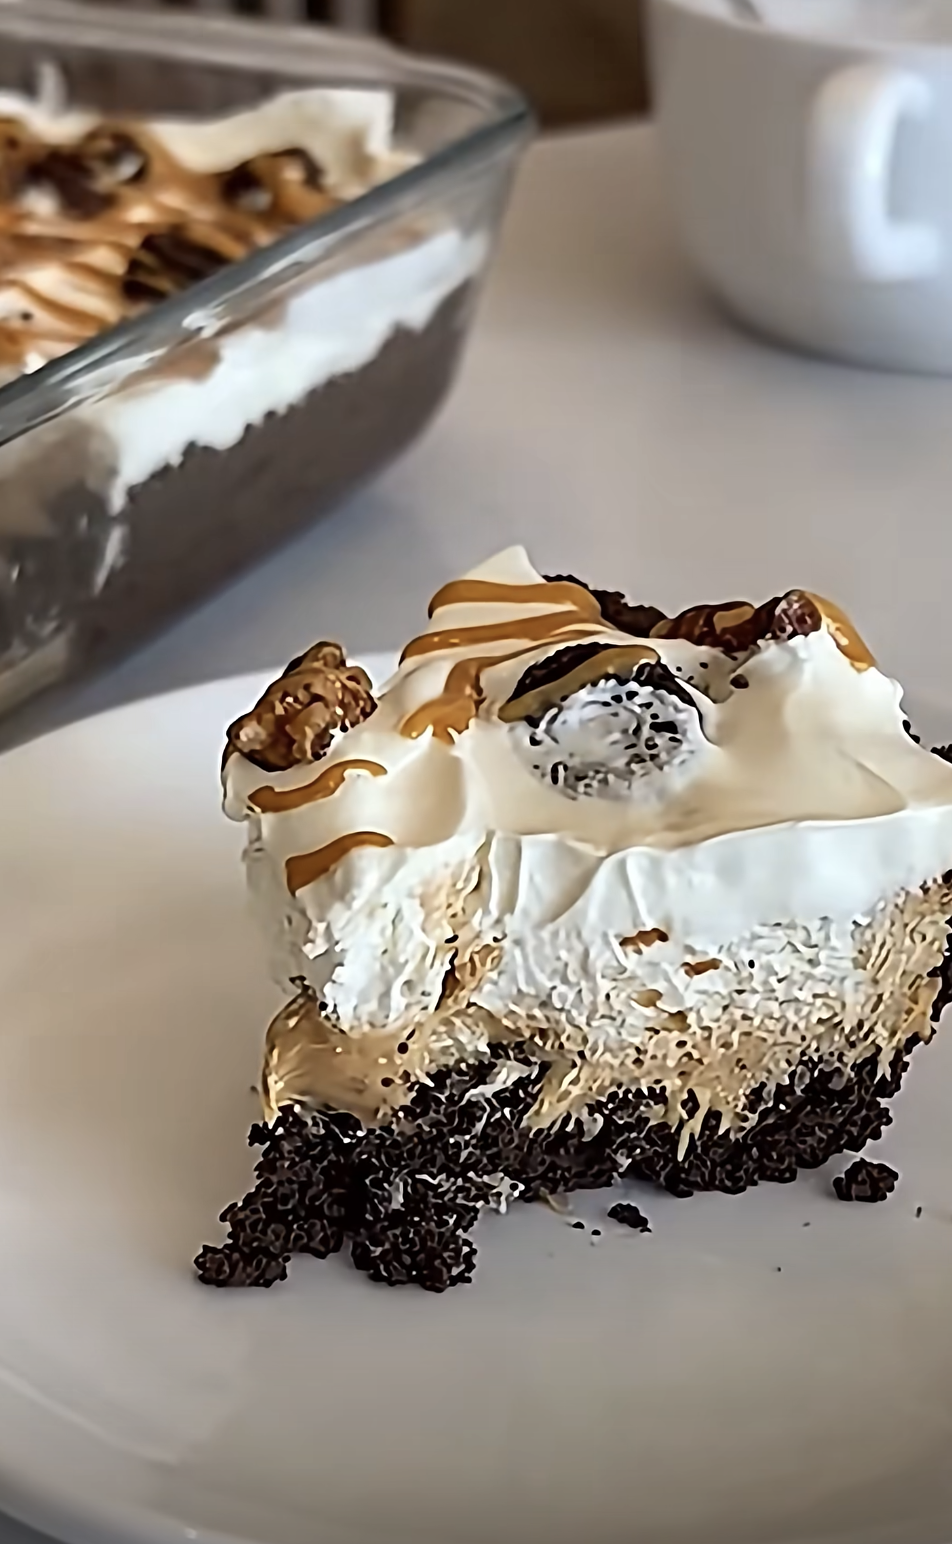
This Peanut Butter Oreo No Bake Pie uses a buttery Oreo crust topped with a smooth peanut butter and cream cheese filling. Then a fluffy whipped topping layer finishes the dessert before crushed Oreos, peanut butter cups, and a warm peanut butter drizzle go over the top.
Although the name says pie, the 9×13-inch pan makes this version especially convenient for parties, potlucks, holidays, birthdays, and family gatherings because you can cut it into neat squares and serve a crowd.
The first time I made this dessert, I needed something impressive for a family gathering but did not have enough time to bake a complicated cake. I had Oreos, peanut butter, and cream cheese in the kitchen, so I started layering them into a chilled dessert. As soon as I spread the peanut butter filling over the cookie crust, I knew it would become a favorite. After chilling, the first slice showed beautiful dark cookie layers against the creamy filling. Everyone asked what was in it, and several people returned for seconds. Since then, this simple dessert has become one of my easiest celebration recipes.
Why Peanut Butter Oreo No Bake Pie Works So Well
The Oreo crust creates a rich chocolate base
The bottom layer of Peanut Butter Oreo No Bake Pie starts with a full package of chocolate sandwich cookies and melted butter.
You do not need to remove the cream filling from the Oreos. Instead, crush the entire cookies. The sweet filling helps bind the crumbs and gives the crust an even richer flavor.
A food processor makes quick work of the cookies. However, you can also place them inside a sturdy zip-top bag and crush them with a rolling pin.
Aim for fine crumbs with a few tiny cookie pieces mixed in. Large chunks can make the crust difficult to cut later.
Once you have crushed the Oreos, combine them with one stick, or 1/2 cup, of melted unsalted butter.
Stir until every crumb looks evenly coated.
Then transfer the mixture to a 9×13-inch pan.
Press it down firmly with the bottom of a measuring cup or the back of a spoon. A compact crust holds together much better than a loosely packed one.
Afterward, place the pan in the freezer while you prepare the filling.
That short freezing period helps the butter firm and creates a sturdy foundation for the creamy peanut butter layer.
Because the crust needs no oven, Peanut Butter Oreo No Bake Pie works especially well during warm weather or when the oven is already busy with another meal.
Ingredients
Equipment
Method
- Crush the package of Oreos into fine crumbs using a food processor or a zip-top bag and rolling pin.
- Combine the crushed Oreos with the melted butter in a 9×13-inch pan. Press the mixture firmly and evenly across the bottom, then place the pan in the freezer.
- Beat the softened cream cheese in a large bowl until smooth. Add the powdered sugar and 2 cups creamy peanut butter and mix until completely combined.
- Gently fold 8 ounces of thawed whipped topping into the peanut butter mixture until light and evenly blended.
- Remove the Oreo crust from the freezer and spread the peanut butter filling evenly over it.
- Spread the remaining 8 ounces of whipped topping evenly over the peanut butter filling.
- Scatter crushed or mini Oreos and chopped peanut butter cups over the whipped topping.
- Microwave 1/4 cup peanut butter for 20 to 30 seconds until thin enough to drizzle. Stir and drizzle it over the top of the dessert.
- Cover and refrigerate for at least 2 hours, preferably 4 hours or overnight, before slicing and serving.
Notes
The peanut butter cheesecake filling stays creamy and fluffy
The center of Peanut Butter Oreo No Bake Pie combines softened cream cheese, powdered sugar, creamy peanut butter, and whipped topping.
The cream cheese gives the filling a cheesecake-like richness.
Meanwhile, peanut butter adds a deep nutty flavor and enough body to help the mixture become thick.
Powdered sugar sweetens the filling without creating a grainy texture.
For the smoothest result, soften the cream cheese before mixing.
Cold cream cheese tends to leave small lumps behind, even after several minutes with an electric mixer. Therefore, leave the cream cheese at room temperature for about 30 to 45 minutes before starting.
Beat the cream cheese first until smooth. Then add the powdered sugar and peanut butter.
Mix until the filling looks thick, creamy, and completely uniform.
Finally, fold in 8 ounces of thawed whipped topping.
Do not beat the whipped topping aggressively. Instead, use a spatula and gently fold it through the peanut butter mixture.
The whipped topping adds air and transforms the dense peanut butter filling into a softer, fluffier layer.
That balance of rich and light textures makes Peanut Butter Oreo No Bake Pie especially satisfying.
How to Make Peanut Butter Oreo No Bake Pie
Build the crust and peanut butter filling
Start with a regular-size package of Oreos.
Crush the cookies into fine crumbs.
Depending on the package size, you will typically end up with about 3 to 4 cups of crumbs. The exact amount does not need to be perfect because this dessert allows some flexibility.
Place the crumbs directly into a 9×13-inch pan or combine them with the butter in a separate bowl first.
Pour in 1/2 cup melted unsalted butter.
Mix thoroughly.
Then press the mixture firmly across the bottom of the pan.
Make sure the corners receive just as much crust as the center.
Once packed, transfer the pan to the freezer.
Next, prepare the filling.
Place two 8-ounce blocks of softened cream cheese in a large mixing bowl.
Beat until smooth.
Add 2 cups powdered sugar and 2 cups creamy peanut butter.
Continue beating until the mixture becomes thick and evenly blended.
Scrape down the sides and bottom of the bowl several times.
Then fold in one 8-ounce container of thawed whipped topping.
Continue folding until no white streaks remain.
Remove the Oreo crust from the freezer.
Spoon the Peanut Butter Oreo No Bake Pie filling over the crust.
Spread it gently into an even layer.
Because the crust may still be somewhat delicate, avoid dragging the spatula aggressively across the surface.
Instead, place spoonfuls of filling around the pan first, and then connect them with the spatula.
This technique prevents cookie crumbs from lifting into the peanut butter layer.
Add the whipped topping and candy finish
Once the peanut butter filling looks smooth, spread another 8 ounces of whipped topping over the surface.
The white layer creates a beautiful contrast with the dark Oreo crust and tan peanut butter filling.
Again, spread gently.
Then prepare the toppings.
Crush or roughly chop several mini Oreos.
Cut peanut butter cups into small pieces.
You can use mini peanut butter cups or regular-size cups.
Scatter both toppings over the whipped layer.
Next, place about 1/4 cup creamy peanut butter in a microwave-safe bowl.
Microwave for approximately 20 to 30 seconds, or until the peanut butter becomes loose enough to drizzle.
Stir before using.
Do not overheat it.
Warm peanut butter drizzles much more easily than cold peanut butter, but it only needs a short burst of heat.
Use a spoon to drizzle thin lines across the entire surface of the Peanut Butter Oreo No Bake Pie.
You can make straight lines, zigzags, or random swirls.
Once decorated, cover the pan and refrigerate the dessert for at least 2 hours.
For cleaner slices and a firmer texture, chill it for 4 hours or overnight.
The resting time allows the layers to settle and become easier to cut.
Tips, Variations, and Serving Ideas
Make every slice neat and beautiful
Peanut Butter Oreo No Bake Pie tastes delicious even if the layers look messy. However, a few simple techniques make the finished dessert much easier to portion.
First, chill it thoroughly.
A soft filling sticks to the knife and can pull the layers apart.
After at least 4 hours of refrigeration, the cream cheese and peanut butter become much firmer.
Second, use a sharp knife.
Dip the blade into hot water, wipe it completely dry, and make one cut.
Then clean the knife before the next cut.
This method creates much cleaner edges.
Because the recipe is rich, smaller portions often work best.
A 9×13-inch pan can comfortably produce 15 to 20 servings depending on how large you cut them.
You can also freeze the dessert briefly before slicing if you prefer particularly sharp layers.
Place the pan in the freezer for about 20 to 30 minutes, but do not freeze it solid unless you plan to store it frozen.
For serving, add a little extra chocolate sauce or peanut butter drizzle to each plate.
A few Oreo crumbs around the edge can also make each portion look polished.
Peanut Butter Oreo No Bake Pie works especially well alongside coffee, cold milk, or a simple fruit platter because the fresh fruit balances the richness.
Easy ways to customize the dessert
One reason Peanut Butter Oreo No Bake Pie works so well is that you can change the toppings without changing the basic recipe.
For extra chocolate flavor, drizzle melted chocolate or chocolate sauce over the top.
You can also add mini chocolate chips.
For more crunch, sprinkle chopped roasted peanuts over the whipped topping.
If you love peanut butter cups, increase the amount and create a full candy layer.
You could also use chocolate peanut butter cups for an even richer flavor.
For a cookies-and-cream variation, mix crushed Oreos directly into the peanut butter filling.
For a salted version, sprinkle a small amount of flaky sea salt over the peanut butter drizzle.
The salt cuts through the sweetness and makes the peanut butter taste more intense.
You can also turn Peanut Butter Oreo No Bake Pie into individual desserts.
Press Oreo crumbs into small cups or jars, add the peanut butter filling, spoon whipped topping over it, and finish with cookies and candy.
Individual servings work especially well for parties because guests can simply grab one from the dessert table.
Make-Ahead, Storage, and Common Mistakes
How to prepare Peanut Butter Oreo No Bake Pie ahead
This dessert practically begs to be made ahead.
In fact, Peanut Butter Oreo No Bake Pie often tastes better after several hours in the refrigerator because the filling firms and the layers settle.
You can make it one full day before serving.
Prepare the crust, filling, and whipped topping layer as directed.
Then cover the pan tightly with plastic wrap or a fitted lid.
For the freshest appearance, you may choose to add the Oreo pieces, peanut butter cups, and drizzle a few hours before serving.
However, they can also go on the night before.
Store the dessert in the refrigerator until needed.
Leftovers keep well for approximately 4 to 5 days when tightly covered.
The Oreo crust may soften slightly over time, but the flavor remains excellent.
Peanut Butter Oreo No Bake Pie can also be frozen.
Cut the chilled dessert into squares first.
Then freeze the portions on a tray until firm.
Transfer them to an airtight freezer container with parchment paper between layers.
For the best quality, enjoy the frozen portions within about 1 month.
Thaw them in the refrigerator before serving.
Some people even enjoy the dessert partially frozen because the filling develops a texture similar to peanut butter ice cream.
Common mistakes and how to avoid them
The first common mistake involves using cold cream cheese.
Cold cream cheese creates lumps.
Soften it first.
Another mistake involves using natural peanut butter that separates heavily.
Although natural peanut butter can work, conventional creamy peanut butter usually gives Peanut Butter Oreo No Bake Pie a thicker and more dependable texture.
If you use natural peanut butter, stir it extremely well before measuring.
Another issue comes from loosely packing the Oreo crust.
Press firmly.
The butter can only hold the crumbs together effectively when the crust is compact.
Do not skip the chilling time either.
The dessert may look ready immediately after assembly, but the filling still needs time to firm.
At least 2 hours is necessary, while 4 hours creates better slices.
Avoid spreading the peanut butter layer too aggressively over the crust.
Frozen Oreo crumbs can still move if you press hard.
Finally, do not pour extremely hot melted peanut butter over the whipped topping.
Let it cool slightly after microwaving.
It should be fluid enough to drizzle without being hot enough to melt the topping beneath it.
Frequently Asked Questions
Can I make Peanut Butter Oreo No Bake Pie the night before?
Yes. This dessert works extremely well when prepared the night before. Keep it tightly covered in the refrigerator and serve it chilled the next day.
Can I use crunchy peanut butter?
Yes. Crunchy peanut butter creates additional texture in the filling. However, creamy peanut butter produces the smoothest and most traditional consistency.
Do I remove the Oreo cream before making the crust?
No. Crush the entire cookie, including the cream filling. The filling contributes sweetness and helps the cookie crumbs bind.
Can Peanut Butter Oreo No Bake Pie be frozen?
Yes. Freeze individual slices in an airtight container for up to about 1 month. Thaw them in the refrigerator before serving or enjoy them slightly frozen.
What can I use instead of peanut butter cups?
Chopped chocolate bars, mini chocolate chips, chopped peanuts, extra Oreos, or chocolate-covered peanuts all make good toppings.
Conclusion
Peanut Butter Oreo No Bake Pie turns simple store-bought ingredients into an indulgent dessert without requiring an oven.
The Oreo crust gives every serving a rich chocolate crunch.
The cream cheese and peanut butter filling tastes smooth, thick, and slightly tangy, while whipped topping keeps it from becoming overly heavy.
Then crushed Oreos, peanut butter cups, and warm peanut butter drizzle make the top look as impressive as it tastes.
Because Peanut Butter Oreo No Bake Pie uses a 9×13-inch pan, it is also practical for feeding a group.
Make it for birthdays, cookouts, potlucks, holidays, family dinners, or any occasion when chocolate and peanut butter sound like the right answer.
Prepare the crust firmly.
Soften the cream cheese.
Fold the whipped topping gently.
Give the layers enough time to chill.
Then slice and serve.
That simple method produces a rich, creamy, crunchy dessert that looks celebratory while requiring surprisingly little effort.