No-Bake Cookies and Cream Icebox Cake is a rich, creamy dessert filled with chocolate sandwich cookies, fluffy whipped cream, and a smooth cream cheese filling. A buttery cookie crust gives every square a chocolatey base, while crushed cookies throughout the filling add the familiar cookies-and-cream flavor.
Because this dessert requires no baking, it works especially well when you need an easy make-ahead treat. The refrigerator handles the final step, allowing the layers to chill and firm for at least 6 hours.
No-Bake Cookies and Cream Icebox Cake also benefits from an overnight chill. You can assemble it the evening before a party, family dinner, holiday, or summer gathering and slice it the following day.
I started making icebox desserts more often after discovering how convenient they are for gatherings. Instead of watching an oven or worrying about serving dessert at exactly the right temperature, I can finish everything the night before and leave it in the refrigerator. Cookies and cream quickly became one of my favorite versions because the contrasting textures make every bite interesting. The bottom stays firm and chocolatey, while the center tastes soft and creamy with little cookie pieces throughout. I also like saving several cookies for the very top. They make a simple dessert look much more finished without requiring complicated decorating.
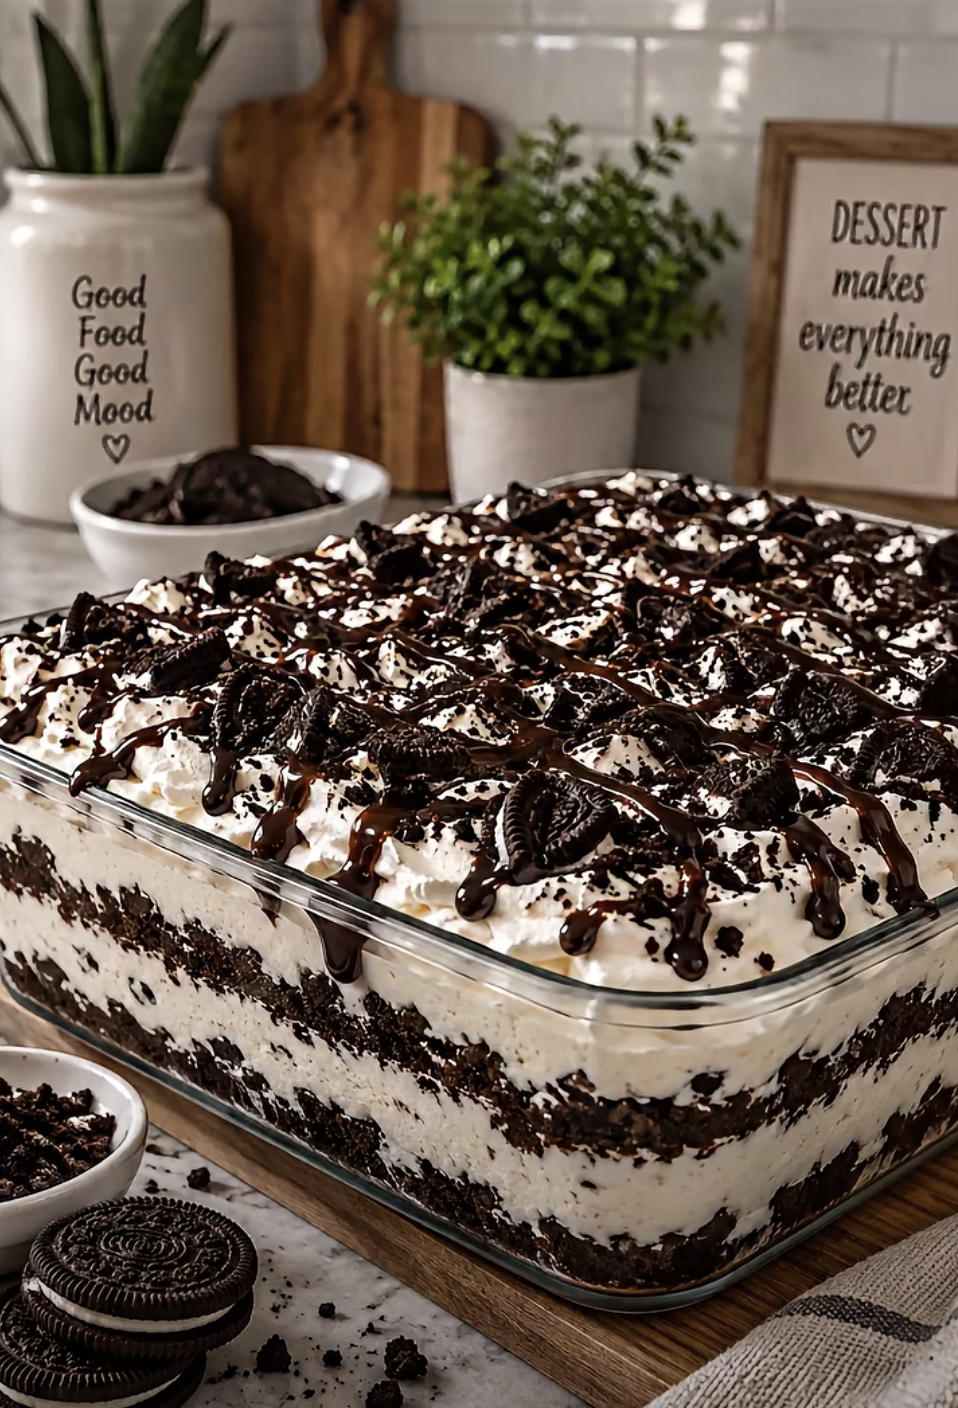
No-Bake Cookies and Cream Icebox Cake
Ingredients
Equipment
Method
- Crush about 24 chocolate sandwich cookies into fine crumbs and mix thoroughly with the melted butter.
- Press the buttery cookie crumbs firmly into the bottom of a 9×13-inch baking dish and refrigerate for 15 minutes.
- Beat the softened cream cheese, 1/2 cup powdered sugar, and vanilla extract until smooth and creamy.
- In a separate bowl, whip the cold heavy whipping cream with the remaining 1/2 cup powdered sugar until stiff peaks form.
- Gently fold approximately half of the whipped cream into the cream cheese mixture, then fold in 1 cup crushed chocolate sandwich cookies.
- Spread the cookies-and-cream filling evenly over the chilled chocolate cookie crust.
- Spread the remaining whipped cream evenly over the cookies-and-cream filling.
- Crush several additional cookies and sprinkle them generously over the whipped cream. Add chocolate chips if desired.
- Cover and refrigerate for at least 6 hours, preferably overnight, until thoroughly chilled and firm.
- Slice the chilled icebox cake into squares and serve cold.
Notes
Making the Chocolate Cookie Crust
Crush the Cookies Into Fine Crumbs
Begin by crushing about 24 chocolate sandwich cookies into fine crumbs.
A food processor makes this step quick, but you can also place the cookies in a sturdy sealed bag and crush them with a rolling pin.
Keep crushing until you have relatively uniform crumbs. A fine texture helps the crust hold together once you add the melted butter.
Transfer the crumbs to a mixing bowl.
Next, pour in 5 tablespoons melted butter.
Stir thoroughly until the butter evenly coats the crumbs. The mixture should resemble damp crumbs and hold together when pressed.
This simple chocolate base gives No-Bake Cookies and Cream Icebox Cake plenty of cookie flavor from the first bite.
Press and Chill the Crust
Transfer the buttery cookie mixture into a 9×13-inch baking dish.
Spread it across the bottom in an even layer.
Next, press the crumbs down firmly. You can use the bottom of a measuring cup or glass to compact the crust evenly.
Pay particular attention to the corners and edges so the finished dessert has a consistent base.
Place the baking dish in the refrigerator for 15 minutes.
This short chilling period allows the butter to firm and helps stabilize the crust before you add the creamy filling.
Meanwhile, soften the cream cheese if necessary and prepare the remaining ingredients.
Preparing the Cookies and Cream Filling
Beat the Cream Cheese Until Smooth
Place 16 ounces softened cream cheese in a large mixing bowl.
Add ½ cup powdered sugar and 1 teaspoon vanilla extract.
Beat the ingredients together until completely smooth and creamy.
Starting with properly softened cream cheese makes this process easier and helps prevent small lumps in the finished filling.
Scrape the sides and bottom of the bowl as needed so everything combines evenly.
The cream cheese mixture provides a slightly tangy base that balances the sweetness of the chocolate sandwich cookies.
Once smooth, set the bowl aside while you prepare the whipped cream for No-Bake Cookies and Cream Icebox Cake.
Whip the Heavy Cream
Pour 2 cups cold heavy whipping cream into a separate mixing bowl.
Add the remaining ½ cup powdered sugar.
Whip the mixture until stiff peaks form.
Next, gently fold approximately half of the whipped cream into the cream cheese mixture.
Use a folding motion rather than vigorous stirring. This approach helps preserve the airy texture of the whipped cream.
Once the mixture looks smooth, fold in 1 cup crushed chocolate sandwich cookies.
Continue folding only until the cookie pieces look evenly distributed.
You should now have a thick, creamy filling with visible chocolate cookie pieces throughout.
Reserve the remaining whipped cream for the top layer.
Assembling the Icebox Cake
Spread the Cookies and Cream Layer
Remove the chilled cookie crust from the refrigerator.
Spoon the prepared cookies-and-cream filling over the crust.
Spread the filling carefully toward the corners and edges of the baking dish.
Use a spatula to create a relatively even layer.
The filling should completely cover the chocolate cookie crust.
Because the crust has already chilled for 15 minutes, it should remain in place as you spread the creamy mixture over it.
Take your time around the edges so the finished No-Bake Cookies and Cream Icebox Cake has clearly defined layers when sliced.
Add the Whipped Cream Topping
Spoon the reserved whipped cream over the cookies-and-cream filling.
Spread it gently into an even top layer.
Next, crush several additional chocolate sandwich cookies.
Sprinkle the cookie pieces generously across the whipped cream.
If desired, scatter ½ cup chocolate chips over the top as well.
You can use fine cookie crumbs, larger pieces, or a combination of both. Larger pieces create a more dramatic cookies-and-cream appearance, while finer crumbs distribute chocolate flavor across every serving.
At this point, the dessert is fully assembled and ready for its long refrigerator chill.
Chilling and Serving the Dessert
Refrigerate Until Firm
Cover the baking dish and place it in the refrigerator.
Chill No-Bake Cookies and Cream Icebox Cake for at least 6 hours.
However, overnight refrigeration works particularly well.
The long chilling period allows the creamy layers to firm and gives the dessert a more sliceable consistency.
Therefore, avoid rushing this step if you want neat squares.
An overnight chill also makes this dessert especially convenient for entertaining because you can complete the preparation a day ahead.
Keep the dessert refrigerated until you’re ready to serve it.
Slice Into Chilled Squares
When you’re ready to serve, remove the baking dish from the refrigerator.
Use a sharp knife to cut the dessert into squares.
For cleaner portions, wipe the knife between cuts.
Use a thin spatula to lift each square from the baking dish.
Serve No-Bake Cookies and Cream Icebox Cake cold.
If you want additional decoration, place a small chocolate sandwich cookie piece on individual servings just before bringing them to the table.
The combination of buttery cookie crust, fluffy cream cheese filling, crushed cookies, and whipped topping creates plenty of texture without requiring any baking.
Ingredients
- 2 packages (14 ounces each) chocolate sandwich cookies, divided
- 5 tablespoons butter, melted
- 16 ounces cream cheese, softened
- ½ cup powdered sugar, for the cream cheese filling
- 1 teaspoon vanilla extract
- 2 cups heavy whipping cream, cold
- ½ cup powdered sugar, for the whipped cream
- 1 cup crushed chocolate sandwich cookies
- ½ cup chocolate chips, optional
Instructions
- Crush about 24 chocolate sandwich cookies into fine crumbs and combine them thoroughly with the melted butter.
- Press the cookie mixture firmly and evenly into the bottom of a 9×13-inch baking dish. Refrigerate for 15 minutes.
- Beat the softened cream cheese, ½ cup powdered sugar, and vanilla extract until smooth and creamy.
- In a separate bowl, whip the cold heavy whipping cream with the remaining ½ cup powdered sugar until stiff peaks form.
- Gently fold approximately half of the whipped cream into the cream cheese mixture, then fold in 1 cup crushed chocolate sandwich cookies.
- Spread the cookies-and-cream filling evenly over the chilled cookie crust.
- Spread the remaining whipped cream over the filling and smooth the surface.
- Crush several additional cookies and sprinkle them generously over the top. Add ½ cup chocolate chips if desired.
- Cover and refrigerate for at least 6 hours, preferably overnight, until thoroughly chilled and firm.
- Slice the No-Bake Cookies and Cream Icebox Cake into squares and serve cold.
Frequently Asked Questions
How long should No-Bake Cookies and Cream Icebox Cake chill?
Refrigerate the dessert for at least 6 hours. However, chilling it overnight gives the layers additional time to firm and makes the cake especially convenient to prepare ahead.
Can I make this icebox cake the night before?
Yes. In fact, the recipe works particularly well as an overnight dessert. Assemble everything, cover the baking dish, and refrigerate it until the following day.
Do I remove the filling from the sandwich cookies before crushing them?
No. Crush the chocolate sandwich cookies with their cream filling intact. Both the cookies and their filling become part of the crust and cookies-and-cream layers.
How do I get cleaner slices?
Chill the dessert thoroughly before cutting it. Then use a sharp knife and wipe the blade clean between cuts. Keeping the dessert cold also helps the layers remain firm.
Are the chocolate chips necessary?
No. The ½ cup chocolate chips are completely optional. The crushed chocolate sandwich cookies already provide plenty of chocolate flavor and texture, so you can leave the chips off without changing the basic dessert.
Conclusion
No-Bake Cookies and Cream Icebox Cake combines a buttery chocolate cookie crust with smooth cream cheese filling, fluffy whipped cream, and plenty of crushed sandwich cookies.
The preparation stays straightforward. First, press the buttery cookie crumbs into the baking dish. Then make the cream cheese filling and freshly whipped cream. After folding crushed cookies into the filling, assemble the creamy layers and finish everything with even more cookie pieces.
Most importantly, give the dessert enough time to chill.
At least 6 hours allows No-Bake Cookies and Cream Icebox Cake to firm properly, while an overnight rest makes preparation especially convenient. Once chilled, simply slice it into cold, creamy squares and serve.