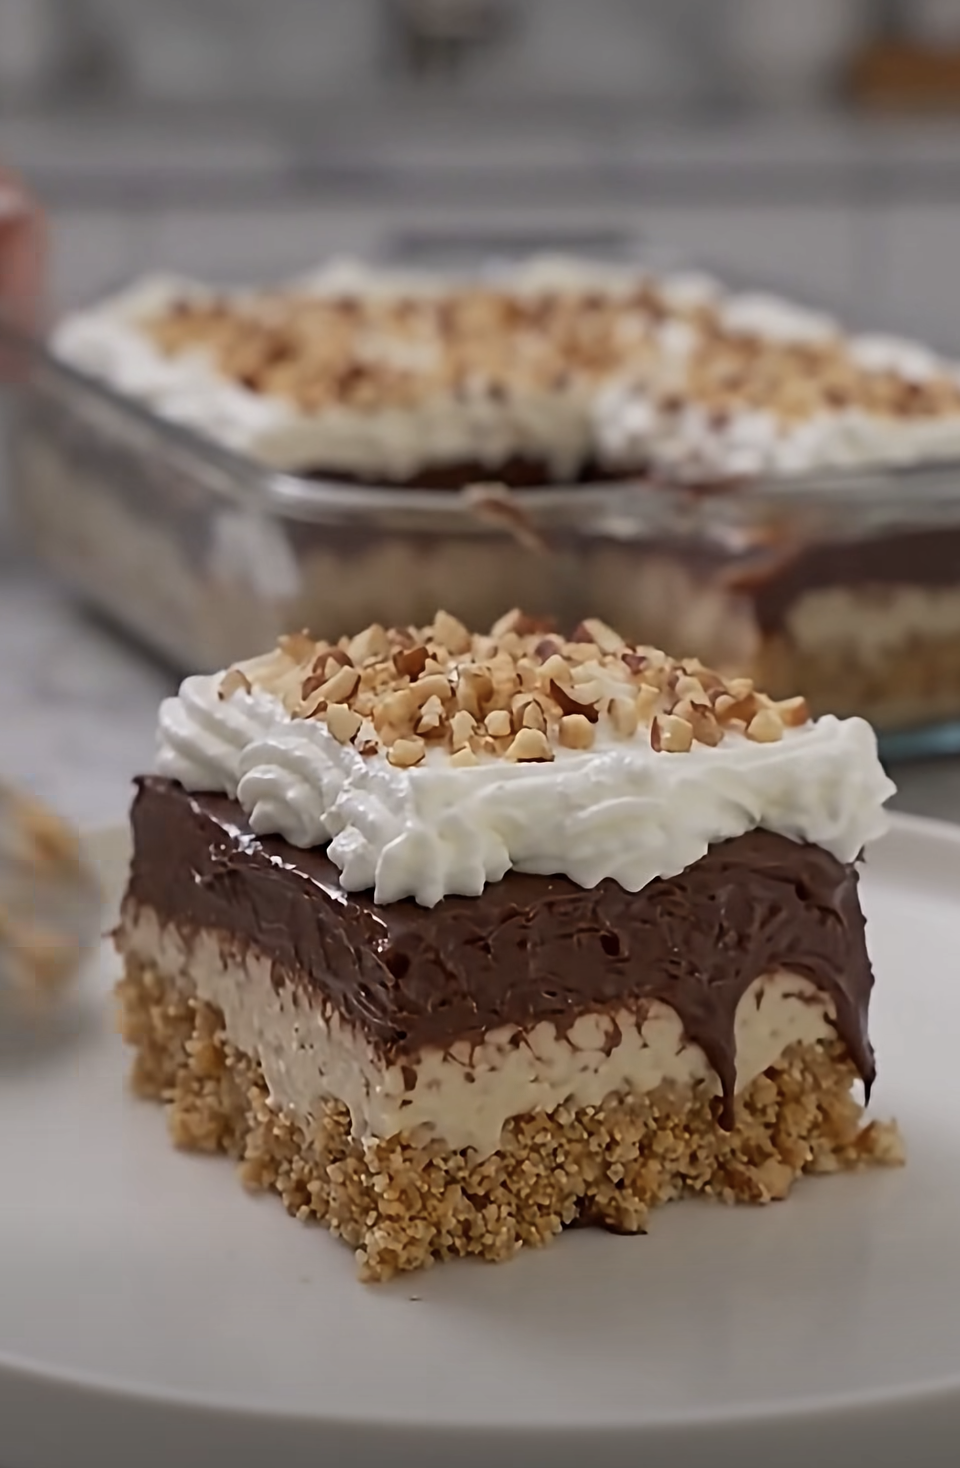
No-Bake Chocolate Peanut Cream Dessert brings together a buttery graham cracker crust, a fluffy cream cheese layer, smooth chocolate pudding, whipped topping, and crunchy roasted peanuts. Every layer adds something different, so each chilled square feels creamy, chocolatey, nutty, and satisfying.
Because this No-Bake Chocolate Peanut Cream Dessert requires no oven, it works especially well when you want an easy make-ahead dessert for holidays, potlucks, birthdays, summer gatherings, or family dinners. You only need about 25 minutes of active preparation. After that, the refrigerator does most of the work.
The thick layers also make this dessert look impressive without requiring complicated techniques. The graham cracker crust provides structure, while the cream cheese filling creates a light, cheesecake-style center. Chocolate pudding adds deep cocoa flavor, and chopped roasted peanuts give the soft dessert a welcome crunch.
For especially clean slices, chill each layer briefly before adding the next one. Then refrigerate the finished dessert overnight if possible. That extra chilling time helps every layer become firmer and easier to cut.
I first made a layered dessert like this when I needed something simple for a family gathering but still wanted it to look special on the table. I prepared each layer separately, chilled the pan between steps, and finished everything the night before. The next day, the squares came out with surprisingly neat layers, and the combination of chocolate, cream cheese, and crunchy peanuts disappeared quickly. I especially liked how the roasted peanuts cut through the sweetness and added texture. Since then, I have appreciated this dessert whenever I need a reliable make-ahead option that feels indulgent without requiring hours in the kitchen.
Why No-Bake Chocolate Peanut Cream Dessert Works So Well
The Layers Create the Perfect Texture
No-Bake Chocolate Peanut Cream Dessert works because every layer serves a purpose.
The graham cracker crust creates the foundation. Graham cracker crumbs bring a slightly toasted flavor, while melted butter helps the crumbs hold together. A small amount of granulated sugar adds sweetness and helps balance the deeper chocolate layer.
Next comes the cream cheese filling. Softened cream cheese gives the layer enough body to hold its shape. Meanwhile, powdered sugar sweetens the mixture smoothly, and vanilla adds warmth.
Whipped topping makes the cream cheese layer lighter. Instead of creating a dense cheesecake filling, it produces a softer, fluffier texture that works well in a chilled layered dessert.
The chocolate pudding layer adds the richest flavor. Instant chocolate pudding thickens quickly when whisked with cold whole milk, which makes assembly simple.
For even more chocolate intensity, you can add melted semisweet chocolate chips. However, let the melted chocolate cool slightly before stirring it into the pudding. Very hot chocolate could loosen the mixture or create an uneven texture.
Finally, roasted peanuts add crunch.
That contrast matters because most of No-Bake Chocolate Peanut Cream Dessert feels soft and creamy. The peanuts break up that softness and add a savory, toasted flavor that keeps the dessert from tasting one-dimensional.
The result gives you buttery crumbs, fluffy cream, silky chocolate, airy topping, and crunchy peanuts in every serving.
Why Chilling Each Layer Helps
The refrigerator plays an important role in No-Bake Chocolate Peanut Cream Dessert.
Although you can assemble the layers one after another, short chilling periods between them can make the finished dessert look cleaner.
Start by chilling the graham cracker crust for 15 to 20 minutes.
This allows the melted butter to firm again. As a result, the crust stays in place when you spread the cream cheese layer over it.
After adding the cream layer, refrigerate the pan for another 10 to 15 minutes if you have time.
This short rest makes the filling slightly firmer, so the chocolate pudding spreads over it more easily without mixing into the white layer.
You can repeat the process after adding the chocolate pudding.
Once that layer feels slightly firm, add the final whipped topping.
These small chilling breaks help No-Bake Chocolate Peanut Cream Dessert develop thicker, more defined layers.
However, the final chill matters most.
Refrigerate the completed dessert for at least 4 to 6 hours. Overnight refrigeration produces even better results because the crust firms, the filling settles, and the pudding becomes more stable.
Therefore, making the dessert one day before serving often gives you the best texture with less stress on serving day.
How to Make No-Bake Chocolate Peanut Cream Dessert
Preparing the Crust and Cream Cheese Layer
Begin No-Bake Chocolate Peanut Cream Dessert with the graham cracker crust.
Place 2 cups graham cracker crumbs in a medium mixing bowl.
Add 1/2 cup melted unsalted butter and 2 tablespoons granulated sugar.
Stir until the crumbs become evenly moistened. The mixture should resemble damp sand and hold together when pressed.
Transfer the mixture to a 9×13-inch baking dish.
Spread it evenly across the bottom, then press it firmly into place.
Use the flat bottom of a measuring cup to compact the crumbs. Firm pressure creates a sturdier crust and helps the finished squares hold together.
Refrigerate the crust for 15 to 20 minutes.
Meanwhile, prepare the cream layer.
Place 8 ounces softened cream cheese in a large mixing bowl. Add 1 cup powdered sugar and 1 teaspoon vanilla extract.
Beat until completely smooth.
Softened cream cheese matters because cold cream cheese can leave small lumps. Therefore, allow it to soften enough to blend easily before you begin.
Next, add 8 ounces thawed whipped topping.
Fold it gently into the cream cheese mixture.
Continue folding until the filling looks fluffy and evenly combined.
Remove the crust from the refrigerator and spread the cream cheese mixture across it.
Smooth the layer carefully all the way to the edges.
For cleaner layers in No-Bake Chocolate Peanut Cream Dessert, refrigerate the pan for 10 to 15 minutes before adding the pudding.
Adding the Chocolate and Peanut Topping
While the cream layer chills, prepare the chocolate pudding.
Pour 3 cups cold whole milk into a large bowl.
Add two 3.9-ounce boxes of instant chocolate pudding mix.
Whisk for about 2 minutes or until the mixture becomes noticeably thick and creamy.
Cold milk helps instant pudding set properly, so avoid using warm milk.
If you want deeper chocolate flavor, melt 1/2 cup semisweet chocolate chips.
Let the melted chocolate cool slightly.
Then stir it into the prepared pudding until completely incorporated.
Remove the chilled pan from the refrigerator.
Spoon the chocolate pudding over the cream cheese layer.
Spread it slowly and gently from the center toward the edges.
Avoid pressing down too hard because you want to keep the layers separate.
If time allows, refrigerate the pan again for about 10 to 15 minutes.
Next, spread 8 ounces whipped topping over the chocolate layer.
Use the back of a spoon or an offset spatula to create soft swirls.
Then sprinkle 3/4 cup roughly chopped roasted peanuts evenly over the top.
You can also add chocolate shavings or a drizzle of melted chocolate.
Cover No-Bake Chocolate Peanut Cream Dessert and refrigerate it for at least 4 to 6 hours.
For the best texture and cleanest slices, refrigerate overnight.
Once thoroughly chilled, cut the dessert into 12 to 15 squares and serve cold.
Tips for Perfect No-Bake Chocolate Peanut Cream Dessert
How to Keep the Layers Thick and Neat
A few simple techniques can help No-Bake Chocolate Peanut Cream Dessert develop the thick, clean layers that make it look so appealing.
First, press the graham cracker crust firmly.
A loose crust can shift when you spread the cream cheese layer. Therefore, compact it well and chill it before continuing.
Second, soften the cream cheese properly.
Cold cream cheese does not blend smoothly, while melted cream cheese can make the filling too soft. Room-temperature cream cheese provides the best balance.
Next, fold the whipped topping gently.
Beating it aggressively can reduce the air that keeps the filling light.
For the pudding, use cold whole milk and the exact amount called for in the recipe.
Adding too much milk creates a thinner pudding, which can spread into the cream layer.
If you add melted chocolate, cool it slightly first.
The optional chocolate helps create a richer and somewhat firmer layer, but very hot chocolate may affect the pudding texture.
Short chilling breaks also make a noticeable difference.
After spreading each layer, refrigerate the dessert for 10 to 15 minutes before moving to the next one.
Finally, give No-Bake Chocolate Peanut Cream Dessert a long final chill.
Four to six hours works, but overnight refrigeration gives the layers more time to set.
When serving, use a sharp knife and wipe the blade clean after every cut.
This simple step keeps the cream and chocolate layers from smearing across each other.
Easy Variations and Flavor Ideas
No-Bake Chocolate Peanut Cream Dessert offers plenty of easy ways to adjust the flavor.
For more peanut flavor, you can swirl a few spoonfuls of creamy peanut butter into the cream cheese layer.
Do not add too much, however, because extra peanut butter can make the filling heavier.
You can also drizzle melted peanut butter over the whipped topping before adding the roasted peanuts.
For additional crunch, add chopped peanuts between the chocolate pudding and whipped topping.
If you prefer a sweeter finish, use chocolate-covered peanuts as part of the garnish.
You can also change the crust.
Chocolate cookie crumbs create an even richer chocolate base, while crushed vanilla wafers make the crust slightly sweeter.
For a salty-sweet variation, use finely crushed pretzels in part of the crust. Their saltiness pairs particularly well with chocolate and roasted peanuts.
Dark chocolate shavings provide another easy option.
Their slightly bitter cocoa flavor balances the sweet filling and whipped topping.
If you want individual portions, assemble No-Bake Chocolate Peanut Cream Dessert in small clear cups.
Add crust crumbs first, then the cream cheese filling, chocolate pudding, whipped topping, and chopped peanuts.
Individual servings work well for parties because guests can grab one without cutting the larger dessert.
Regardless of the variation, keep the main balance intact: creamy filling, chocolate pudding, and crunchy peanuts.
Make-Ahead, Storage, and Serving Ideas
Preparing the Dessert Ahead of Time
No-Bake Chocolate Peanut Cream Dessert makes an excellent make-ahead recipe.
In fact, preparing it the day before often gives better results than making it shortly before serving.
Assemble all of the layers, cover the baking dish tightly, and refrigerate overnight.
The extra chilling time allows the crust and fillings to firm completely.
As a result, No-Bake Chocolate Peanut Cream Dessert becomes easier to slice into attractive squares.
If you want the peanuts to stay especially crisp, you can add them shortly before serving instead of before the overnight chill.
The same approach works for chocolate shavings or drizzle.
However, adding the whipped topping ahead of time works well.
For holiday meals, prepare the dessert after dinner the night before. Then leave it refrigerated until you need it the following day.
This schedule keeps dessert preparation separate from the busier meal preparation.
If you need to transport the dish, keep it cold.
Place the covered pan in a cooler with ice packs, especially during warm weather.
Once you reach your destination, transfer the dessert to a refrigerator until serving.
No-Bake Chocolate Peanut Cream Dessert tastes best cold, and the layers also stay firmer when chilled.
Therefore, remove only the amount you plan to serve and keep the rest refrigerated.
Storing Leftovers and Serving Clean Slices
Store leftover No-Bake Chocolate Peanut Cream Dessert tightly covered in the refrigerator.
For the best texture, enjoy it within about three to four days.
The crust may gradually soften as it absorbs moisture from the layers above it. However, the dessert should still taste creamy and rich.
The peanuts may also lose some crunch over time.
Therefore, you can keep extra chopped roasted peanuts in a separate container and sprinkle them over leftover slices just before serving.
When cutting the dessert, use a sharp knife.
For especially clean cuts, dip the knife into warm water, dry it thoroughly, and then slice.
Wipe the blade between cuts.
This method helps the knife pass smoothly through the chilled pudding and cream layers.
A small offset spatula also makes it easier to lift pieces from the pan.
The first square may come out less neatly than the others because you need room to slide the spatula underneath. After that, the remaining pieces usually lift more easily.
Freezing No-Bake Chocolate Peanut Cream Dessert is possible, but the texture may change after thawing.
The whipped topping and pudding can lose some of their original smoothness.
Therefore, refrigeration remains the preferred storage method.
Serve the dessert cold and add fresh peanuts, chocolate shavings, or drizzle immediately before bringing it to the table.
Frequently Asked Questions
Can I make No-Bake Chocolate Peanut Cream Dessert the night before?
Yes. Overnight chilling works especially well because it allows every layer to become firm and makes the dessert easier to slice cleanly.
Can I add peanut butter to the cream cheese layer?
Yes. You can beat a small amount of creamy peanut butter into the cream cheese mixture for a stronger peanut flavor. Keep the amount moderate so the filling stays light and fluffy.
Do I need the melted chocolate chips?
No. They are optional. The instant chocolate pudding already creates a rich chocolate layer. However, melted semisweet chocolate adds deeper flavor and a slightly more indulgent texture.
Why did my layers mix together?
The layers may have been too soft during assembly. Chill the crust and cream cheese layer before adding the pudding, then spread each new layer gently. Short 10-to-15-minute chilling periods can help keep the layers distinct.
How long does No-Bake Chocolate Peanut Cream Dessert keep?
Store it covered in the refrigerator and enjoy it within about three to four days for the best flavor, texture, and peanut crunch.
Conclusion
No-Bake Chocolate Peanut Cream Dessert combines buttery graham cracker crumbs, fluffy cream cheese filling, rich chocolate pudding, whipped topping, and crunchy roasted peanuts in one easy layered treat.
Because it requires no oven, the recipe works especially well for busy holidays, summer gatherings, potlucks, and make-ahead family desserts.
The method also stays simple enough for beginners.
Start with a firmly packed graham cracker crust. Then add the creamy filling, thick chocolate pudding, whipped topping, and roasted peanuts.
For the neatest layers, chill the pan briefly between steps.
Most importantly, give No-Bake Chocolate Peanut Cream Dessert at least 4 to 6 hours in the refrigerator after assembly. Overnight chilling produces even better results.
Once thoroughly cold, cut it into squares and serve with extra peanuts, chocolate shavings, or a drizzle of chocolate if desired.
With its balance of creamy, chocolatey, buttery, and crunchy textures, No-Bake Chocolate Peanut Cream Dessert makes an easy crowd-pleasing option whenever you need a rich dessert without baking.