No-Bake Chocolate Layered Dessert combines crunchy chocolate cookie layers with fluffy chocolate cream and a glossy chocolate topping for an indulgent treat that requires no oven. Each chilled square delivers several textures at once: crisp crumbs, smooth chocolate filling, silky topping, and a final scattering of chocolate pieces.
This No-Bake Chocolate Layered Dessert is especially useful when you need an impressive make-ahead dessert without complicated baking. The layers come together with crushed chocolate cookies, melted butter, cream cheese, whipped cream, cocoa, powdered sugar, and melted chocolate. After assembly, several hours in the refrigerator transform those simple ingredients into a firm yet creamy dessert that cuts into generous squares.
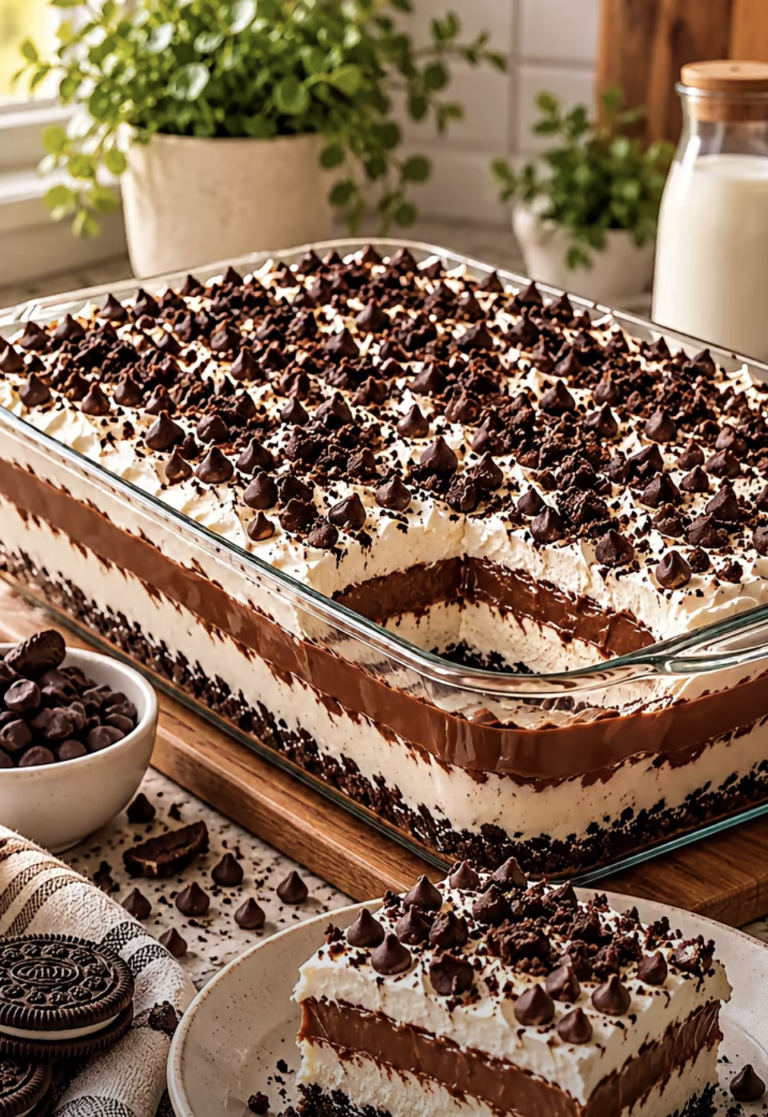
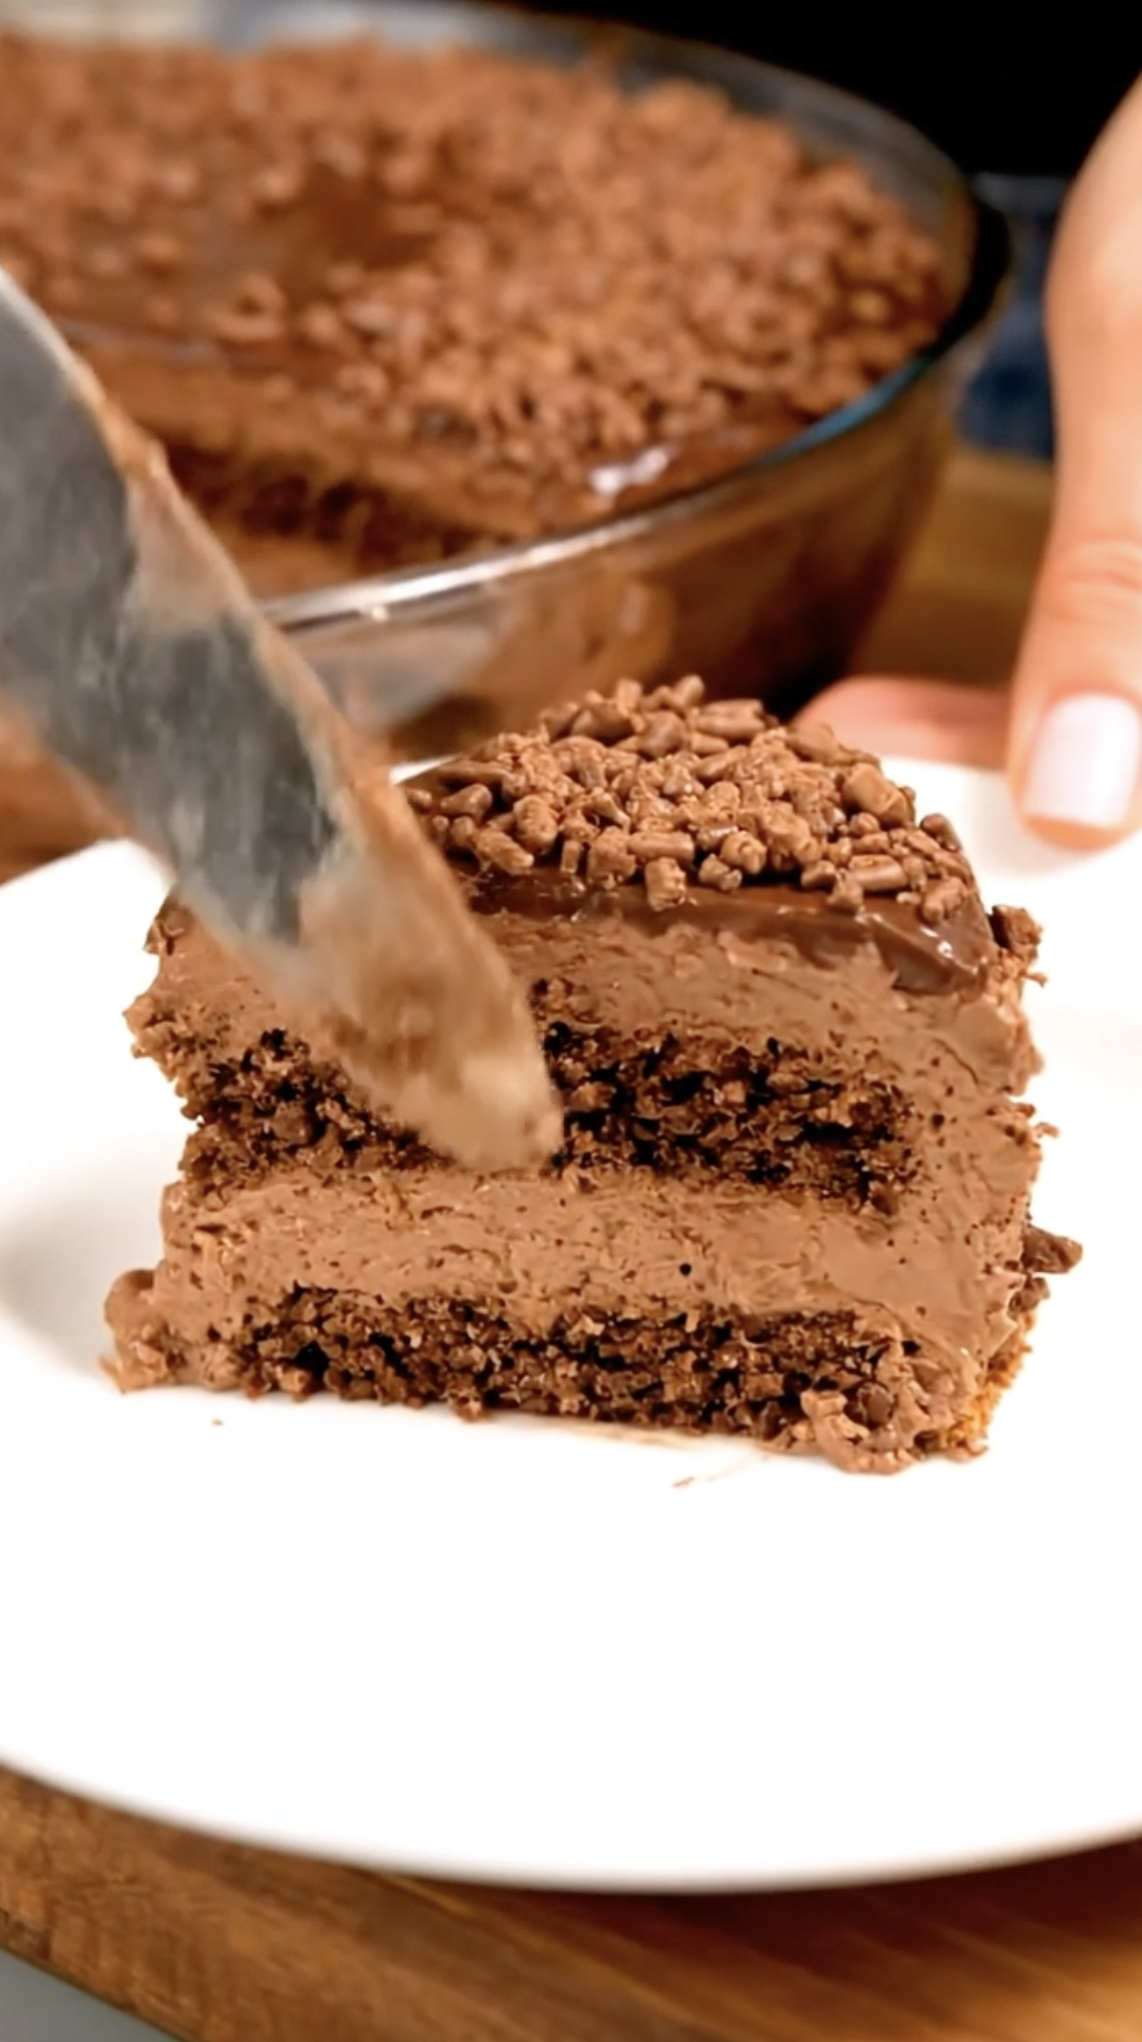
The reference image shows exactly why this style of dessert feels so satisfying. A thick chocolate cream layer sits between dark, crunchy crumb layers, while another creamy layer and glossy chocolate finish cover the top. Small chocolate pieces add even more texture. Although the finished dessert looks elaborate, the preparation remains beginner-friendly.
I first made a layered chocolate dessert when I needed something that could sit quietly in the refrigerator while I prepared the rest of dinner. I wanted plenty of chocolate flavor, but I also wanted a dessert that felt cool and creamy rather than heavy like a dense cake. I pressed the first cookie layer into the dish, spread the chocolate cream over it, and repeated the layers before chilling everything overnight. The next day, I cut the first square and saw those dark crumbs running through the soft chocolate filling. Everyone immediately wanted a piece, and the contrast between crunchy cookies and creamy filling made it memorable.
Building the Crunchy Chocolate Layers
Make a Firm Chocolate Cookie Base
The bottom layer gives No-Bake Chocolate Layered Dessert enough structure to support its creamy filling.
Start with 3 cups finely crushed chocolate cookies.
Chocolate sandwich cookies work particularly well because they create a dark, flavorful crumb. You can crush the cookies in a food processor or place them in a sturdy zip-top bag and use a rolling pin.
Aim for relatively fine crumbs.
However, leave a few slightly larger pieces if you want the crunchy appearance visible in the reference image.
Transfer the crumbs to a mixing bowl.
Add ½ cup melted unsalted butter and stir until the mixture looks evenly moistened.
When pressed between your fingers, the crumbs should hold together.
Reserve approximately 1 cup of the crumb mixture for the middle layer.
Then transfer the remaining crumbs to a 9-inch square dish.
Press them firmly across the bottom.
Use a flat-bottomed measuring cup to compact the mixture into an even layer.
Firm pressure matters because this No-Bake Chocolate Layered Dessert relies on refrigeration rather than baking to set its crust.
Once the base feels compact, place the dish in the refrigerator for about 20 minutes.
Meanwhile, prepare the chocolate filling.
The cold temperature will firm the butter and create a stronger foundation for the creamy layers.
Keep Some Crunch Between the Creamy Layers
The reference image shows a dark, textured layer running through the center of the chocolate cream.
That middle layer provides an important contrast.
Instead of making one thick block of mousse, adding cookie crumbs between the cream layers gives every serving more texture.
Keep the reserved chocolate crumbs nearby while you prepare the filling.
If you want an even crunchier center, mix ½ cup finely chopped chocolate into those crumbs.
Small chocolate pieces work better than large chunks because the finished No-Bake Chocolate Layered Dessert will slice more easily.
You can also use chocolate sprinkles or finely chopped chocolate wafers.
However, avoid adding too many hard pieces.
You want noticeable crunch without making the dessert difficult to cut.
The middle crumb layer does not need additional melted butter.
In fact, keeping it slightly loose helps create the textured stripe visible between the creamy sections.
When you eventually sprinkle the crumbs over the first layer of chocolate filling, distribute them evenly from edge to edge.
That way, every slice contains the same combination of crunchy crumbs and smooth chocolate cream.
Making a Rich and Fluffy Chocolate Filling
Beat the Cream Cheese Until Completely Smooth
The creamy portion of No-Bake Chocolate Layered Dessert needs enough body to hold its shape after chilling.
Place 8 ounces softened cream cheese in a large mixing bowl.
Beat it with an electric mixer until smooth.
Starting with properly softened cream cheese makes this step much easier and helps prevent small lumps.
Next, add 1 cup powdered sugar.
Beat again until the mixture becomes creamy and uniform.
Add ⅓ cup unsweetened cocoa powder and 1 teaspoon vanilla extract.
Continue mixing until no dry streaks remain.
Scrape the bottom and sides of the bowl with a rubber spatula.
Cocoa can hide in small pockets, so thorough mixing ensures consistent chocolate flavor throughout the filling.
At this stage, the mixture will feel relatively thick.
That is exactly what you want.
The whipped cream added next will lighten it considerably.
Taste a small amount.
The filling should taste rich and chocolatey, with enough sweetness to balance the unsweetened cocoa.
If you prefer deeper chocolate flavor, add another tablespoon of cocoa.
However, avoid adding too much dry cocoa because it can make the filling overly dense.
Fold in Whipped Cream for a Lighter Texture
Pour 2 cups cold heavy whipping cream into a separate mixing bowl.
Beat the cream until stiff peaks form.
When you lift the beaters, the cream should hold its shape without collapsing.
However, stop mixing before it becomes grainy.
Add approximately one-third of the whipped cream to the chocolate cream cheese mixture.
Fold it in gently with a rubber spatula.
This first addition loosens the chocolate base.
Then add the remaining whipped cream in two portions.
Continue folding with broad, gentle movements.
Avoid aggressive stirring because it can knock out too much air.
Once fully combined, the filling for No-Bake Chocolate Layered Dessert should look fluffy, smooth, and mousse-like.
Remove the chilled crust from the refrigerator.
Spread half of the chocolate filling over the cookie base.
Use an offset spatula to create an even layer.
Then sprinkle the reserved chocolate crumbs across the surface.
Gently press them just enough to help them stay in place.
Do not push them deeply into the filling.
Finally, spread the remaining chocolate cream over the crumb layer.
Work gently so the middle crumbs remain distinct.
Smooth the top before adding the final chocolate finish.
Creating the Glossy Chocolate Topping
Make a Simple Chocolate Ganache
A glossy topping gives No-Bake Chocolate Layered Dessert the polished appearance shown in the reference image.
Place 6 ounces chopped semisweet chocolate in a heatproof bowl.
Heat ½ cup heavy cream until it becomes hot and steamy.
Do not let it boil aggressively.
Pour the hot cream directly over the chopped chocolate.
Leave the mixture undisturbed for about 2 minutes.
Then stir slowly from the center outward.
As you stir, the chocolate and cream will combine into a smooth, glossy ganache.
Let the ganache cool for several minutes before adding it to the dessert.
It should remain pourable but should not feel hot.
Hot ganache can soften the cream underneath.
Once slightly cooled, pour it over the top layer.
Use an offset spatula to spread the chocolate evenly.
You do not need a perfectly smooth surface.
In fact, gentle swirls can create an attractive homemade appearance similar to the reference dessert.
The ganache will become firmer as the No-Bake Chocolate Layered Dessert chills.
However, it will remain softer than a hard chocolate shell, which makes cutting much easier.
Add Chocolate Pieces for the Final Crunch
Before the ganache fully sets, scatter approximately ½ cup chopped chocolate, chocolate curls, or chocolate sprinkles across the surface.
The reference image uses small textured chocolate pieces generously over the top.
This final layer reinforces the chocolate flavor while adding visual contrast.
You can use finely chopped milk chocolate for extra sweetness.
Alternatively, dark chocolate creates a more intense finish.
Chocolate curls provide an elegant appearance, while sprinkles offer the easiest option.
Keep the pieces fairly small.
Large chocolate chunks can make clean slicing more difficult.
Once decorated, cover the dish carefully.
Make sure the covering does not touch the ganache.
Then refrigerate the No-Bake Chocolate Layered Dessert for at least 6 hours.
Overnight chilling works even better.
During this time, the cookie crust firms, the cream cheese filling stabilizes, and the ganache develops a soft, sliceable consistency.
The center crumb layer also absorbs just enough moisture to become cohesive without losing all of its texture.
Serving, Storing, and Customizing the Dessert
Get Clean Layers When You Slice
For the best presentation, keep No-Bake Chocolate Layered Dessert refrigerated until you are ready to serve it.
Use a sharp knife to cut the chilled dessert into squares.
For especially neat edges, dip the knife into warm water.
Then wipe it completely dry before making each cut.
Repeat between slices.
This small step helps the blade pass through the ganache and creamy layers without dragging chocolate across the sides.
Use a thin serving spatula to lift each piece from the dish.
The finished square should reveal a dark cookie crust, chocolate cream, crunchy middle stripe, another creamy layer, and glossy topping.
Serve the dessert cold.
Because the filling contains cream cheese and whipped cream, refrigeration helps maintain its structure.
You can add a few fresh strawberries or raspberries to each plate.
Their tart flavor provides a pleasant contrast to the rich chocolate.
Coffee also pairs particularly well with No-Bake Chocolate Layered Dessert.
Try Easy Flavor Variations
Once you know the basic method, this dessert becomes easy to customize.
For a chocolate-peanut butter variation, add ½ cup creamy peanut butter to the cream cheese mixture.
Peanut butter adds richness while complementing the chocolate cookie crust.
For a mint chocolate version, add a very small amount of peppermint extract to the filling.
A little goes a long way.
For mocha flavor, dissolve 1 teaspoon instant espresso powder in the vanilla before adding it to the chocolate mixture.
Coffee intensifies the cocoa without making the dessert taste overwhelmingly like coffee.
You can also add toasted hazelnuts or pecans to the middle crumb layer.
Chop them finely so the No-Bake Chocolate Layered Dessert remains easy to slice.
Store leftovers covered in the refrigerator.
The dessert tastes best within several days.
You can also freeze individual portions.
Freeze them until firm, wrap them carefully, and place them in an airtight freezer container.
Thaw the portions overnight in the refrigerator before serving.
The cream may become slightly softer after freezing, but the dessert should remain rich and enjoyable.
Frequently Asked Questions
Can I make No-Bake Chocolate Layered Dessert the day before?
Yes. Overnight chilling actually works very well. It gives the filling, cookie layers, and chocolate topping plenty of time to firm before slicing.
What kind of cookies should I use?
Chocolate sandwich cookies create a dark, flavorful crust and middle layer. However, chocolate wafer cookies or another crisp chocolate cookie can also work.
Why is my chocolate filling too soft?
The filling may need additional refrigeration. Also, make sure you whip the heavy cream to stiff peaks before folding it into the cream cheese mixture.
Can I use whipped topping instead of heavy cream?
Yes. Whipped topping offers a convenient substitute. However, freshly whipped heavy cream gives No-Bake Chocolate Layered Dessert a richer flavor.
Can I freeze this chocolate dessert?
Yes. Freeze individual portions for easier storage. Thaw them in the refrigerator before serving so the filling softens gradually.
Conclusion
No-Bake Chocolate Layered Dessert delivers an impressive combination of chocolate flavor and contrasting textures without requiring an oven.
A buttery chocolate cookie crust creates the foundation.
Next, fluffy chocolate cream cheese filling adds a rich but airy layer.
A stripe of crunchy cookie crumbs runs through the center, creating the textured appearance seen in the reference image.
Then another generous layer of chocolate cream covers the crumbs.
Finally, silky chocolate ganache and chopped chocolate finish the top.
Although No-Bake Chocolate Layered Dessert looks elaborate when sliced, each part uses straightforward techniques.
Crush the cookies.
Whip the cream.
Mix the chocolate filling.
Build the layers.
Then let the refrigerator finish the job.
For the best results, chill the completed dessert for at least 6 hours or overnight.
That waiting period allows everything to become firm enough for attractive slices while keeping the filling creamy.
Serve it cold with fresh berries, coffee, or simply on its own.
Whether you prepare it for a birthday, holiday dinner, potluck, family gathering, or weekend chocolate craving, No-Bake Chocolate Layered Dessert offers plenty of rich chocolate flavor in every creamy, crunchy bite.