Introduction
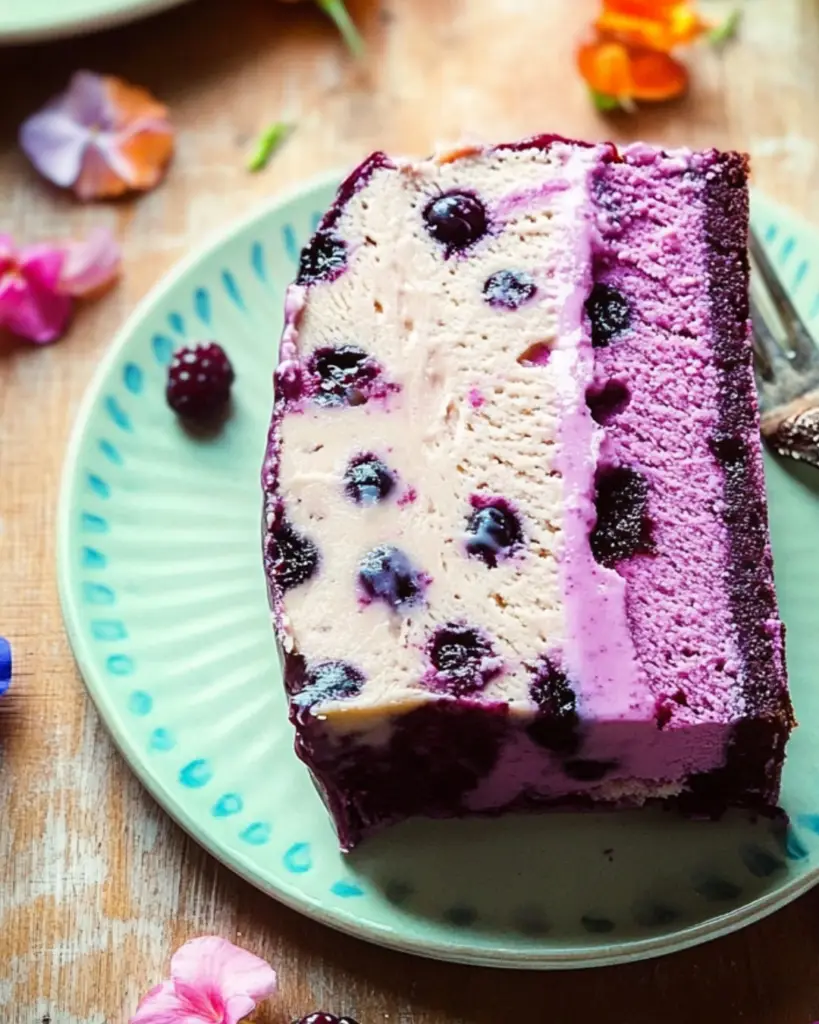
As the world quiets down and a tranquil hush settles in, there’s something incredibly satisfying about pulling out a decadent treat just in time for that late-night craving. The Midnight Berry Ice Cream Loaf Cake is your invitation to indulge in a whimsical dessert narrative that combines the creamy, nostalgic allure of ice cream with the fresh, vibrant flavor profile of seasonal berries. This no-bake dessert offers a rich tapestry of taste and texture, delighting your senses with every bite. Designed to be the centerpiece at your next midnight feast, this cake is as visually stunning as it is delicious, making it perfect for a small gathering or a late-night indulgence. So, gather your scoops and spatulas as we delve into the heart of this frosty delicacy that promises to bring a sweet end to your day.
Detailed Ingredients
Creating the Midnight Berry Ice Cream Loaf Cake is as much about embracing each component’s individual essence as it is about marrying them into harmony. Every ingredient is chosen to enhance the overall dessert, from the comforting embrace of creamy ice creams to the tangy sparkle of fresh berries.
– 2 cups of vanilla ice cream, softened: Vanilla ice cream serves as the base layer of our dessert, its creamy, sweet simplicity setting the stage for more complex flavors.
– 1 cup of chocolate ice cream, softened: This layer adds richness and depth, its iconic taste enhanced by the crumbly cookies and juicy berries.
– 2 cups of crushed chocolate cookies: Using your favorite chocolate cookies, either store-bought or homemade, will introduce a crunchy texture that contrasts beautifully with the soft layers of ice cream and berries.
– 1 cup of mixed berries (blueberries, raspberries, and chopped strawberries): Fresh berries give the cake a burst of tangy freshness, cutting through the richness of the ice creams.
– 1/4 cup of sugar: This balances the tartness of the berries, enhancing their natural sweetness without overwhelming their flavor profile.
– 2 tablespoons of water: Essential for creating a syrupy consistency in the berry compote.
– 1 teaspoon of vanilla extract: This adds a warm, aromatic depth, blending seamlessly with both layers of ice cream.
– 1/2 cup of whipped cream: Whipped cream is the final touch that adds a fluffy lightness, finishing the dessert with a creamy flourish.
– Additional berries and mint leaves for garnish: These provide the finishing artistic touches, adding visual appeal and extra flavors to each serving.
Prep Time, Cook Time, Total Time, Yield
To achieve this culinary delight, you will need to dedicate a bit of time. While the steps are simple, allowing for a hands-off approach during the freezing period, attention to detail will ensure the most delicious outcome.
– Prep Time: 20 minutes
– Cook Time: 7 minutes
– Total Time: 4 hours 27 minutes
– Yield: 8 servings
Detailed Directions and Instructions
1. Preparing the Loaf Pan
Begin by thoroughly lining a loaf pan with parchment paper, allowing the sides to overhang, which will facilitate lifting the cake out later. Proper preparation of the pan is key to achieving a clean, picture-perfect finish.
2. Creating the Berry Layer
In a small saucepan over medium heat, mix together the 1 cup of mixed berries, 1/4 cup of sugar, and 2 tablespoons of water. Stir the mixture gently as it heats, allowing the sugar to dissolve and the berries to release their juices. Cooking for 5-7 minutes should produce a soft, syrupy compote. Remove from the heat and immediately stir in the vanilla extract, infusing the berry mixture with its aromatic warmth. Set aside to cool to room temperature.
3. Assembling the Layers
Spread the softened vanilla ice cream evenly on the bottom of the prepared loaf pan, smoothing it out with a spatula. Sprinkle half of the crushed chocolate cookies over this layer, pressing them in lightly to ensure they adhere to the ice cream.
4. Adding the Berry Compote
Once cooled, pour the berry mixture over the cookie layer, using the back of a spoon to distribute it evenly. This layer will soak into the cookies slightly, infusing them with berry flavor.
5. More Layers of Flavor
Spoon the softened chocolate ice cream over the berry compote, spreading it to create a smooth, even layer. Follow with the remaining crushed cookies, pressing them gently into the chocolate ice cream.
6. Completing the Cake
Finish by spreading the whipped cream across the top. This layer will not only add a light, airy texture but also create a beautiful blank canvas on which to add the garnishes.
7. Freezing
Place the assembled cake in the freezer for at least 4 hours or until completely firm. The extended freezing time allows the flavors to meld together and the layers to set fully.
8. Serving the Masterpiece
To serve, use the overhanging parchment paper to lift the cake from the pan. Slice with a sharp knife, wiping it clean between cuts to maintain the integrity of each slice. Garnish with fresh berries and mint leaves for a final pop of color and hint of fresh flavor.
Notes
When selecting berries, consider choosing those that are in season for the most robust flavor. For an extra punch of indulgence, drizzle melted chocolate over the top before freezing to create a shell-like texture that complements the soft interior. Adjust the sugar level in the berry compote to your liking, especially if using berries that vary significantly in tartness.
Cook Techniques
The key technique in this recipe is layering, which ensures each component retains its texture and flavor while contributing to the whole. When assembling the layers, ensure each component is evenly distributed to prevent any section from overpowering the dish with a single texture or flavor. Freezing the cake after layering is vital to set the structure, transforming it from a simple assembly of ingredients into a cohesive, sliceable dessert.
FAQ
1. Can I use different flavors of ice cream?
Absolutely! While the classic vanilla and chocolate combination is a tried-and-true favorite, feel free to experiment with different flavors. Consider using coffee ice cream for a mocha twist or a berry-flavored ice cream to intensify the fruitiness.
2. Is it possible to make this dessert ahead of time?
Certainly. This dessert can be made up to a week in advance. Keep it tightly covered in the freezer to prevent freezer burn or absorption of other flavors.
3. What if I don’t have a loaf pan?
Use any similar-sized deep dish or square pan as an alternative, adjusting the layering process to fit the chosen dish.
Conclusion
The Midnight Berry Ice Cream Loaf Cake is more than just a dessert. It’s a fusion of flavors and textures, creating a sensory journey that delights both taste and sight. Perfect for sharing with others during a late-night gathering or enjoying alone as a personal indulgence, this dessert embodies a luxuriously convenient take on culinary creativity.
More Recipe Suggestions and Combinations
Take the inspiration from this dessert and explore other no-bake options. Consider a tropical version with mango and coconut ice cream, or a Nutella twist by adding a layer of hazelnut spread. For cookies and cream lovers, intensify the cookie content, or for a classic touch, incorporate a layer of banana for a banana split homage. The possibilities are as limitless as your imagination, making these variations perfect companions to the Midnight Berry Ice Cream Loaf Cake at any dessert table.

Midnight Berry Ice Cream Loaf Cake
Ingredients
Method
- Line a loaf pan with parchment paper, allowing edges to overhang.
- In a small saucepan over medium heat, combine mixed berries, sugar, and water. Stir until sugar dissolves and berries release juices, cooking for 5-7 minutes until syrupy.
- Remove from heat and stir in vanilla extract. Set aside to cool.
- Spread softened vanilla ice cream evenly across the bottom of the pan and sprinkle half the crushed cookies, pressing them lightly.
- Pour the cooled berry mixture over the cookie layer, spreading evenly.
- Spoon softened chocolate ice cream over the berry layer and add the remaining crushed cookies.
- Spread whipped cream across the top as the final layer.
- Place the cake in the freezer for at least 4 hours or until completely firm.
- Lift the cake from the pan using parchment paper and slice with a sharp knife, cleaning between cuts.
- Garnish with fresh berries and mint leaves before serving.