Before we dive into this glittering little science-meets-art adventure, let me just say how grateful I am that you’re here—ready to roll up your sleeves and create something absolutely magical! Whether you’re a parent looking for a hands-on learning moment, a teacher planning a classroom project, or simply a curious soul wanting to add a bit of sparkle to your day, this Crystal Growing Experiment is pure joy in a jar.✨
This is not just a science experiment—it’s a dazzling memory in the making. And I promise, when you pull those shimmering crystal stars out of the jar after 24 hours? You’ll be just as wide-eyed as the kids!
💌 Want this recipe straight to your inbox?
Subscribe to get more creative experiments and family-friendly projects delivered fresh every week!
What Is the Crystal Growing Experiment?
This crystal growing activity is a STEM-friendly project that blends science, creativity, and a bit of kitchen alchemy. Using just Borax, hot water, and pipe cleaners, you can create stunning, star-shaped crystal ornaments that sparkle like something from a fairy tale.
Why You’ll Absolutely Love This Project
- Educational + Entertaining – Teaches kids about supersaturation and crystal formation while keeping them completely engaged.
- Minimal Ingredients – Just a few household items turn into a science lab!
- Mess-Free Magic – The setup is simple, and cleanup is a breeze.
- Customizable Designs – Switch up the shapes, colors, and sizes. The sky’s the limit!
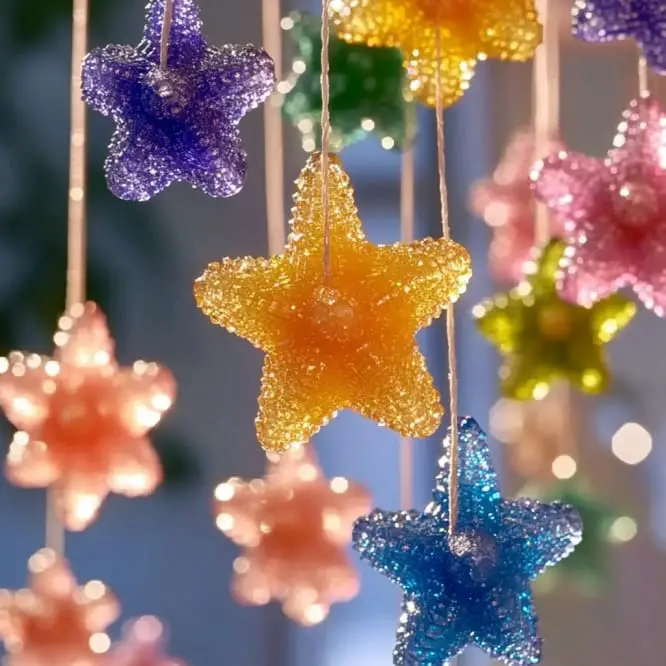
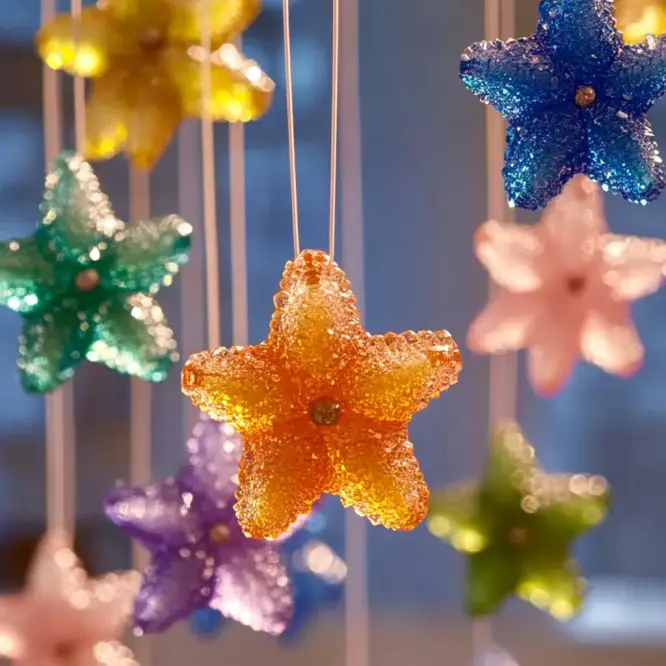
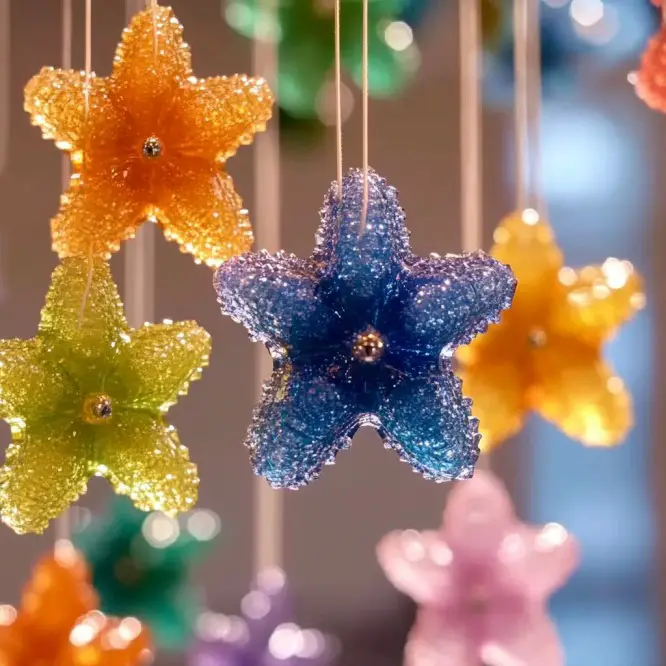
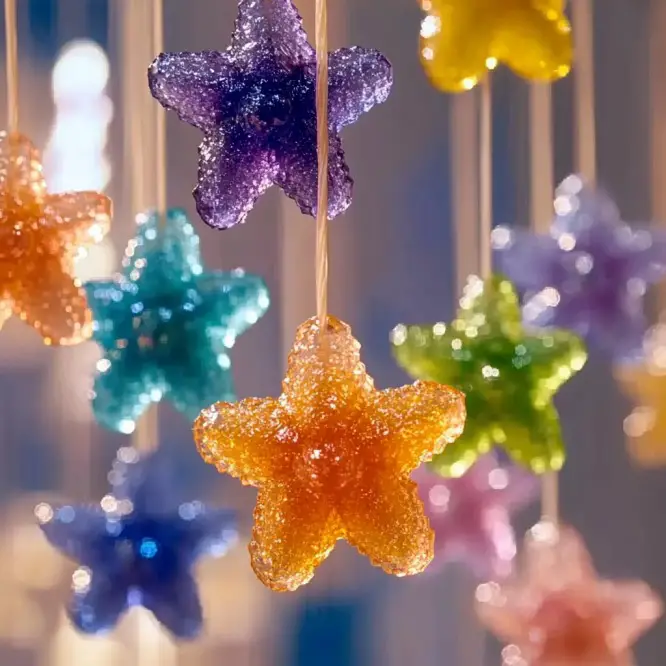
What Do the Crystals Look Like?
They grow overnight into frosted, snowy clusters of glittering beauty. The texture is crystalline, similar to sugar rock candy, and the effect? Stunning. They catch the light and look absolutely gorgeous hung in windows, on holiday trees, or even as gift toppers!
Benefits of This Project
- Hands-on science exploration
- Encourages patience and observation
- Builds fine motor skills
- Promotes creativity and experimentation
- Perfect for holiday crafts or homeschool science units
🛒 Ingredients List
- 3 cups boiling water
- ¾ cup Borax (found in the laundry aisle!)
- 6 pipe cleaners
- 2 pieces of string
- Popsicle sticks
- Optional: Food coloring
🔧 Tools You’ll Need
- Mason jars or wide glass containers
- Measuring cups
- Spoon for stirring
- Scissors
- Paper towels for drying
🌈 Optional Additions & Variations
- Add food coloring to make colored crystals.
- Use shaped cookie cutters to guide the pipe cleaners into stars, hearts, or snowflakes.
- Try glitter pipe cleaners for extra sparkle (though crystals may hide the glitter).
- Swap popsicle sticks with pencils or chopsticks in a pinch.
🧪 How to Grow Crystals – Step-by-Step Instructions
1. Shape Your Stars
Bend each pipe cleaner around a cookie cutter to create a star shape. Twist the ends to secure and trim any excess.
2. String It Up
Tie one end of a string to the top of each star. Attach the other end to a popsicle stick.
3. Set the Stage
Gently lower the star into a mason jar so it hangs freely and doesn’t touch the sides. Rest the popsicle stick horizontally across the jar’s opening.
4. Mix the Magic Solution
In a separate container, stir ¾ cup Borax into 3 cups boiling water until fully dissolved. (This creates a supersaturated solution.)
5. Pour and Wait
Pour the solution into the mason jar, making sure to cover the star completely. Now, patience! Let it sit undisturbed for 12–24 hours.
6. Reveal the Crystals
After a day, gently lift the star from the jar. Marvel at the crystal formations, then lay it on a paper towel to dry completely.
🍽️ What to Pair With This Project
Okay, hear me out—I know this isn’t a food recipe, but trust me, every good project is better with snacks! Serve up some:
- Hot cocoa and marshmallows
- A tray of sugar cookies (bonus if they’re star-shaped!)
- Fresh fruit for a sweet science snack session
💡 Pro Tips for Sparkly Success
- Use boiling water, not just hot tap water.
- Make sure your Borax is fully dissolved before pouring.
- Don’t disturb the jars—crystals need peace to grow!
- Test different shapes and note how the formations change.
🧊 Storage Instructions
Once dried, the crystal stars can be stored in a dry, cool place. Keep them in a box lined with tissue paper or bubble wrap to protect them. They’ll last for years as beautiful keepsakes!
📚 General Info
- Best for kids ages 6+ with adult supervision.
- Crystals are NOT edible – please remind little ones!
- Great for classroom science, holiday crafts, or STEM fairs.
❓ FAQ – You Asked, I Answered!
Can I use sugar or salt instead of Borax?
Not for this effect. Borax forms faster, clearer crystals. Sugar/salt crystals grow differently and take longer.
Are Borax crystals safe?
Yes, with proper supervision! Just don’t eat them or touch your face while handling the solution. Always wash hands after.
Can I reuse the solution?
You may be able to reheat and use once more, but crystals may be smaller.
✨ Wrap-Up: Why You’ll Love Growing Crystals at Home
This crystal growing experiment is anything but boring!! It’s the kind of project that sneaks in learning, encourages creativity, and gives you a physical (and sparkly) reward at the end. I’m kicking myself for not having shot it sooner—it’s that pretty on camera. 💫
If you loved this, you’ll definitely want to try:
- DIY Rock Candy
- Homemade Snowflake Ornaments
- Salt Dough Handprints with Glitter
📸 Share the Sparkle!
Made your own crystal stars? I’d love to see them!
📌 Pin your creations on Pinterest and tag me so I can feature your brilliance!
💬 Leave a review below—your tips and photos inspire others to try it too!
🧮 Nutritional Info (Just Kidding—But Seriously)
No calories here! Just shimmering science, imagination, and smiles per serving.
Ready to turn science into sparkle? 🧪💖
Let the crystals grow—and the memories too.
Would you like a printable version of this experiment with photos and bonus variations?
Crystal Growing Experiment
Ingredients
Method
- Bend each pipe cleaner around a cookie cutter to create a star shape. Twist the ends to secure and trim any excess.
- Tie one end of a string to the top of each star. Attach the other end to a popsicle stick.
- Gently lower the star into a mason jar so it hangs freely and doesn’t touch the sides. Rest the popsicle stick horizontally across the jar’s opening.
- In a separate container, stir ¾ cup Borax into 3 cups boiling water until fully dissolved.
- Pour the solution into the mason jar, making sure to cover the star completely. Let it sit undisturbed for 12–24 hours.
- After a day, gently lift the star from the jar. Marvel at the crystal formations and lay it on a paper towel to dry completely.


