Let me start by saying thank you for being here—truly. Whether you’re a curious parent, a creative teacher, or just someone looking for an interactive afternoon of fun, you’re in the right place. These Homemade Bouncing Balls are part science experiment, part DIY toy, and totally entertaining.

Kids love making them—and let’s be honest, grown-ups do too! With just a few basic ingredients, you’ll go from mixing to bouncing in less than 30 minutes. It’s fast, fun, and packed with learning!
Want more awesome STEM crafts like this delivered to your inbox? Don’t forget to subscribe below and let the fun keep rolling! 😉
What Are Homemade Bouncing Balls?
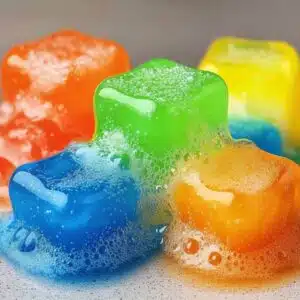
Homemade bouncing balls are squishy little spheres made from a glue and borax reaction. The texture is rubbery, stretchy, and—yes—super bouncy! You’re actually watching chemistry in action as molecules link up and form a flexible, bouncy polymer.
It’s a satisfying blend of craft, science, and play—and the results are genuinely fun to toss, bounce, and customize.
Why You’ll Love This Craft
- 🧪 STEM-friendly – a great intro to polymers and chemical reactions
- ✋ Hands-on and engaging – tactile, colorful, and kid-approved
- 🕒 Quick results – bounce-ready in under 20 minutes
- 🌈 Customizable – change colors, add glitter, or make them glow!
- 💡 Educational + fun – sneak in some science while playing

What Do These Balls Look and Feel Like?
They’re soft, squishy at first, and then firm up into rubbery, slightly squiggly spheres. Each ball is about the size of a gumball or small bouncy ball. The color options are endless—and if you add glow-in-the-dark paint? Total showstopper.
They’re springy, a bit stretchy, and bounce surprisingly high when tossed onto a hard surface!
Ingredients & Materials
You’ll Need:
- ✅ 1 tablespoon white school glue
- ✅ 1 tablespoon water
- ✅ ½ teaspoon borax powder
- ✅ Food coloring (optional)
- ✅ ¼ teaspoon cornstarch (optional, for firmer texture)
- ✅ Glow-in-the-dark paint (optional, for glowing fun!)
- ✅ Ziplock bag (optional, for no-mess mixing)
Tools:
- Small mixing bowl
- Separate borax bowl
- Spoon or craft stick
- Clean hands for kneading
How to Make Bouncing Balls – Step-by-Step
1. Prep Your Workspace
Lay down wax paper or a tray to protect your table. Gather your materials and bowls.
2. Mix Glue & Water
In your first bowl, add:
- 1 tablespoon white school glue
- 1 tablespoon water
Mix well until smooth.
3. Add Color (Optional)
Drop in your favorite food coloring or glow paint. Stir again to mix the color evenly.
4. Make the Borax Solution
In a separate bowl, dissolve:
- ½ teaspoon borax powder
- 1 tablespoon warm water
Stir until fully dissolved.
5. Combine and Stir
Slowly pour the borax solution into the glue mixture while stirring. Watch as it starts to clump together—this is the polymer magic at work!
6. Knead by Hand
Once it gets sticky and thick, remove the clump and begin kneading with your hands. Knead for 1–2 minutes, until it’s no longer tacky.
7. Add Cornstarch (Optional)
If the mixture feels too soft or sticky, knead in ¼ teaspoon of cornstarch for a firmer bounce.
8. Shape Into Balls
Roll the dough between your palms to form smooth, tight balls. Smaller balls bounce better!
9. Let Them Rest
Place your balls on a flat surface for 10 minutes. This allows them to firm up before bouncing.
10. Bounce Away!
Test your ball on a hard surface. Watch it spring up and enjoy the science in action!
Tips for Best Results
- Want multiple colors? Make separate batches with different dye drops.
- Balls bounce best when they’re smooth and firm—roll tightly!
- If the ball feels too sticky, dust hands with cornstarch or a little borax.
- Store balls in a ziplock bag or airtight container to keep them from drying out.
What to Do with Your Homemade Bouncy Balls
- 🎯 Set up bounce-and-catch challenges
- 🎨 Make themed balls—think galaxy, neon, or glow
- 🧪 Turn it into a science lesson—talk about polymers and elasticity
- 🎁 Wrap them in clear bags for birthday party favors!
FAQs: Homemade Bouncy Balls
Is Borax safe for kids?
Yes—with supervision! Borax is safe for crafts when used in small amounts. Always wash hands afterward and avoid ingestion.
Can I skip the borax?
Borax is what creates the bouncy texture, so it’s essential for this particular recipe. But you can explore cornstarch + baking soda recipes for a borax-free version.
How long do the balls last?
They’re best for same-day play, but if stored in a sealed bag, they can last up to a week. Over time, they may dry out or flatten.
Why is my ball not bouncing?
It may be too sticky or soft. Try adding a little more cornstarch or kneading longer to improve texture.
In Summary: Why This Craft Is a Bounce Above the Rest
Homemade bouncing balls are a fast, fascinating, and fun project that delivers big smiles and even bigger bounces. Whether you’re doing it for a science unit, rainy day boredom, or just because, this activity ticks all the boxes: creative, educational, and wildly entertaining.
And when you see those eyes light up at the first bounce? You’ll know it was time well spent. 💙
More Hands-On DIYs You’ll Love:
- 💎 Borax Crystal Growing
- 🧼 Foamy Soap Dough Sensory Play
- 🌈 DIY Puffy Paint
- 🎨 Salt Painting for Kids
Tell me which one you want next—I’m ready to get creative with you!
Show Off Your Bounce! 🌟
Did you make your own bouncing balls?
📌 Pin this craft on Pinterest and tag me with your colorful creations!
📸 Or leave a comment with your favorite combos—I’d love to see how yours turned out!
“Nutritional” Value (Non-Edible Craft)
- 🧠 100% Curiosity
- 💡 100% Learning
- ⚽ 100% Bounce
- 🍴 0 Calories (but please don’t eat them!)
Thanks for bouncing by. Keep crafting, keep learning, and keep having fun—because the best projects are the ones made with joy. 💫
Homemade Bouncing Balls
Ingredients
Method
- Lay down wax paper or a tray to protect your table. Gather your materials and bowls.
- In your first bowl, add 1 tablespoon white school glue and 1 tablespoon water. Mix well until smooth.
- Drop in your favorite food coloring or glow paint. Stir again to mix the color evenly.
- In a separate bowl, dissolve ½ teaspoon borax powder in 1 tablespoon warm water. Stir until fully dissolved.
- Slowly pour the borax solution into the glue mixture while stirring. Watch as it starts to clump together.
- Once it gets sticky and thick, remove the clump and begin kneading with your hands for 1–2 minutes.
- If the mixture feels too soft or sticky, knead in ¼ teaspoon of cornstarch for a firmer bounce.
- Roll the dough between your palms to form smooth, tight balls.
- Place your balls on a flat surface for 10 minutes to firm up before bouncing.
- Test your ball on a hard surface and enjoy the science in action!