Some of the best kids’ activities are the ones that blend creativity with curiosity — and Fizzy Art does exactly that! With just a few simple kitchen ingredients, this process art activity turns your child’s curiosity into a vibrant science experiment that bubbles, fizzes, and delights.
The first time I did this with my nephew, he was mesmerized — eyes wide, little fingers dropping colorful vinegar onto the baking soda with squeals of excitement. It’s sensory, it’s visual, and it’s just messy enough to feel like real fun!
💌 Want more colorful, low-prep STEAM crafts delivered straight to your inbox? Subscribe now and never run out of creative ideas again!
🔬 What is Fizzy Art?
Fizzy art is a playful process-based art project that combines baking soda and vinegar to create a fizzy chemical reaction. The twist? Add food coloring, and you’ve got a bubbling, swirling, color-mixing explosion right on paper!
This is part science experiment, part abstract art — and all parts awesome. It’s perfect for toddlers, preschoolers, elementary-age kids, or anyone who loves watching art come alive!
💥 Why You’ll Love Fizzy Art
- Engaging STEAM activity that combines art + science
- Low-prep and budget-friendly – made from kitchen staples
- Open-ended and creative – no “right” way to do it
- Supports learning in color theory, chemical reactions, and motor skills
- Fun for all ages – toddlers to tweens will be fascinated
What It Looks and Feels Like
As you drop colored vinegar onto the baking soda, bubbles immediately start forming, popping and fizzing in bursts of color. The surface becomes a blend of soft pastels and bright pigments that swirl together with a delightful crackle and pop!
🧂 Ingredients & Materials You’ll Need
- Baking soda – your fizzing base
- White vinegar – activates the reaction
- Food coloring – choose a variety of vibrant shades
- Small cups or bowls – to mix vinegar + color
- Pipettes, droppers, or paintbrushes – for application
- Watercolor paper, cardstock, or thick paper – holds up to wet media
- Shallow tray or baking sheet – to contain the mess (and the fun!)
Optional Add-ons:
- Glitter or sequins (because sparkle makes everything better!)
- Spoons or spatulas (for layering baking soda)
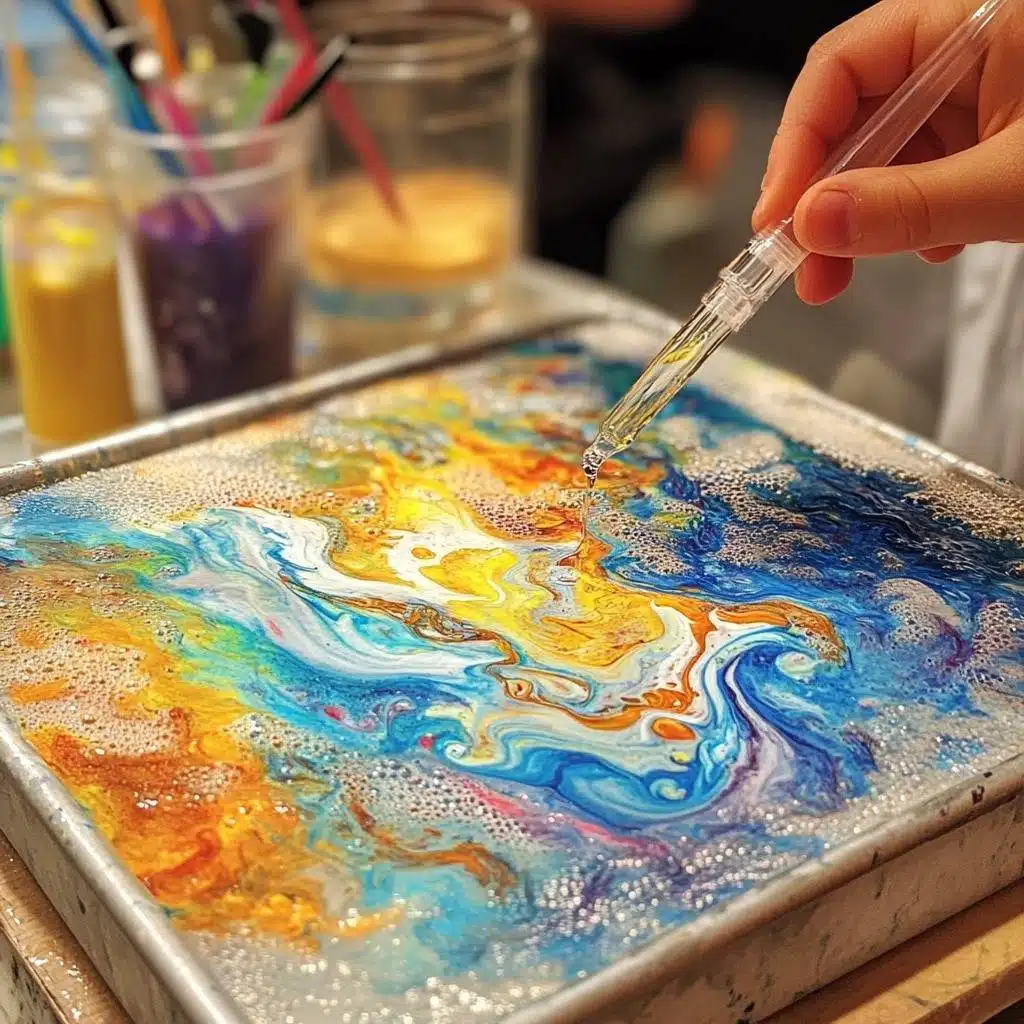
🎨 How to Create Your Own Fizzy Art
1. Set Up Your Canvas
Place your paper in a shallow tray or baking sheet. This keeps the fizz contained and makes clean-up a breeze!
2. Sprinkle the Baking Soda
Generously cover the paper with baking soda. Spread it evenly or get creative with patterns — it’s up to you.
3. Mix Your Fizzy Paints
In separate cups, mix a few drops of food coloring with white vinegar. The more food coloring, the more vivid your fizz!
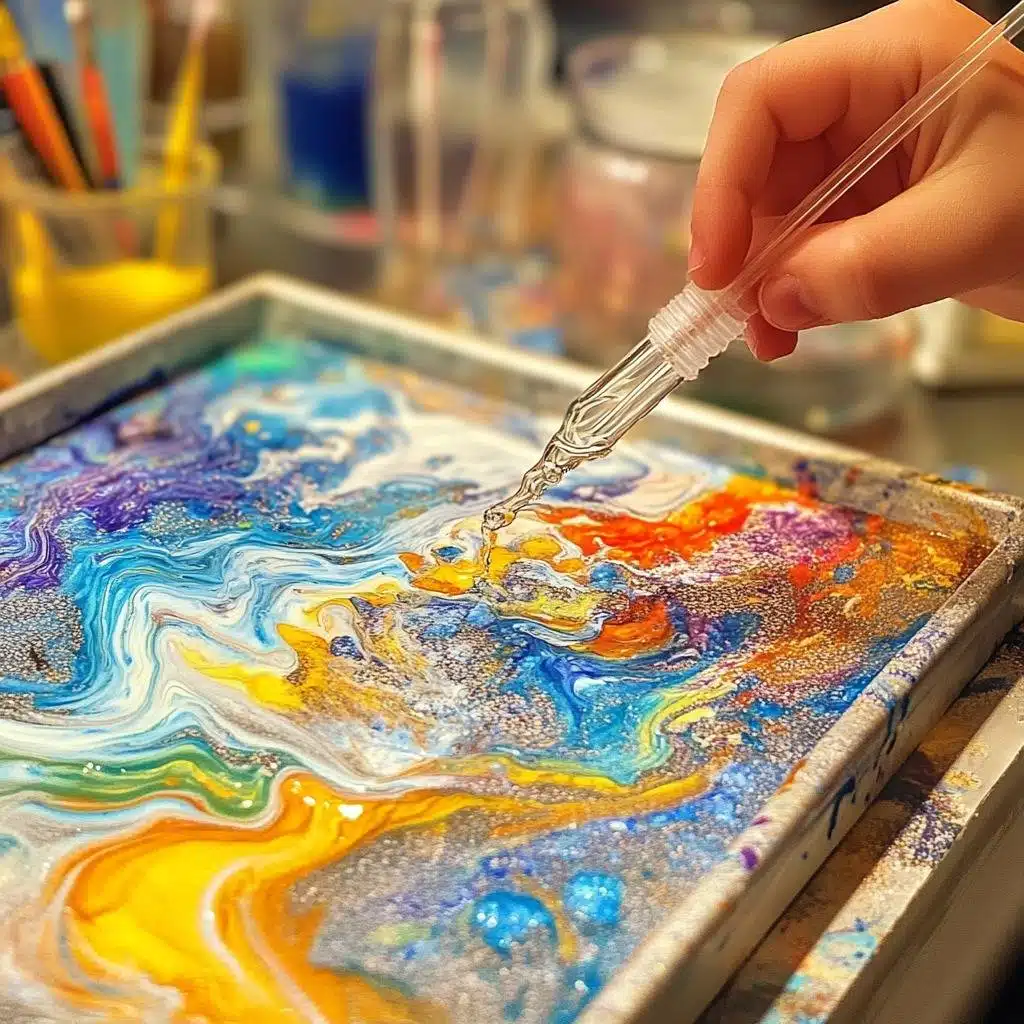
4. Start the Fun!
Using droppers or brushes, drip the colored vinegar onto your paper. Watch the fizzy reaction bring your artwork to life!
5. Explore and Experiment
Layer different colors, try small drops vs. big splashes, or target specific areas with more baking soda for dramatic fizzing bursts. This is a great time to talk about primary and secondary colors too!
6. Let It Dry
Once the fizzing stops, set your paper aside to dry completely. The result is a textured, abstract painting full of color and movement.
🧠 Educational Benefits of Fizzy Art
- STEAM learning – introduces chemical reactions in a fun way
- Fine motor development – great practice for using pipettes or droppers
- Creative expression – no rules, just exploration!
- Color theory – observe how colors mix and blend
- Sensory play – engaging visuals, sounds, and even smells
🌟 Bonus Tips & Fun Variations
- Shape it Out: Use the glue method from salt painting to draw shapes first, then fill them in with baking soda for more structured fizz art.
- Add Sparkle: Sprinkle glitter or sequins while the paper is still wet to catch the light once dried.
- Create Rainbows: Drop colors in ROYGBIV order and watch a fizzy rainbow unfold!
- Fizz Freeze Art: Chill the vinegar before adding it for a unique texture as it fizzes more slowly.
❓ Frequently Asked Questions
Can I use regular paper instead of watercolor paper?
It’s best to use thick or watercolor paper since regular printer paper will tear easily when wet. Cardstock can work in a pinch.
Is this safe for toddlers?
Yes! All ingredients are non-toxic, but adult supervision is still recommended to avoid tasting or overuse of materials.
How long does it take to dry?
Most paintings will dry in 1–2 hours, depending on how much vinegar was used. Lay flat and avoid touching until fully dry.
Can I save the leftover baking soda or vinegar mixture?
The colored vinegar can be saved for a day or two in sealed containers. Baking soda that has been used should be discarded after the activity.
🖼️ In Conclusion
Fizzy Art is an explosion of learning and creativity that brings the wonder of science right onto your child’s canvas. It’s affordable, fun, and a total crowd-pleaser — ideal for playdates, classrooms, or a rainy afternoon at home.
It’s not about perfect pictures — it’s about the joy of discovery, the magic of the fizz, and the freedom to create without rules. ✨
📸 Show Us Your Fizzy Creations!
We love seeing your art in action! Share your fizz-tastic masterpieces using #FizzyArtFun on Pinterest or Instagram and inspire others to try this playful project too. 💬 Don’t forget to comment with your favorite color combos or reactions!
🧪 More STEAM Activities for Curious Kids:
- Salt Painting: Colorful Capillary Action on Paper
- Magic Milk Color Swirl Experiment
- Bubble Art with Dish Soap & Food Coloring
Thanks for adding color and curiosity to your world — one fizzy drop at a time! 💥🎨💧
Fizzy Art
Ingredients
Method
- Place your paper in a shallow tray or baking sheet to keep the fizz contained and make clean-up easier.
- Generously cover the paper with baking soda. Spread it evenly or create patterns.
- In separate cups, mix a few drops of food coloring with white vinegar. The more food coloring you use, the more vivid the fizz!
- Using droppers or brushes, drip the colored vinegar onto your paper and watch the fizzy reaction bring your artwork to life!
- Layer different colors, experiment with drops vs. splashes, and talk about colors while observing the fizzing.
- Once fizzing stops, set your paper aside to dry completely, resulting in a textured, colorful abstract painting.