Before we dive in, can I just say thank you? Thank you for taking time out of your day to explore something creative and joyful for the little ones (or yourself—no judgment here, salt painting is magical at any age!). If you’re on the hunt for an art activity that’s both beautiful and brain-boosting, this DIY salt painting is about to steal your heart.
And hey—don’t miss out! If you’d love more fun crafts like this delivered straight to your inbox, be sure to subscribe to get weekly kid-approved ideas that spark creativity and connection.
Why You’ll Love This DIY Salt Painting Flower Craft
This isn’t just another kids’ art project—this is science-meets-art-meets-wow. Salt painting is a sensory experience, a creative outlet, and a gorgeous art form all in one. Here’s why it’s a winner:
- 🧠 Educational: It introduces color blending, texture, and capillary action in a way kids can see in real time.
- 🎨 Creative: There are no rules here—flowers, butterflies, sunshine, even fireworks! Anything goes.
- 🧼 Low Mess: Yes, it’s a craft with glue and salt, but setup and cleanup are a breeze.
- 💛 Magical for All Ages: Whether you’re crafting with toddlers or tweens, this project adapts to every skill level.
What Does Salt Painting Look and Feel Like?
Imagine vibrant colors gliding along a glittery, salty trail—like watercolor fireworks on a garden path. The texture is raised and crunchy, the colors blend like magic, and the final product looks like something you’d frame. Bonus: the painting process is so calming that it often turns into a mindful moment for everyone involved.
The Benefits of This Craft
- Encourages fine motor skill development
- Teaches basic principles of science and art
- Inspires creative confidence
- Offers sensory stimulation
- Creates lasting keepsakes
Ingredients & Tools You’ll Need
Ingredients:
- White school glue (PVA)
- Fine grain table salt
- Watercolor paints (or liquid watercolors/food coloring + water)
Tools:
- Paintbrushes, pipettes, or droppers
- Heavyweight paper (like watercolor paper or thick cardstock)
- Small cups or palette for paint
- Tray or newspaper (to catch extra salt)
Optional Additions & Substitutions
- Use colored salt for a different effect (just mix salt with a bit of food coloring and let it dry).
- Add glitter to the salt for sparkle.
- Try different paint tools like Q-tips or straws for a new technique.
- Replace watercolors with tempera paint diluted with water.
How to Make Salt Painting Flowers – Step-by-Step
1. Prep Your Space
Lay out your materials and cover your workspace with a tray or newspaper. Salt goes everywhere if you’re not ready!
2. Draw with Glue
Using your glue bottle, draw simple flower shapes—petals, stems, leaves. Feel free to freestyle or follow a pencil sketch.
3. Salt the Glue
While the glue is still wet, sprinkle a generous amount of salt over your glue lines. Shake off the excess salt onto your tray for reuse.
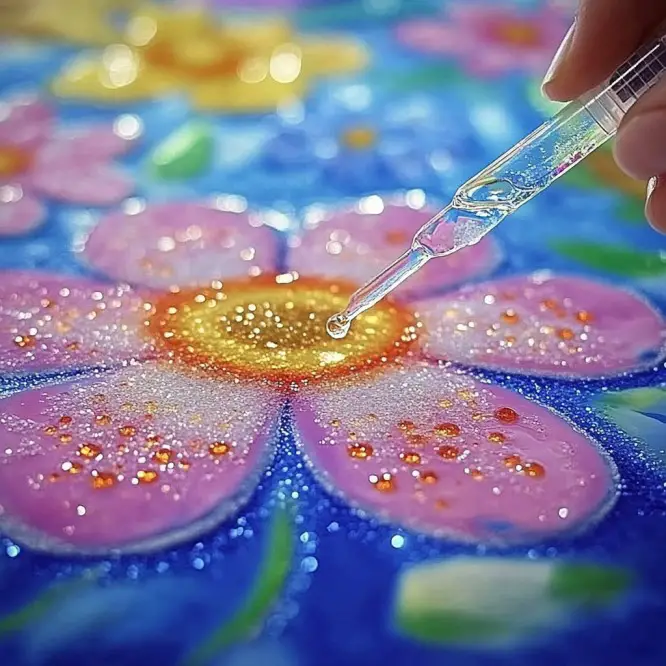
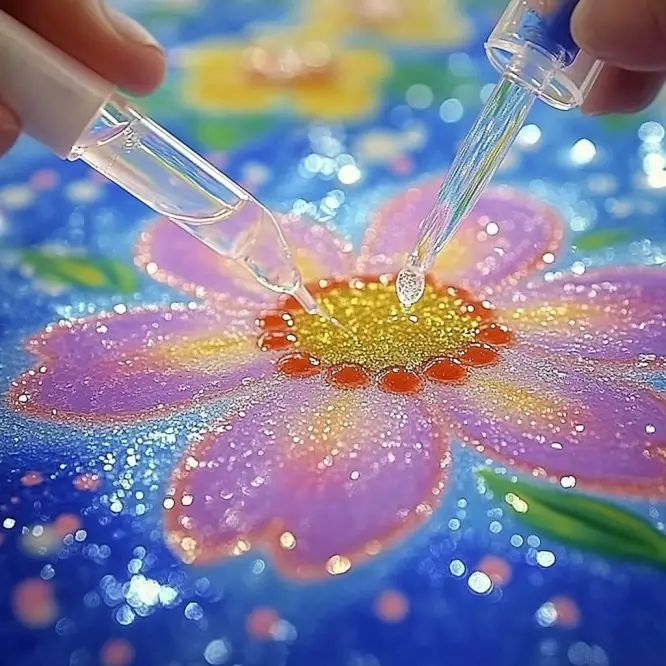
4. Paint with Magic
Dip your brush or dropper into the watercolor and gently touch the salted glue. Watch as the color flows—this part never gets old!

5. Let It Dry
Lay the painting flat and let it dry completely (a few hours or overnight is best). Resist the urge to touch—it’s delicate while wet.
6. Display With Pride
Once dry, your artwork is ready to shine! Frame it, hang it in a window, or use it as a handmade card.
What to Pair With This Activity
This salt painting project pairs beautifully with:
- A nature walk to gather flower ideas 🌸
- A storytime session with books about gardens or spring
- A lesson on the science of absorption
- A calming background playlist for a full sensory experience
Tips for Success
- Thicker glue lines = better salt adherence
- Test your watercolor consistency—too much water can oversaturate the salt
- Dry flat and undisturbed to avoid color bleeding
- Use darker or more vibrant colors for stronger contrast
Storage Instructions
While salt paintings aren’t the most long-lasting artworks due to their fragile texture, they can be preserved for display:
- Keep them in a cool, dry place
- Consider sealing lightly with a spray fixative (test first!)
- Avoid humid or wet areas to prevent salt degradation

FAQs About Salt Painting Flowers
Can I use regular printer paper?
It’s better to use thicker paper like watercolor paper or cardstock to prevent warping.
What if I don’t have watercolors?
You can easily substitute with food coloring mixed in a little water!
Is this safe for toddlers?
Yes, but with supervision—especially around salt and glue. Let them drop the paint while you manage the setup.
Can this be used for a school project?
Absolutely! It’s a wonderful mix of science, art, and fun—perfect for STEAM learning.
In Summary: Why This DIY Salt Painting Belongs in Your Craft Collection
Simple ingredients, stunning results, and a process that feels a little like watching magic happen right in front of your eyes—this salt painting flower project is anything but boring!! Whether you’re home on a rainy day, teaching a class, or just looking for something special to do together, this one checks every box. 🌼
Love This Craft? Try These Peachy DIYs Next!
- 🍑 Peach Pit Stamping Art for Kids
- 🍑 Homemade Peach Scented Playdough
- 🍑 Peach Paint Puffs – Puffy Painting with Summer Vibes
📸 Share Your Masterpieces!
Did your kiddos make something amazing with this DIY? Tag your photos on Pinterest and leave a review—I love seeing your creations and sharing your joy with others! 💖
🥄 Nutritional Info (Just Kidding—But Here’s a Fun Fact!)
While this isn’t an edible project, salt painting teaches about capillary action—the same process plants use to absorb water. Craft + science = win!
Thanks for stopping by, and happy crafting! Don’t forget to subscribe so you never miss a chance to create something beautiful. 🌸
Salt Painting
Ingredients
Method
- Lay out your materials and cover your workspace with a tray or newspaper to catch extra salt.
- Using your glue bottle, draw simple flower shapes—petals, stems, leaves.
- While the glue is still wet, sprinkle a generous amount of salt over your glue lines and shake off the excess salt onto your tray.
- Dip your brush or dropper into the watercolor and gently touch the salted glue, watching as the color flows.
- Lay the painting flat and let it dry completely for a few hours or overnight.
- Once dry, frame it, hang it in a window, or use it as a handmade card.


