First of all, thank you for being here! Whether you’re a crafty parent, an enthusiastic DIYer, or just someone looking to bring a little sunshine into your home, I’m so grateful you stopped by. Projects like this one make my heart sing—simple, beautiful, and packed with personality. This Clear Glue Flower Suncatcher is one of those delightful crafts that blends creativity with nature in the most whimsical way. It’s also a gentle nudge to pause, gather, and appreciate the little things—like a daisy pressed last spring or that shimmer of sunlight through a homemade window charm. 🌼
If you’re loving these DIYs, don’t miss out—subscribe below and I’ll send lovely craft ideas like this right to your inbox!
Why You’ll Fall in Love with This Craft
This isn’t just a craft—it’s a tiny piece of art. A mix of translucent glue and pressed flowers captures sunlight like a stained glass window, and the result is anything but boring!! Whether you’re crafting with kids, decorating a cozy corner, or gifting a handmade keepsake, this project checks all the boxes: easy, gorgeous, affordable, and personal.
Reasons to Love This Suncatcher
- No special tools required—you probably have most of these items already!
- Endless customization—use what you love or what’s seasonal.
- Kid-friendly and mess-minimal—yes, even with glue involved!
- Perfect for gifts, party favors, or holiday crafts.
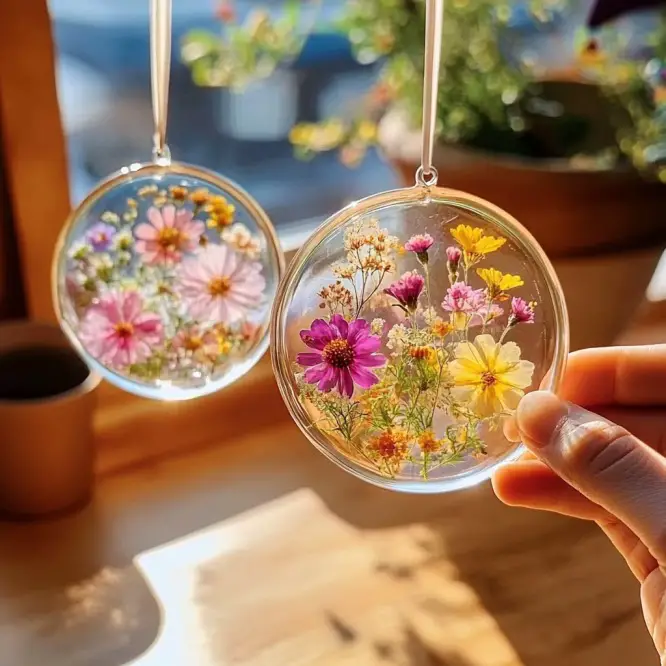
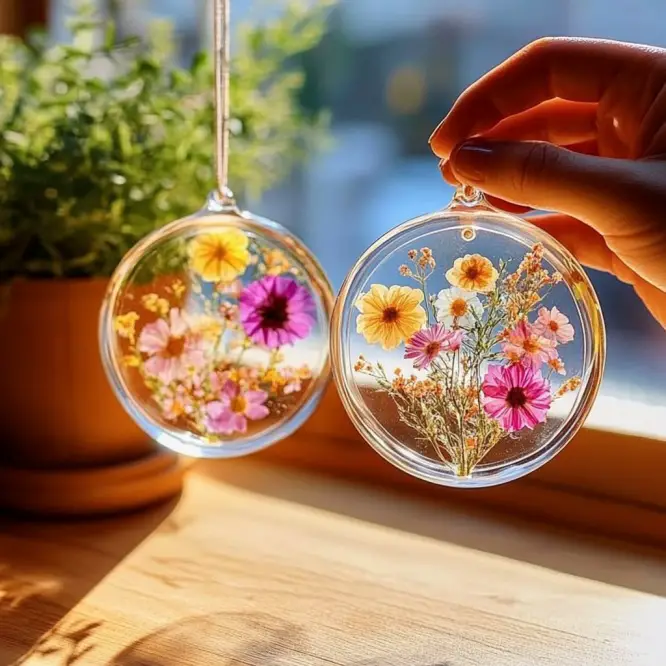
What It Looks and Feels Like
Imagine soft petals and golden flecks caught in sunlight, suspended in a crystal-clear disc. The glow as the sun pours through your window is downright magical. These suncatchers are lightweight, durable, and beautifully delicate—like a flower frozen in time.
Benefits of Making Your Own Suncatcher
- Encourages creativity and mindfulness
- Brings natural beauty indoors
- Upcycles items like old lids and leftover craft supplies
- Inspires kids (and adults!) to observe and preserve nature
Ingredients You’ll Need
- Clear school glue (like Elmer’s Clear)
- Plastic lid (from yogurt, sour cream, etc.) or clear acetate sheet
- Pressed flowers (store-bought or homemade)
- Optional: Tissue paper scraps, glitter, sequins, or dried leaves
- String or suction cup hook (for hanging)
- Scissors
- Wax paper or parchment paper (to protect workspace)
- Optional: Black marker or dark paper for making a decorative frame
Tools You’ll Want Handy
- Clean, dry surface
- Tweezers (optional but helpful for placing flowers)
- Hole punch (or skewer) for threading string

Add-Ins & Substitutions
- No pressed flowers? Use dried herbs, clippings, or leaf skeletons.
- No acetate sheet? Try a clean CD case or clear packaging plastic.
- Eco-friendly glitter: Swap for crushed eggshells or biodegradable sparkles.
- Frame it: Use a black Sharpie or dark construction paper to make a faux leaded-glass border.
How to Make a Clear Glue Flower Suncatcher (Step-by-Step)
Step 1: Prep Your Workspace
Lay out wax or parchment paper to protect your table. Place your plastic lid or acetate sheet on top.
Step 2: Pour the Glue
Fill your lid or acetate with a thin, even layer of glue—about 1/4 inch thick. Tap gently to remove any air bubbles.
Step 3: Decorate
While the glue is still wet, gently place your pressed flowers and other decorations. Press them down lightly with a fingertip or tweezers to ensure they’re flat and submerged.
Step 4: Let it Dry
Set aside in a warm, dry spot for 24–48 hours, or until completely clear and firm to the touch. Dry time can vary based on glue thickness and humidity.
Step 5: Peel & Finish
Once dry, carefully peel the glue disk from the lid or sheet. Trim any rough edges with scissors. Punch a small hole at the top, thread a string, or use a suction cup to hang it in your window!
Perfect Pairings: What to Display With It
- Hang multiple suncatchers at varying lengths in front of one window
- Display alongside paper butterflies or origami cranes for a whimsical garden scene
- Gift them with a handwritten poem or note about the flowers used
Crafting Tips for Success
- Flat flowers work best—thicker blooms may not dry evenly.
- Avoid overcrowding—leave space for the light to shine through.
- Test glue thickness—too thin and it might tear; too thick and it takes forever to dry.
- For a polished finish, smooth the back with a damp finger while the glue is still drying.
Storage Tips
Store your suncatcher flat in a dry, cool place when not in use. Avoid folding or pressing it under heavy objects, as the glue can warp over time. If storing long-term, tuck it between layers of wax paper in a book or craft box.
Frequently Asked Questions
Can I use white glue instead of clear?
Technically yes, but it won’t have the same transparent stained-glass effect.
How do I press my own flowers?
Place flowers between parchment paper in a heavy book for 1–2 weeks, or use a microwave flower press for faster results.
Will this craft work with kids?
Absolutely! Just supervise younger children with scissors and glue. It’s a wonderful hands-on way to explore nature and creativity.
Wrap-Up: A Ray of Sunshine You Made Yourself
This Clear Glue Flower Suncatcher is more than a fun project—it’s a sweet reminder that beauty can bloom from the simplest things. Whether you’re crafting alone or with loved ones, it’s a chance to slow down, create something lasting, and let the light in—literally and metaphorically. 💛
Want more crafts that mix nature, light, and love? Be sure to subscribe and I’ll send them your way.
Try These Next!
🌸 DIY Pressed Flower Bookmarks
🍁 Autumn Leaf Garland Tutorial
🌿 Botanical Wall Art with Dried Plants
Share Your Craft!
If you make this, I’d love to see it! 📸
Tag your creations on Pinterest or Instagram with #SunshineCraftDIY so we can all swoon over them together.
Nutritional Information
Just kidding—no calories in sunshine and flowers! 😉
But seriously: this craft is zero waste, full of joy, and packed with creativity. Happy making!
Clear Glue Flower Suncatcher
Ingredients
Method
- Lay out wax or parchment paper to protect your table. Place your plastic lid or acetate sheet on top.
- Fill your lid or acetate with a thin, even layer of glue—about 1/4 inch thick. Tap gently to remove any air bubbles.
- While the glue is still wet, gently place your pressed flowers and other decorations. Press them down lightly with a fingertip or tweezers to ensure they’re flat and submerged.
- Set aside in a warm, dry spot for 24–48 hours, or until completely clear and firm to the touch. Dry time can vary based on glue thickness and humidity.
- Once dry, carefully peel the glue disk from the lid or sheet. Trim any rough edges with scissors. Punch a small hole at the top, thread a string, or use a suction cup to hang it in your window!


