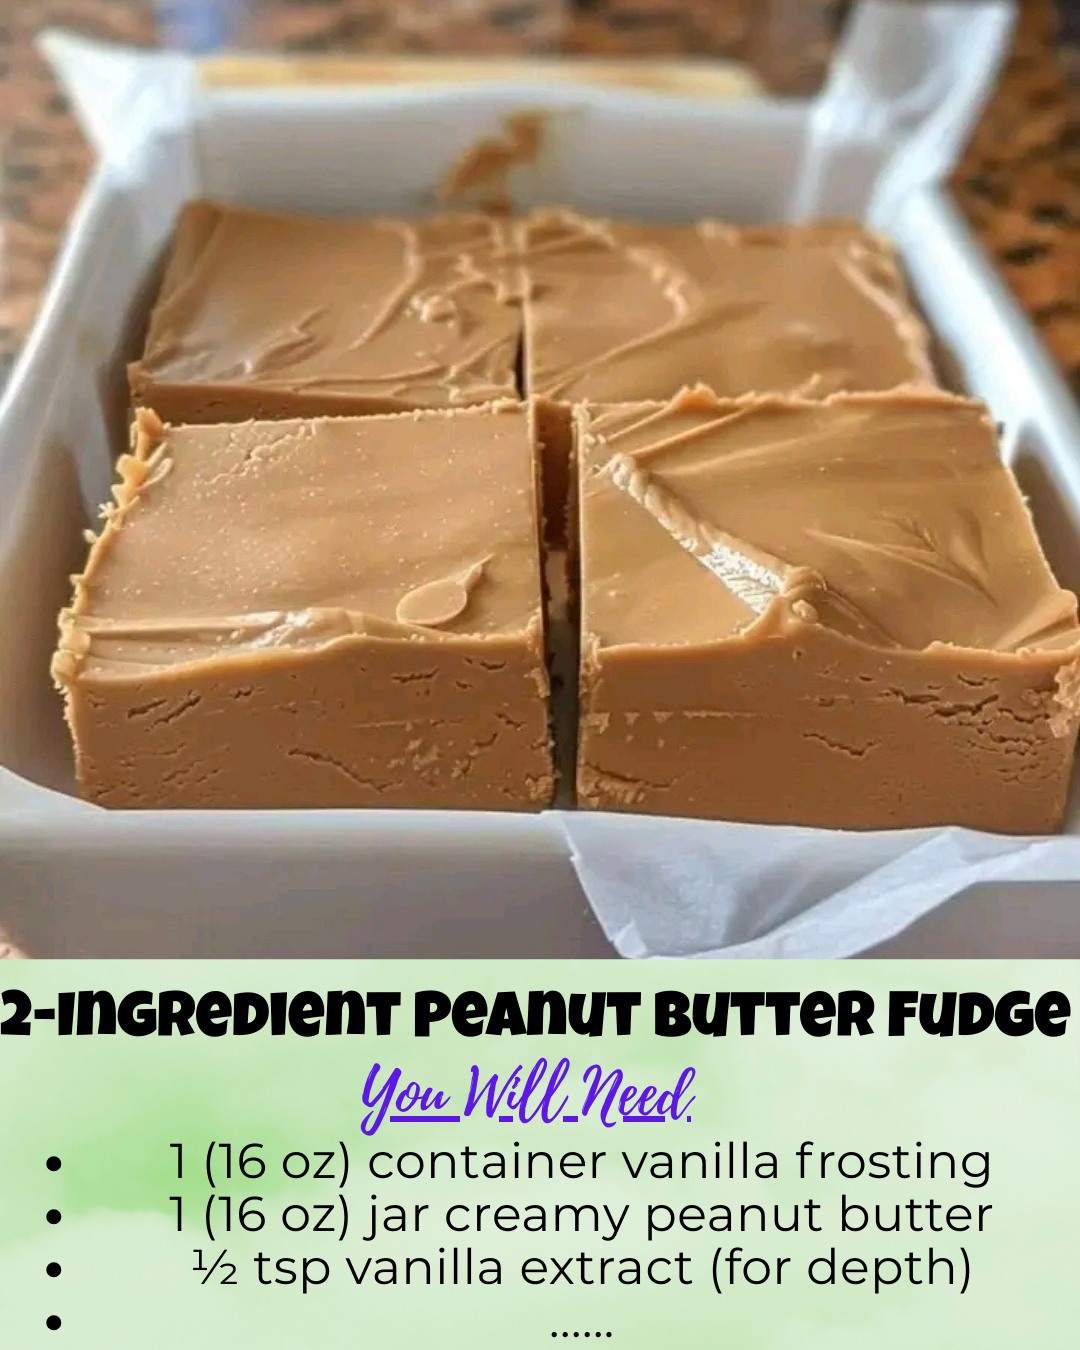
2-Ingredient Peanut Butter Fudge proves that incredible desserts do not require complicated techniques or long ingredient lists. With only peanut butter and vanilla frosting, this recipe creates a creamy, sliceable fudge that tastes rich, smooth, and deeply peanut-buttery. The mixture melts together in minutes and sets in the refrigerator, producing a velvety treat that feels indulgent without requiring an oven or candy thermometer.
Because the recipe uses pantry staples, it works perfectly when you want a quick homemade dessert. The texture turns firm enough to cut into neat squares while remaining soft and creamy inside. Even better, the recipe adapts easily with simple toppings or mix-ins if you want to customize the flavor.
One afternoon I needed a quick dessert for unexpected visitors and remembered hearing about a fudge made with frosting and peanut butter. The idea sounded almost too simple to work, but curiosity won. After a few minutes in the microwave, the mixture turned smooth and glossy. Once chilled and sliced, the fudge tasted rich and nostalgic, like a childhood treat that somehow required almost no effort. Since then, it has become a dependable recipe whenever a fast sweet treat is needed.
Why 2-Ingredient Peanut Butter Fudge Works So Well
The Magic of Peanut Butter and Frosting
The beauty of 2-Ingredient Peanut Butter Fudge lies in the chemistry of the ingredients. Vanilla frosting already contains sugar, fat, and stabilizers that allow it to firm up once cooled.
When combined with peanut butter, the frosting melts smoothly and creates a thick, creamy mixture. As the fudge chills, the sugars and fats solidify together, forming the classic fudge texture without requiring candy-making techniques.
Because of this natural balance, the mixture becomes firm enough to slice while still maintaining a soft, creamy consistency.
Another advantage is that the frosting adds subtle vanilla sweetness, which complements the roasted flavor of the peanut butter.
A Perfect Beginner Dessert
Many fudge recipes require careful temperature control and specialized equipment. However, this recipe eliminates those challenges entirely.
Instead of cooking sugar to precise temperatures, you simply melt the ingredients gently and stir until smooth. This makes the recipe ideal for beginner cooks or anyone who wants a quick dessert without complicated steps.
Additionally, the recipe scales easily. You can double the batch for holiday trays, potlucks, or gift boxes. Because the fudge stores well, it remains a convenient make-ahead dessert for gatherings or celebrations.
Ingredients and Equipment
Key Ingredients
2-Ingredient Peanut Butter Fudge relies on just two main ingredients, although a few optional additions can enhance the flavor.
Vanilla Frosting
A standard 16-ounce container of full-fat vanilla frosting provides sweetness and structure. The stabilizers in frosting help the fudge firm up after chilling.
Creamy Peanut Butter
Regular creamy peanut butter works best because it blends smoothly with the frosting. Avoid natural peanut butter, which may separate and prevent the fudge from setting properly.
Optional Flavor Boosters
A few simple additions can enhance the basic recipe.
Vanilla extract deepens the sweetness and aroma.
A pinch of fine sea salt balances the sweetness and highlights the peanut flavor.
Mini chocolate chips or chopped peanuts add texture and contrast.
Flaky sea salt sprinkled on top creates a sweet-salty finish.
Equipment Needed
The equipment list for this recipe remains very simple.
Microwave-Safe Bowl
Used to melt the peanut butter and frosting together.
Spatula or Spoon
Helps stir the mixture until smooth.
8×8 Baking Pan
Provides the ideal thickness for fudge squares.
Parchment Paper
Makes it easy to lift the chilled fudge out of the pan for slicing.
Because the process requires minimal tools, cleanup stays quick and easy.
Ingredients
Equipment
Method
- Place vanilla frosting and peanut butter in a microwave-safe bowl.
- Microwave on medium power in 30-second intervals, stirring each time until smooth.
- Stir in vanilla extract, sea salt, or optional mix-ins if desired.
- Line an 8×8 pan with parchment paper and pour in the fudge mixture.
- Spread evenly and sprinkle optional toppings over the surface.
- Refrigerate for 1–3 hours until firm.
- Lift from pan using parchment paper and slice into 16 squares.
Notes
Step-by-Step Instructions
Melting the Ingredients
Start by placing the vanilla frosting and peanut butter into a large microwave-safe bowl.
Microwave the mixture on medium power in 30-second intervals. After each interval, stir thoroughly.
Continue heating and stirring until the mixture becomes smooth, glossy, and fully combined. This usually takes about 1½ to 2 minutes.
Using medium power helps prevent overheating, which could cause the mixture to become too oily.
Adding Flavor Enhancements
Once the mixture melts smoothly, you can customize the flavor if desired.
Stir in vanilla extract for deeper sweetness or a pinch of sea salt for balance.
If you enjoy texture, fold in mini chocolate chips or chopped peanuts. These additions distribute throughout the fudge and create interesting bites.
At this stage, the mixture should remain thick yet pourable.
Pressing the Fudge Into the Pan
Line an 8×8 pan with parchment paper, leaving extra paper hanging over the edges.
This overhang acts as a handle that will help lift the fudge out later.
Pour the warm fudge mixture into the pan. Use a spatula to spread it evenly and smooth the surface.
If desired, sprinkle flaky sea salt, chocolate chips, or chopped peanuts over the top.
Chilling Until Firm
Place the pan in the refrigerator and allow the fudge to chill for one to three hours.
During this time, the mixture firms up and becomes easy to slice.
If you need faster results, you can place the pan in the freezer for about 45 to 60 minutes. However, refrigeration often produces a creamier final texture.
Once the fudge feels firm, lift it out of the pan using the parchment paper.
Cutting Perfect Fudge Squares
Transfer the chilled fudge to a cutting board.
Use a sharp knife to slice it into 16 squares.
For clean edges, run the knife under hot water and wipe it dry between cuts. This technique prevents the fudge from sticking to the blade.
The finished squares should look smooth, glossy, and rich with peanut butter flavor.
Variations and Flavor Ideas
Chocolate Swirl
Before chilling the fudge, drizzle melted chocolate over the surface.
Use a toothpick or knife to gently swirl the chocolate through the mixture. This creates a beautiful marbled effect and adds extra richness.
S’More Fudge
For a playful twist, fold mini marshmallows and crushed graham crackers into the mixture before pressing it into the pan.
This variation combines peanut butter fudge with classic campfire flavors.
Salted Caramel Fudge
Drizzle a few spoonfuls of caramel sauce across the surface before chilling.
Lightly swirl it through the fudge for ribbons of caramel sweetness.
Nut-Free Version
If peanut allergies are a concern, sunflower seed butter works as a substitute for peanut butter.
The result remains creamy and sliceable while providing a slightly different flavor profile.
Storage Tips
Refrigerator Storage
Store fudge squares in an airtight container in the refrigerator for up to two weeks.
Layer parchment paper between rows to prevent sticking.
Freezer Storage
For longer storage, place the fudge in a single layer on a tray and freeze until firm.
After freezing, transfer the pieces to a sealed freezer bag or container.
Frozen fudge can last up to two months. Allow pieces to thaw for about 15 minutes before serving.
Frequently Asked Questions
Can I use natural peanut butter?
Natural peanut butter tends to separate and may prevent the fudge from setting properly. Regular creamy peanut butter works best.
Can I make this fudge on the stovetop?
Yes. Gently melt the frosting and peanut butter in a saucepan over low heat, stirring constantly until smooth.
Why is my fudge too soft?
Soft fudge usually means it has not chilled long enough. Refrigerate it longer until it firms completely.
Can I double the recipe?
Yes. Simply double the ingredients and use a larger pan such as a 9×13 dish.
Can I add chocolate chips?
Absolutely. Mini chocolate chips blend nicely into the mixture and add extra sweetness.
Conclusion
2-Ingredient Peanut Butter Fudge offers one of the simplest ways to create a rich homemade dessert. With only peanut butter and vanilla frosting, this recipe produces smooth, creamy fudge that slices beautifully and tastes incredibly satisfying.
Because the preparation takes only minutes and requires no special equipment, this fudge works perfectly for quick desserts, holiday treats, or thoughtful homemade gifts.
Whether you enjoy it plain, topped with sea salt, or filled with chocolate and caramel swirls, each square delivers sweet peanut-butter flavor in the easiest way possible.