Before we dive in—I just want to say how much joy it brings me to share creative, hands-on crafts like this one with you. Whether you’re a parent, teacher, or someone who simply loves bringing a little color and sparkle into your life, thank you for being here. This project is a favorite of mine because it’s simple, stunning, and full of possibilities!
If you’d love easy DIY crafts like this one delivered straight to your inbox (with occasional bonuses and exclusive tips!), don’t forget to subscribe below and join our creative circle 💌
What Is a Clear Glue Suncatcher?
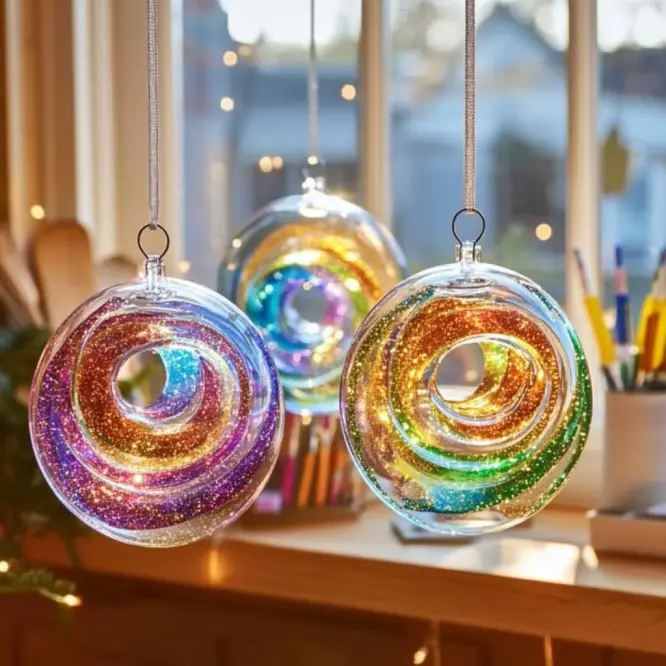
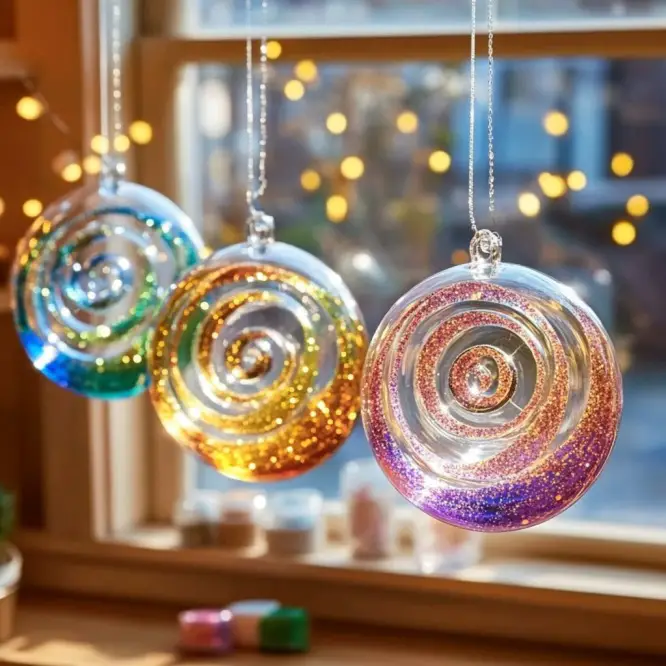
A Clear Glue Suncatcher is a vibrant, handmade decoration that looks absolutely magical when sunlight streams through it! Created with clear school glue and a splash of color, this craft transforms an ordinary plastic lid into a dazzling window charm.
No fancy materials, no special skills—just imagination and a few household supplies. Whether it’s a rainy-day activity or a fun addition to your homeschool curriculum, this suncatcher project is anything but boring!!
Why You’ll Love This Craft
- 🌞 Stunning Sunlit Effect – These suncatchers look like stained glass when sunlight hits them!
- 🎨 Creative & Customizable – Each one is totally unique. You control the colors, swirls, and sparkle.
- 👧🧑 Kid-Friendly & Mess-Minimized – Great for all ages, with minimal clean-up!
- 🌿 Budget-Conscious – Made with inexpensive, accessible supplies.
- 💖 Memory-Maker – This is the kind of project that creates keepsakes and sweet moments together.
What Does a Glue Suncatcher Look & Feel Like?
Once dried, these little beauties are flexible, glossy, and slightly squishy—like a translucent gel window cling! The color swirls catch the light and shimmer, and if you add glitter or sequins? ✨ Let’s just say your windows will thank you.
Benefits of Making This Craft
- Encourages fine motor skills and color recognition in kids
- Perfect for seasonal decorations (think hearts for Valentine’s, leaves for autumn!)
- Can double as gifts or party favors
- Completely customizable to match your home or classroom decor
Ingredients You’ll Need
- Clear school glue (Elmer’s works great)
- Food coloring or liquid watercolor paints
- Plastic lid (yogurt, sour cream, etc.) or clear plastic sheet
- Toothpicks or paintbrushes (for swirling!)
- Scissors
- Wax or parchment paper (to protect your surface)
Optional Add-Ons:
- Glitter
- Sequins
- Beads
- String or suction cup hook (for hanging)
Tools You’ll Need
- Flat surface for drying
- Small scissors (for trimming)
- Patience (this part’s essential for drying time!)
Optional Additions & Fun Variations
🎨 Layered Colors – Try using multiple glue layers with different colors for added depth.
✨ Embedded Texture – Add mini beads or sequins directly into the glue for a tactile surprise.
🌈 Theme It! – Think seasonal shapes: snowflakes, pumpkins, hearts. Use stencils to guide your glue shapes!

How to Make a Clear Glue Suncatcher – Step-by-Step
Step 1: Prepare Your Base
Lay down wax paper on your table to protect your surface. Place your plastic lid on top.
Step 2: Pour the Glue
Fill the inside of the lid with a ¼ inch thick layer of clear glue. Not too thin, or it may crack when peeled.
Step 3: Add Color
Drop in food coloring or watercolor. Less is more! Swirl with a toothpick or paintbrush into mesmerizing patterns.
Step 4: Add Sparkle
If you want extra shimmer, sprinkle glitter or sequins across the top of the wet glue.
Step 5: Let It Dry
Let the suncatcher sit undisturbed for 24–48 hours in a dry place. It should be fully dry and slightly peelable.
Step 6: Peel and Trim
Carefully peel it from the lid. Use scissors to trim rough edges if needed.
Step 7: Display With Pride
Thread string through the top or attach a suction cup to display in a sunny window.
What to Pair It With
- 🌻 Great companion activity to nature walks—use leaves and flowers in your designs!
- 🎁 Gift it with a handwritten note for birthdays or holidays.
- 🎨 Use as a follow-up craft to a painting session—let the creativity flow!
Tips for Success
- Avoid overloading with color—too much can muddy your design.
- Drying takes longer in humid climates; place near a fan or dehumidifier.
- Use lids with smooth interiors for easier peeling later.
- Encourage little ones to plan their color scheme before starting.
Storage Instructions
Store finished suncatchers flat between wax paper in a cool, dry place. Avoid heat, which may warp or melt them slightly.
For seasonal reuse, keep them in a labeled envelope or folder.
Frequently Asked Questions
Can I use white glue instead of clear?
Not recommended—the white dries opaque and won’t give that stained glass effect.
What age is this suitable for?
With supervision, kids as young as 3 can enjoy swirling the colors! Older kids and adults love this too.
How long do they last?
Indoors and out of direct heat, they can last months or even longer!
Can I use essential oils or scents?
It’s best to skip oils—they can interfere with drying and stickiness.
Final Thoughts
Simple, affordable, and totally captivating—this Clear Glue Suncatcher Craft is one of those projects that proves creativity doesn’t require complexity. It’s all about color, light, and joy, and I hope it brings all three to your home!
Looking for more creative fun? Check out our Painted Salt Dough Ornaments or the DIY Window Clings tutorial—both perfect for year-round crafting.
Share Your Creations!
Made this craft? I’d love to see your masterpieces!
📸 Snap a photo and tag us on Pinterest, or leave a review below. Let’s inspire each other!
Nutritional Information
😄 None this time—unless you count feeding your creative soul. (And that’s always worth the calories.)
Ready to create a little window magic? Go grab your glue and let’s make something beautiful 💛
Clear Glue Suncatcher
Ingredients
Method
- Lay down wax paper on your table to protect your surface. Place your plastic lid on top.
- Fill the inside of the lid with a ¼ inch thick layer of clear glue. Not too thin, or it may crack when peeled.
- Drop in food coloring or watercolor. Less is more! Swirl with a toothpick or paintbrush into mesmerizing patterns.
- If you want extra shimmer, sprinkle glitter or sequins across the top of the wet glue.
- Let the suncatcher sit undisturbed for 24–48 hours in a dry place. It should be fully dry and slightly peelable.
- Carefully peel it from the lid. Use scissors to trim rough edges if needed.
- Thread string through the top or attach a suction cup to display in a sunny window.