Before we jump into this joyful little project, let me say thank you. Thank you for being here, for sharing in these small creative joys with me, and for finding beauty in the simplest of things—like sunlight dancing through a handmade suncatcher. There’s something so nostalgic, so grounding, about crafting with your hands. And today’s DIY is anything but boring!!
Whether you’re looking for a sweet afternoon project with the kids, a thoughtful homemade gift, or just a lovely way to reuse those mason jar lids you’ve got tucked in a drawer—this Mason Jar Lid Sun Catcher is exactly what your heart (and window!) needs.
Want more sweet projects and recipes like this one? 💌 [Subscribe to get them straight to your inbox!]
Why You’ll Love This Mason Jar Lid Sun Catcher
- Kid-friendly and adult-approved! Simple steps make it perfect for all ages.
- Budget-friendly – Uses items you probably already have at home.
- Eco-conscious – A beautiful way to repurpose old mason jar lids.
- Customizable – Let your creativity shine with colors, patterns, and twine styles!
What It Looks & Feels Like
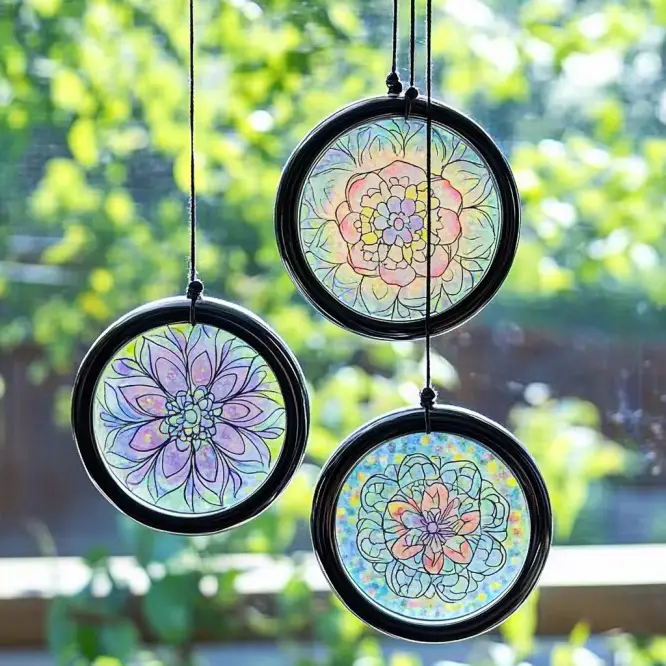
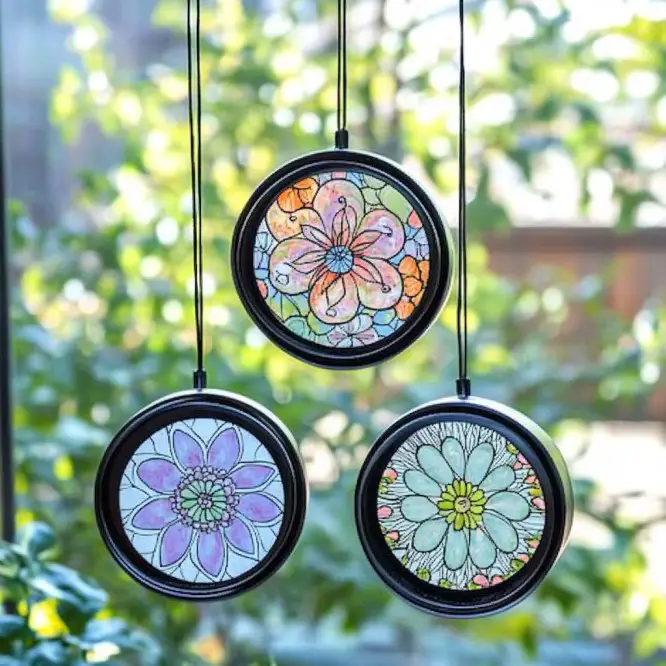
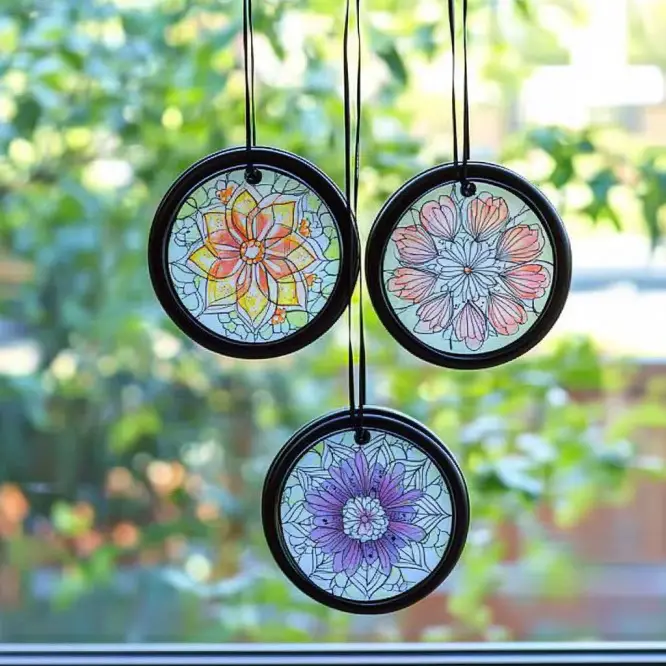
Once hung, these sun catchers glow like little stained-glass ornaments—catching the light in all the right ways. The colors of your art become softer, warmer, and slightly translucent from the oil, giving off a dreamy, vintage vibe. They look stunning hanging in kitchen windows, on porches, or even strung along a garden fence.
The Benefits of Making This Craft
- Encourages mindfulness and creativity.
- Provides a bonding activity for families or classrooms.
- Gives a second life to mason jar lids.
- Adds whimsical charm to your home decor.
What You’ll Need
Ingredients & Supplies:
- 🖍️ Colored art page or coloring page
- 🫙 Mason jar lids (flat part, not the ring)
- 🪵 Wide mouth mason jar bands
- 🫒 Olive oil (or any clear kitchen oil)
- 💠 Cotton balls
- ✂️ Scissors
- 🧵 Twine or ribbon
- 🧴 Glue (Aleene’s Tacky Glue or something similar)
- 🧻 Paper towel
Optional Additions or Substitutions
- Try wax paper art for a different glow.
- Use pressed flowers instead of coloring pages for a rustic botanical look.
- Swap twine for colored ribbon for a fun seasonal twist!
- Add glitter glue or washi tape around the rim for extra sparkle.
Step-by-Step: How to Make a Mason Jar Lid Sun Catcher
Step 1: Oil Up Your Art
Use a cotton ball to gently apply a thin layer of oil to your colored art page. This will give it a soft, transparent quality. Don’t soak it—just enough to saturate. Dab away the excess with a paper towel and let it dry for about 5 minutes.
Step 2: Trace & Cut
Place your mason jar lid over your artwork and trace a circle. Cut just inside the line so the piece will fit snugly into the lid.
Step 3: Glue It In
Apply a small amount of glue inside the lid, then press your artwork in—make sure the colorful side is facing outward. Smooth it gently so there are no bubbles.
Step 4: Add Twine & Hang
Wrap twine around the outside of the lid and tie it tight to secure. Then, leave about 4 inches of twine and tie a final knot at the top for hanging.
And voilà—your homemade sun catcher is ready to shine!
What to Pair It With
These are adorable on their own, but they also look incredible:
- In a group display with different designs.
- As gift tags on homemade jam jars.
- Hung across a window with string lights for a dreamy vibe.
- As ornaments during the holidays!
Tips for the Prettiest Sun Catchers
- Don’t skip dabbing off the oil! Too much can smudge your art.
- For vivid results, use bold, rich colors in your drawings.
- Let your glue dry fully before hanging.
- Want a rustic look? Use jute twine and neutral-toned drawings.
How to Store or Gift These
You can make several in one afternoon and store them flat in a box until needed. Wrap them in tissue paper and give them as heartfelt, handmade gifts for birthdays, Mother’s Day, or holidays.
General Info
- Time to Make: About 15–20 minutes per sun catcher
- Skill Level: Easy (even preschoolers can help!)
- Best For: Window decor, kids’ crafts, DIY gifts
Frequently Asked Questions
Can I use acrylic paint instead of colored pencil or marker?
Absolutely! Just make sure it’s completely dry before oiling.
Does the oil make the paper greasy or attract dust?
Only if you overdo it. A light coat is enough, and blotting with a paper towel helps remove excess.
Can I use plastic lids?
You can, but the look and structure are best with metal mason jar lids.
Wrapping It Up
There’s something truly magical about light shining through your own creativity. This Mason Jar Lid Sun Catcher is a testament to that—a joyful, handmade piece that brightens your space and your spirit.
Whether you make one or a dozen, I hope you’ll share them with someone you love. And if you do, I’d love to see them!!
You Might Also Love…
🌞 [DIY Painted Rock Garden Markers]
🎨 [Pressed Flower Bookmarks]
🍑 [Homemade Peach Jam Recipe (No Pectin!)]
Share Your Sunshine!
✨ Tried this craft? I’d love to see your creations!
Tag me on Pinterest or share your photos in the comments below. Your version might inspire someone else. 💛
Nutritional Information
Just pure joy—zero calories, 100% sunshine. 😉
Mason Jar Lid Sun Catcher
Ingredients
Method
- Step 1: Oil Up Your Art - Gently apply a thin layer of oil to your colored art page using a cotton ball. Blot excess with a paper towel.
- Step 2: Trace & Cut - Place your mason jar lid over your artwork, trace a circle, and cut just inside the line.
- Step 3: Glue It In - Apply glue inside the lid, press your artwork in with the colorful side facing outward, and smooth out any bubbles.
- Step 4: Add Twine & Hang - Wrap twine around the lid, tie securely, leaving a 4-inch length to tie a knot for hanging.