Introduction
Because crafting is not just an enjoyable pastime but also a way to express creativity, finding a simple yet stunning project can spark inspiration. Although many DIY ideas flood Pinterest boards and weekend calendars, only a few stand out as both affordable and family-friendly. Since everyone loves vibrant colors that catch the sunlight and add personality to a space, this DIY suncatcher recipe is the perfect blend of artistry and simplicity. Additionally, you don’t need any specialized equipment or expensive supplies to bring it to life. Therefore, whether you’re a seasoned crafter or a curious beginner, you’ll absolutely fall in love with this radiant suncatcher project.
Why You’ll Love This Recipe
Because this suncatcher recipe is both visually delightful and incredibly easy to follow, it’s a top pick for crafters of all skill levels. Although you can find dozens of window decoration ideas, few are as customizable and budget-friendly as this one. While the materials list is refreshingly short, the outcome is dazzling enough to hang proudly in any sunny spot. Since the finished product mimics the beauty of stained glass, it offers a high-end aesthetic without the hefty price tag. Moreover, kids and adults alike can join the fun, making it a perfect bonding activity for families. Thus, if you’re looking for a quick and charming DIY that brightens any window, this project is a must-try.
Ingredients
Because you’ll need just a few easily accessible items, gathering your materials will be a breeze. Therefore, make sure you have the following supplies on hand:
- Colored glass gems or flat marbles (available at most craft or dollar stores)
- Clean plastic lids (like those from butter, sour cream, or yogurt containers)
- Clear Elmer’s Glue (or any clear-drying craft glue)
- Ribbon or fishing line for hanging
Necessary Tools
Although this craft doesn’t require many tools, having the right ones will ensure the process goes smoothly. Consequently, gather the following before you begin:
- A glue gun (optional, for securing the ribbon)
- Scissors (to cut the ribbon or fishing line)
- Toothpick or skewer (for adjusting gem placement)
- Paper towels (for quick cleanups)
- Plastic table cover or newspaper (to protect your work surface)
Ingredient Swaps and Additions
While the original recipe is quite straightforward, adding your personal touch can take it to the next level. For instance, instead of traditional glass gems, you could use translucent beads or acrylic jewels for a different look. Alternatively, if you don’t have plastic lids, you can repurpose clear disposable plates or even silicone molds. Because customization is key to a meaningful crafting experience, you can also sprinkle in glitter or add a drop of food coloring to the glue for a tinted effect. Furthermore, inserting tiny pressed flowers between the gems offers a whimsical, nature-inspired twist. Therefore, no matter your artistic preference, there’s always room to make this suncatcher truly your own.
Step-by-Step Instructions
Because following clear steps makes crafting more enjoyable, here’s exactly how to create your DIY suncatcher:
Step 1: Prepare Your Workspace
Before you start, lay down a plastic cover or newspapers to protect your table. Since glue can sometimes be messy, this step helps with a quick cleanup later.
Step 2: Add the Glue
Next, take a clean plastic lid and squeeze a generous amount of clear Elmer’s Glue onto the flat side. Because the glue will serve as the base for your design, make sure it’s spread evenly across the surface.
Step 3: Place the Gems
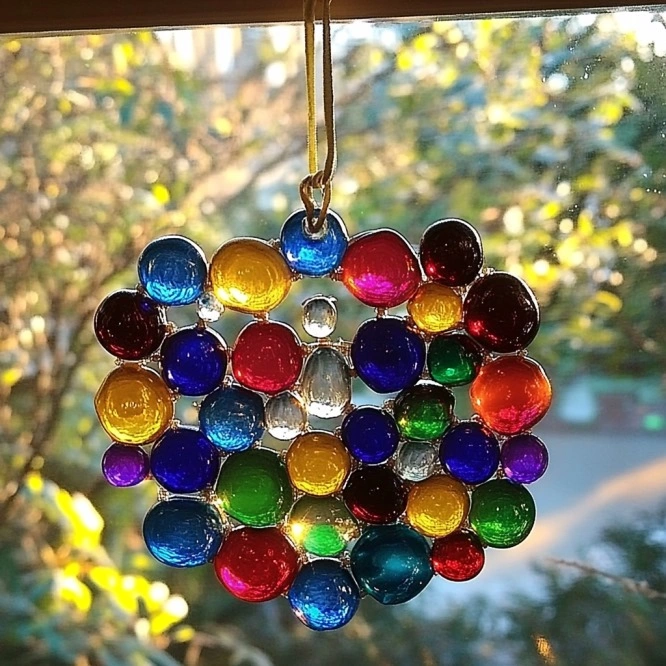
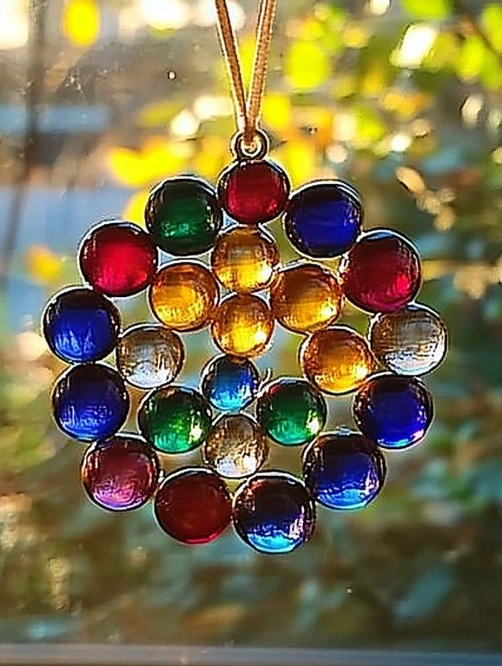
Then, begin placing your colored glass gems or stones onto the glue. While doing this, ensure that the stones touch each other to create a cohesive look. Although you might be tempted to arrange them randomly, a planned pattern often yields a more eye-catching result.
Step 4: Secure the Gems
Once your design is complete, add another layer of glue over the top of the stones. Since this extra layer helps hold everything in place, it’s essential for long-term durability.
Step 5: Let It Dry
After your suncatcher is fully assembled, set it aside to dry. While it might seem ready after a few hours, it’s best to wait 3 to 4 full days for the glue to dry completely. Because moisture can affect the final clarity, patience truly pays off here.
Step 6: Add Hanging Ribbon
After the glue has dried and turned fully clear, check for any visible gaps between the stones. If you find any, you can thread a piece of ribbon or fishing line through the gaps to secure it. Alternatively, if no gaps are present, use a glue gun or a dab of clear craft glue to attach a loop of ribbon to the back for hanging.
Pro Tips for Success
Because every detail counts in a craft project, a few pro tips can make a huge difference. First, always use a completely clean and dry lid, as residue can prevent the glue from adhering properly. Also, avoid moving the suncatcher while it’s drying, since jostling can shift the gems and ruin the design. Furthermore, although it’s tempting to use hot glue for quicker results, it dries too fast for precise placement and lacks the transparency of Elmer’s glue. If your room is humid, consider placing the project near a dehumidifier to speed up drying. Lastly, using a toothpick to fine-tune gem placement ensures a polished final product.
Serving Suggestions
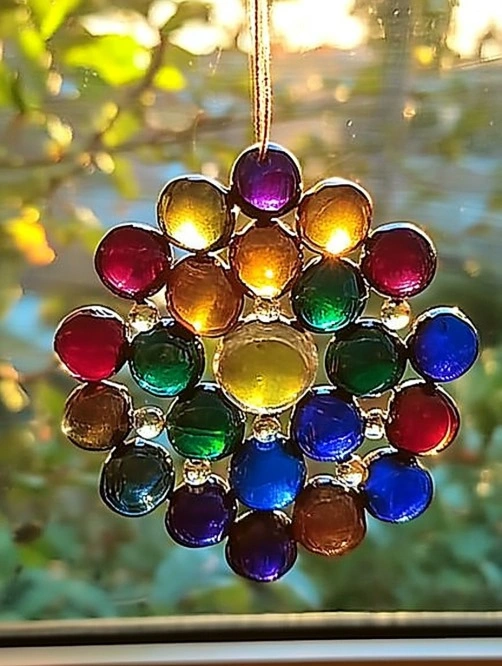
Because your new suncatcher deserves to shine, choosing the right spot to hang it is key. For maximum sparkle, place it in a window that receives direct sunlight during the morning or afternoon. Alternatively, hanging it from a tree branch or pergola can add a whimsical touch to your outdoor space. While it looks beautiful on its own, combining multiple suncatchers of varying sizes creates a stunning display. Additionally, you can use them as handmade gifts, holiday ornaments, or party favors for events like birthdays or bridal showers. Therefore, however you choose to showcase your suncatcher, it’s bound to brighten someone’s day.
Storing and Reheating (if applicable)
Although this craft project doesn’t involve food, it’s still helpful to know how to store it safely. Because the suncatcher is made from glue and plastic, avoid exposing it to extreme heat or direct rain. While it can withstand regular indoor conditions, high humidity may eventually weaken the glue bond. Therefore, store it in a cool, dry area when not in use. Additionally, wrap it in tissue paper or bubble wrap if you plan to store it long-term or transport it. Since this is a decorative item, there’s no need for reheating; however, should any pieces fall off, simply reattach them with a dab of glue.
Nutritional Information
Because this is a craft recipe rather than an edible one, there’s no nutritional breakdown. Nevertheless, here’s a whimsical take on what it “feeds” creatively:
- Creativity: 100%
- Joy: 85%
- Patience Required: 60%
- Mess Factor: 30%
- Satisfaction Rating: 100%
FAQs
1. How long does the glue take to dry completely?
Because the glue needs to become crystal clear and fully hardened, drying typically takes 3 to 4 days.
2. Can I use school glue instead of clear Elmer’s Glue?
Although school glue works, it dries white rather than transparent, which diminishes the suncatcher’s brilliance.
3. What kind of plastic lids work best?
Since flexible lids might bend under the weight, use sturdier lids like those from butter tubs or cream cheese containers.
4. How can I make this craft more eco-friendly?
While reusing plastic lids is already a great step, you can also source secondhand glass gems or repurpose broken costume jewelry.
5. Is this project safe for kids?
Yes, although adult supervision is advised, especially when handling hot glue or small gem pieces.
Conclusion
Because DIY crafts are an outlet for creativity and connection, making your own suncatcher is both fulfilling and fun. Although it only takes a few materials and steps, the end result is a beautiful piece of art that brings light and color into your space. While you may start with one, chances are you’ll be inspired to make many more in different colors and shapes. Therefore, whether you’re looking for a fun weekend activity, a thoughtful handmade gift, or a way to spruce up your windows, this suncatcher recipe delivers on every level.

Suncatcher
Ingredients
Method
- Lay down a plastic cover or newspapers to protect your table.
- Take a clean plastic lid and squeeze a generous amount of clear Elmer's Glue onto the flat side.
- Begin placing the colored glass gems onto the glue, ensuring they touch each other to create a cohesive look.
- Add another layer of glue over the top of the stones to hold everything in place.
- Set the suncatcher aside to dry for 3 to 4 days for the glue to dry completely.
- Check for any gaps between the stones and thread a piece of ribbon or use a glue gun to attach a loop of ribbon to the back for hanging.