Introduction:
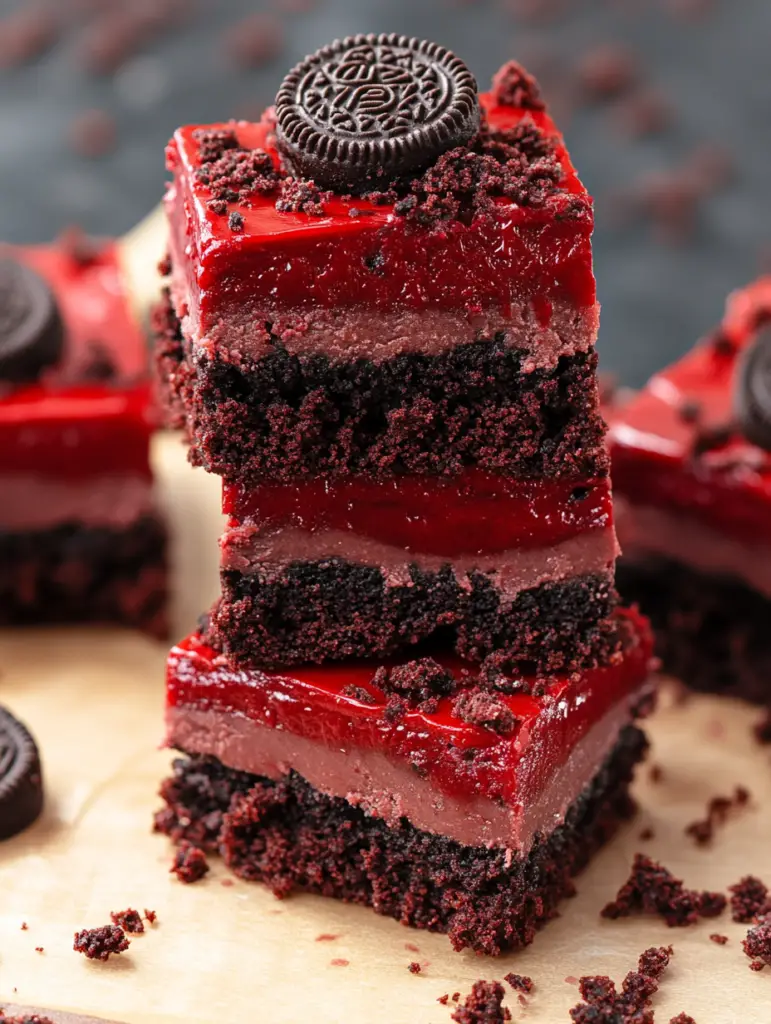
Indulge in the ultimate dessert experience with Red Velvet Oreo Truffle Brownie Bars. This gourmet treat marries the classic charm of red velvet, the creamy richness of Oreo truffles, and the indulgence of chocolate ganache. Vibrant and rich in flavor, these bars are not only perfect for celebrations but also for a special treat with family or friends. Whether you’re a newbie in the kitchen or a seasoned home baker, this recipe is straightforward and guarantees impressive results.
Detailed Ingredients:
The magic of these bars comes from the combination of several luscious ingredients. Here’s what you’ll need:
Red Velvet Layer:
– Start with a box of red velvet cake mix, approximately 18.25 oz. This creates the iconic color and subtle cocoa flavor characteristic of red velvet.
– Add 1/2 cup of unsalted butter, melted to lend moisture and richness to the base.
– One egg is needed to help bind the mix together.
– To ensure the batter is smooth and easy to spread, incorporate 1/2 cup of milk.
Oreo Truffle Layer:
– Crush 24 Oreo cookies finely. These will provide a divine crunch and flavor contrast against the soft layers that complement the cream cheese perfectly.
– Choose 8 oz of cream cheese, softened, which will blend smoothly with the Oreos to create a luxurious truffle spread.
Chocolate Ganache:
– Use 2 cups of semi-sweet chocolate chips, which you’ll melt to form a glossy topping.
– 1 cup of heavy cream is mixed with the chocolate chips to create a luscious ganache.
– Finish with 1 teaspoon of vanilla extract to enhance and round out the chocolate flavor.
Optional Garnish:
– For a festive touch, you might add sprinkles or additional crushed Oreos as a garnish.
Prep Time, Cook Time, Total Time, Yield:
This recipe is designed to be time-efficient without sacrificing flavor.
– Prep Time: 20 minutes – Preparing the layers and assembling your ingredients.
– Cook Time: 25 minutes – Baking the red velvet base to perfection.
– Total Time: 1 hour 45 minutes – Includes necessary chilling time for seamless slicing and serving.
– Yield: This recipe yields approximately 24 delicious brownie bars, perfect for sharing at parties or keeping all to yourself for a weeklong indulgence.
Detailed Directions and Instructions:
1. Preheat your oven to 350°F (175°C). Prepare a 9×13 inch baking dish by lining it with parchment paper, leaving some overhang for easy lifting.
2. In a large mixing bowl, combine the red velvet cake mix with the melted butter, egg, and milk. Stir until the batter is smooth and thick, free from lumps. Pour this batter into the prepared baking dish, using a spatula to spread it evenly.
3. Place the baking dish in the oven and bake for 20-25 minutes. Keep an eye out for the edges to become slightly firm while the center remains soft. Once baked, allow the brownie layer to cool completely before proceeding.
4. Meanwhile, create the Oreo truffle layer. In a medium-sized bowl, mix the finely crushed Oreo cookies with the softened cream cheese. Stir until the mixture is creamy and well-blended.
5. Once the brownie base has cooled, gently spread the Oreo truffle mixture over the top, ensuring even coverage.
6. To prepare the ganache, place the semi-sweet chocolate chips in a heatproof bowl. In a small saucepan, bring the heavy cream to a simmer over low heat. Pour the heated cream over the chocolate chips and let sit for a minute before stirring. Stir until the mixture is completely smooth, then add the vanilla extract and mix well.
7. Pour the chocolate ganache over the Oreo layer, using a spatula to spread it evenly for a smooth finish.
8. If desired, add sprinkles or additional crushed Oreos on top of the ganache for extra flair.
9. Transfer the baking dish to the refrigerator and chill for at least 1-2 hours to allow the layers to set firmly. This ensures clean cuts and stable pieces when serving.
10. Once set, use the parchment overhang to lift the entire block from the dish, then cut into bars of your preferred size. Serve chilled and enjoy your delightful creation.
Notes:
– If you prefer a thicker red velvet layer, consider using a slightly smaller baking dish, adjusting the baking time as needed.
– For a fun color twist, try using different types of Oreo cookies, such as golden Oreos.
– Make sure the bars are well chilled before cutting to achieve precise clean cuts.
– The dessert keeps well in the refrigerator for up to a week, making it an excellent make-ahead option.
Cook Techniques:
– Always ensure the oven is preheated for accurate baking times.
– When making the ganache, be cautious not to overheat the cream, as this might cause the chocolate to seize rather than melt smoothly.
– If you’re short on time, prioritize cooling the layers sufficiently to maintain the bars’ shape.
FAQ:
Q: Can I freeze the Red Velvet Oreo Truffle Brownie Bars?
A: Yes, these bars can be frozen. Individually wrap each piece in plastic wrap and then store in an airtight container. Thaw them in the refrigerator before serving.
Q: Can I use a homemade red velvet cake recipe instead of a boxed mix?
A: Absolutely! A homemade cake will work wonderfully; simply adjust the recipe and baking time accordingly.
Q: Can I substitute white chocolate for semi-sweet chocolate in the ganache?
A: If you prefer white chocolate, you can use it for the ganache. Bear in mind that it will alter the sweetness and overall flavor.
Conclusion:
These Red Velvet Oreo Truffle Brownie Bars bridge multiple layers of deliciousness into a single, cohesive dessert bar that’s as delightful to the eyes as it is to the taste buds. With each bite, you’re greeted with the classic note of red velvet, followed by the smoothness of Oreo cream cheese truffle, topped with an indulgent slick of chocolate ganache. This dessert looks impressive but is simple enough for any home baker. Perfect for impressing guests or treating yourself, these bars are destined to become a beloved recipe in your collection.
More Recipes Suggestions and Combinations:
– Red Velvet Cupcakes with Oreo Cream Cheese Frosting: Switch up the brownie texture for a cupcake experience.
– Oreo Cheesecake Bars: Keep the Oreo theme going with these creamy cheesecake bars.
– Triple Chocolate Brownies: Indulge in a pure chocolate adventure with layers of varying chocolate flavors.
– Red Velvet Cake Pops: Use any leftover cake mix or crumbles to create colorful, bite-sized treats.
Develop your dessert repertoire by exploring these variations, adapting the basic concepts from the Red Velvet Oreo Truffle Brownie Bars into new, delightful combinations. Experiment with flavors and share the love of baking and chocolate with those around you.






























Loaded Chili Cheese Dog Pasta Bake
Elvis Presley Cake: A Sweet Southern Legend
Two-Ingredient Lemon Bars (Light, Fluffy & Irresistibly Easy!)
Gooey Mozzarella Biscuit Bombs