Introduction
Imagine walking into your home and being instantly greeted by the calming aroma of lavender, the soft sweetness of rose petals, or the comforting notes of chamomile. Now picture these fragrances paired with beautiful, handcrafted floral wax melts that are not only functional but also decorative. Creating your own DIY floral wax melts is a fun, relaxing project that adds both charm and scent to your space. Whether you’re an avid DIYer or just looking for a creative weekend activity, these wax melts are the perfect introduction to natural home fragrance. Plus, they make stunning homemade gifts!
In this comprehensive guide, we’ll walk you through everything you need to know to make your own floral wax melts—from selecting your ingredients to customizing scents and colors. Get ready to transform your home with beauty and fragrance, one wax melt at a time!
Why You’ll Love This Recipe
There are countless reasons to fall in love with these floral wax melts. First and foremost, they are completely customizable. You can choose your favorite essential oils, your preferred dried flowers, and even add natural coloring like mica powder to make them truly your own. This flexibility allows you to match the scent to the seasons, your mood, or even the décor of a specific room.
Second, these wax melts are eco-friendly and non-toxic. Unlike store-bought versions that may contain synthetic fragrances or paraffin wax, these DIY versions use soy wax or beeswax and pure essential oils. This makes them safer for both you and your family.
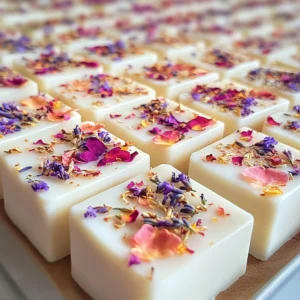
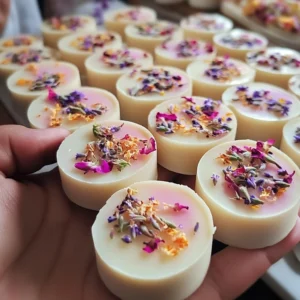
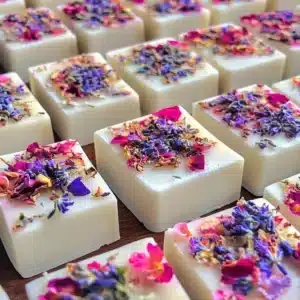
Third, the visual appeal cannot be overstated. Embedded with dried flower petals, these wax melts are as beautiful as they are fragrant. They look stunning displayed in a decorative dish or as part of a thoughtful homemade gift set.
And finally, they are incredibly easy and cost-effective to make. With just a few ingredients and tools, you can create a batch in under an hour. Whether you use them in a wax warmer, as a drawer freshener, or a little decorative touch in your home, these floral wax melts will bring you joy every day.
Ingredients
To make approximately 15–20 wax melts (depending on mould size), you will need:
- 1 cup soy wax flakes or beeswax pellets (natural and unscented)
- 1–2 tablespoons dried flowers, such as:
- Lavender buds
- Rose petals
- Chamomile blossoms
- Calendula petals
- 15–30 drops essential oils, depending on strength and desired scent profile. Popular options include:
- Lavender
- Geranium
- Ylang Ylang
- Lemon
- Peppermint
- Eucalyptus
- Optional: mica powder (natural, skin-safe coloring)
These natural ingredients not only ensure a clean burn and lovely scent but also offer aromatherapy benefits.
Necessary Tools
Before you begin, make sure you have the following tools on hand:
- Silicone moulds (flower shapes, hearts, stars—anything goes!)
- Heat-safe glass or metal bowl
- Small pot (to use as the base of a double boiler)
- Wooden skewer or spoon for stirring
- Measuring cups and spoons
- Parchment paper (for easy clean-up)
- Dropper or pipette (optional, for precise oil addition)
Having these items prepared before you start will make the process smoother and more enjoyable.
Ingredient Swaps and Additions
The beauty of this recipe lies in its flexibility. Here are some ideas to personalize your wax melts:
- Wax Types: Substitute soy wax with beeswax for a slightly longer melt time and a naturally honeyed aroma.
- Essential Oils: Create custom blends like lavender + peppermint for relaxation or lemon + eucalyptus for a fresh, energizing scent.
- Flowers: Try jasmine buds, cornflower petals, or hibiscus for unique visual and aromatic variations.
- Add-ins: Add a pinch of dried herbs like rosemary or mint leaves for extra texture and scent.
- Coloring: Use beetroot powder or turmeric for a natural tint if you prefer to avoid mica.
You can even make themed wax melts—think holiday blends with cinnamon and orange peel, or spring scents with floral petals and vanilla.
Step-by-Step Instructions
Let’s walk through the process in simple, achievable steps:
- Set Up the Double Boiler: Fill a small pot with an inch or two of water and bring to a simmer. Place your heat-safe bowl on top, ensuring it doesn’t touch the water.
- Melt the Wax: Add 1 cup of wax flakes or pellets into the bowl. Stir occasionally with a wooden skewer or spoon as it melts completely. This usually takes 8–10 minutes.
- Add Essential Oils and Color: Once the wax is fully melted, remove it from heat. Let it cool slightly (to around 120°F) before adding essential oils. Add 15–30 drops, depending on how strong you want the scent. Stir well.
- Add Mica Powder (Optional): If using, stir in a small pinch of mica powder for a gentle color infusion. Mix thoroughly to ensure even distribution.
- Prepare the Moulds: Place your silicone moulds on a parchment-lined tray for stability. Sprinkle a few dried flowers into each cavity.
- Pour the Wax: Carefully pour the melted wax into each mould, covering the flowers. Pour slowly to avoid spills and air bubbles.
- Cool and Set: Let the wax cool and harden completely, which takes about 1 hour. You can speed this up slightly by placing them in the fridge for 20–30 minutes.
- Unmould and Store: Gently pop out the wax melts and store them in an airtight container away from heat and sunlight.
Pro Tips for Success
- Measure Precisely: Don’t eyeball your wax-to-oil ratio. Too much essential oil can affect the structure.
- Don’t Overheat: Essential oils lose potency at high temperatures. Add them only after the wax has slightly cooled.
- Layer Flowers Thoughtfully: Don’t overfill the moulds with flowers, or they may prevent the wax from setting smoothly.
- Use a Pouring Spout: If your bowl doesn’t have one, consider using a small jug for a neater pour.
- Test a Small Batch: Try a mini test batch to tweak the scent strength and oil combinations before committing to a full batch.
Serving Suggestions
While these wax melts are primarily for scenting, here are a few lovely ways to present or use them:
- In Wax Warmers: Place one or two melts into your wax warmer to fill the room with fragrance.
- As Drawer Fresheners: Keep them in linen drawers or closets for a subtle scent.
- Gift Sets: Wrap a few in parchment paper or place in a mason jar tied with twine for a charming homemade gift.
- Wedding or Party Favors: Choose a theme scent and mould shape for customized event favors.
- Decorative Displays: Fill a decorative bowl with several melts for a lovely centerpiece.
Storing and Reheating
- Storage: Store in a cool, dry place inside an airtight container. Keep out of direct sunlight to preserve color and scent.
- Shelf Life: Best used within 6–8 months for optimal fragrance.
- Reheating: If used in a wax warmer, simply let the melt cool and solidify before removing and replacing it. Do not reheat melts that have lost their scent.
Nutritional Information
Since this product is not meant for consumption, there are no nutritional values. However, here’s a breakdown of its contents for safety and awareness:
- 100% Natural Wax (soy or beeswax)
- No Synthetic Fragrances
- Essential Oil-Based
- Vegan (if using soy wax)
- Biodegradable Ingredients
FAQs
1. Can I reuse wax melts? While the wax itself can be reused, the scent diminishes over time. It’s best to discard used melts once they no longer release fragrance.
2. Are floral wax melts safe for pets? Some essential oils are not pet-safe. Avoid using oils like tea tree, eucalyptus, and peppermint if you have pets at home.
3. Can I use fresh flowers instead of dried? No, fresh flowers contain moisture which can lead to mold and may interfere with wax setting.
4. What if I don’t have a silicone mould? You can use ice cube trays or mini muffin tins lined with paper cups as an alternative.
5. How can I make the scent stronger? Increase essential oil drops slightly, but avoid exceeding 10% of the total wax volume. Also, make sure to add oils at the right temperature.
Conclusion
Making your own DIY floral wax melts is not just about fragrance—it’s about creating a sensory experience, customizing your environment, and engaging in a mindful, creative process. With just a handful of ingredients and a little time, you can craft something that not only smells incredible but also brings beauty into your everyday life. Whether you gift them to loved ones or keep them all to yourself (we won’t tell!), these wax melts are a small luxury with a big impact.
Ready to try your hand at another delightful DIY? Explore more of our natural home and body projects below!
Floral Wax Melts
Ingredients
Method
- Set up a double boiler by filling a small pot with 1-2 inches of water and bringing it to a simmer.
- Place a heat-safe glass or metal bowl on top of the pot, ensuring it doesn't touch the water.
- Add 1 cup of wax flakes or pellets into the bowl and stir occasionally as it melts completely, which usually takes about 8-10 minutes.
- Once the wax is fully melted, remove it from heat and let it cool slightly (around 120°F).
- Add 15-30 drops of essential oils and stir well until combined.
- If using mica powder, stir in a small pinch for color infusion.
- Prepare silicone moulds by placing them on a parchment-lined tray.
- Sprinkle a few dried flowers into each mould cavity.
- Carefully pour the melted wax into each mould, fully covering the flowers. Pour slowly to avoid spills.
- Let the wax cool and harden completely, approximately 1 hour (or 20-30 minutes in the fridge).
- Once set, gently pop out the wax melts and store them in an airtight container away from heat and sunlight.