Before we dive into the magic of these handmade aroma stones, let me just say—thank you for being here. If you’re anything like me, you’re always on the lookout for small, beautiful ways to make your space feel more calm, more you. Whether it’s the scent of lavender wafting through your home office or the invigorating zing of peppermint greeting you in the morning, these DIY aroma stones are a sweet little gift you can give yourself (and your senses).
I love projects like this. They’re easy, customizable, and make fabulous gifts! You can make a batch in an afternoon and enjoy their scent for weeks to come. 💖
👉 Want this project in your inbox so you can try it later? Don’t forget to subscribe to my newsletter—I’ll send it straight to you!
Why You’ll Love These DIY Aroma Stones
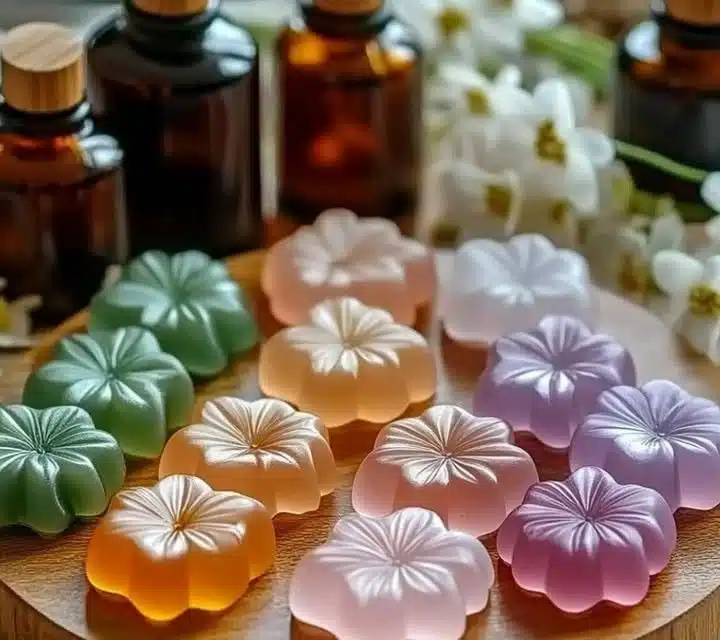
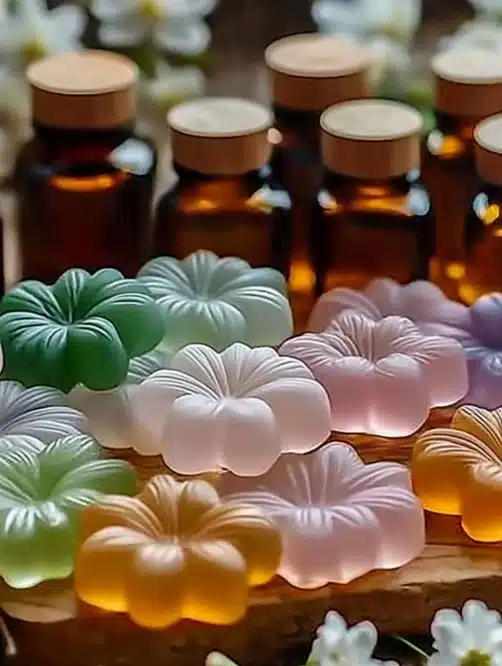
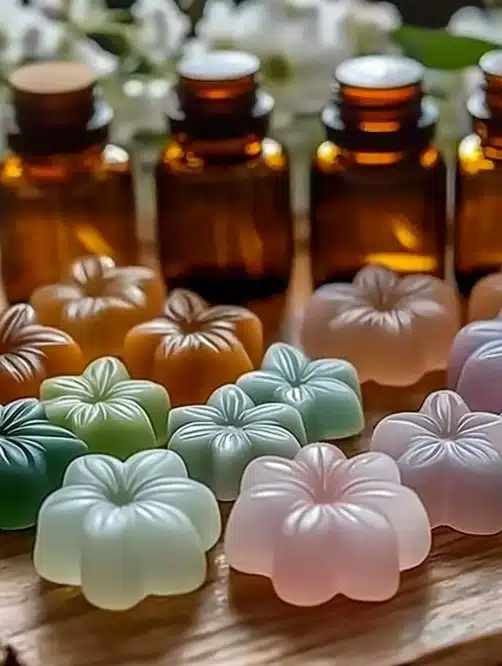
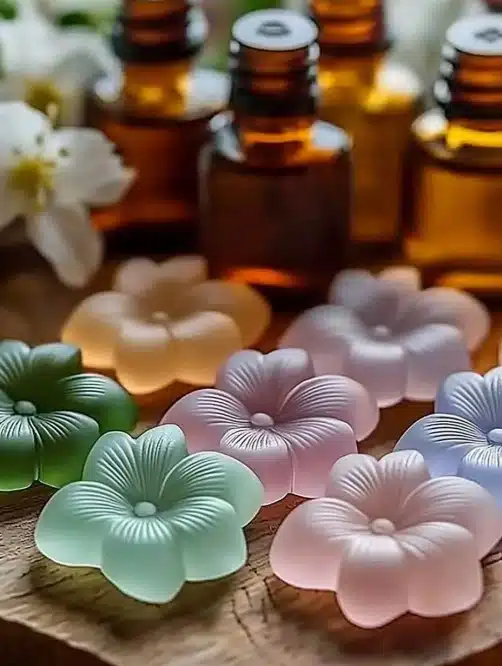
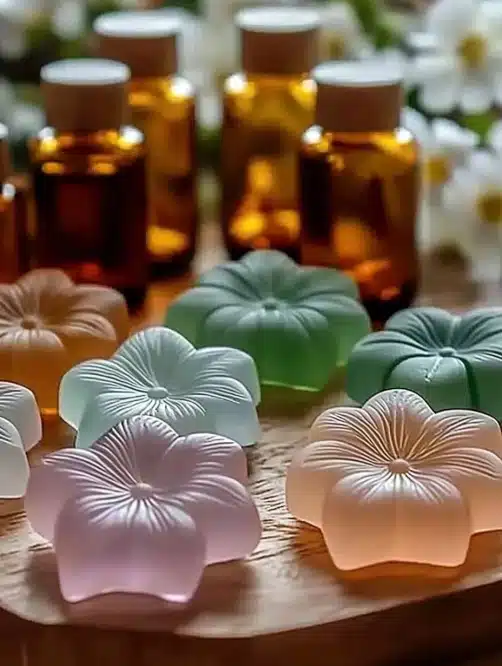
These delightful little scent diffusers are anything but boring!! They’re handmade, eco-friendly, and endlessly customizable. Whether you want to use essential oils for relaxation, focus, or just to freshen up a room, these stones are the perfect natural alternative to chemical-filled air fresheners.
Reasons to love them:
No heat or electricity required
Lasts for weeks with just a few drops of essential oil
Beautiful enough to double as décor
Safe around kids and pets (just don’t let them nibble!)
Thoughtful handmade gifts for any occasion
What Do DIY Aroma Stones Smell Like?
That’s the beauty—they smell like whatever you want. Choose lavender for winding down, lemon for a bright kitchen vibe, eucalyptus for a spa-like bathroom feel, or peppermint to perk you up.
They’re like mini scent capsules, slowly releasing their aroma over time—no synthetic overpowering here, just subtle, clean fragrance.
Benefits of DIY Aroma Stones
🌿 Non-toxic & all-natural
💸 Budget-friendly
🌎 Zero-waste option for home fragrance
🎁 Perfect for gifting or party favors
💡 Customizable with shapes and colors to match any aesthetic
Ingredients You’ll Need
½ cup baking soda
½ cup cornstarch
¼ cup warm water
15–30 drops of your favorite essential oil
Optional: mica powder or natural food colouring
Tools for the Project
Mixing bowl
Spoon or spatula
Silicone moulds (or cookie cutters + rolling pin)
Parchment paper or drying tray
Optional Add-Ins & Substitutions
No mica powder? A drop of beet juice or turmeric can tint naturally.
No silicone moulds? Ice cube trays or mini muffin tins work beautifully.
Want extra texture? Try adding a pinch of dried herbs like lavender or rosemary.
How to Make DIY Aroma Stones – Step-by-Step
Step 1: Mix the Base
Combine ½ cup baking soda and ½ cup cornstarch in your mixing bowl.
Slowly stir in ¼ cup warm water until a dough forms—it should feel like soft clay.
Too sticky? Add more cornstarch a teaspoon at a time.
Want color? Add a pinch of mica or a drop of food coloring and knead until evenly blended.
Step 2: Shape the Stones
Press your dough into silicone moulds or roll it out and use cookie cutters.
Smooth rough edges gently with your fingers.
Carefully unmould and lay them on parchment paper or a tray.
Step 3: Let Them Dry
Let the stones air-dry for 24–48 hours.
Flip them halfway through so both sides dry evenly.
Step 4: Add the Essential Oils
Once completely dry, drop 3–5 drops of essential oil on each stone.
Let them absorb the oil for 1–2 hours before using.
How to Use Your Aroma Stones
Place them anywhere you’d like a burst of natural fragrance:
In your dresser drawers
On your bedside table
In a pretty bowl on your desk
Inside your car cup holder
Tucked into a linen closet or guest bathroom
They’re also gorgeous when displayed in little glass jars or vintage tins!
Tips for Perfect Aroma Stones Every Time
Don’t rush the drying process—humid days may need more time.
Use a dropper to apply oils for more precision.
Store unused stones in an airtight container to keep them fresh.
How to Store DIY Aroma Stones
If you’re not using them right away, keep them in a sealed jar or tin to prevent scent loss. You can always refresh them with more essential oil later!
Frequently Asked Questions
How long do aroma stones last?
The scent usually lasts 1–2 weeks, but you can refresh it anytime with more oil.
Can I reuse aroma stones?
Absolutely! Just reapply your favorite essential oils whenever the scent fades.
Are aroma stones safe for kids and pets?
Yes—just make sure essential oils used are safe for your household, and keep them out of reach of small hands or paws that might try to taste them.
Wrap-Up: Scented Serenity in the Simplest Form
These DIY aroma stones are proof that a little bit of nature and creativity can go a long way. You don’t need fancy tools or expensive materials—just a few pantry staples and your favorite scents. Whether you’re giving them as gifts or using them to brighten your own space, these stones are a joy to make and a delight to use.
If you’re as obsessed with all-natural fragrance as I am, try pairing these with:
My Homemade Linen Spray with Lavender & Vanilla
DIY Soy Wax Melts for Essential Oil Diffusers
Baked Lemon-Lavender Sachets (yes, they smell as dreamy as they sound!)
Share the Love! 💛
Tried this project? I’d love to see your creations! Tag me on Pinterest or drop a photo in the comments. Let’s inspire each other!
📌 Pin now, make later!
Nutritional Info 😄
Okay, you definitely shouldn’t eat these, but they are nourishing for the soul and the senses.
DIY Aroma Stones
Ingredients
Method
- Combine ½ cup baking soda and ½ cup cornstarch in your mixing bowl.
- Slowly stir in ¼ cup warm water until a dough forms—it should feel like soft clay.
- If the mixture is too sticky, add more cornstarch a teaspoon at a time.
- For coloring, add a pinch of mica or a drop of food coloring and knead until evenly blended.
- Press your dough into silicone moulds or roll it out and use cookie cutters.
- Smooth rough edges gently with your fingers.
- Carefully unmould and lay them on parchment paper or a tray.
- Let the stones air-dry for 24–48 hours, flipping them halfway through to ensure even drying.
- Once completely dry, drop 3–5 drops of essential oil on each stone.
- Let them absorb the oil for 1–2 hours before using.