Amish White Bread is one of those timeless recipes that turns simple pantry staples into a soft, slightly sweet, and incredibly comforting loaf. Mastering Amish White Bread at home allows you to enjoy bakery-quality bread with minimal effort and maximum flavor. The aroma alone makes the entire process worthwhile, filling your kitchen with warmth and nostalgia.
Unlike complex artisan loaves, this bread focuses on simplicity. However, its texture and taste make it feel special enough for any occasion. Whether you’re making sandwiches, toast, or simply enjoying a warm slice with butter, this recipe delivers consistent, delicious results every time.
Ingredients
Equipment
Method
- Dissolve sugar in warm water, then add yeast and let it bloom until foamy.
- Mix in milk, butter, and salt, then gradually add flour to form a soft dough.
- Knead the dough for 8–10 minutes until smooth and elastic.
- Place dough in a greased bowl, cover, and let rise until doubled in size.
- Punch down dough and shape into a loaf.
- Place in a greased loaf pan and allow a second rise until above pan edge.
- Bake at 350°F (175°C) for 25–30 minutes until golden brown.
Notes
The Comfort Behind Amish White Bread
A Simple Tradition with Deep Roots
Amish baking traditions emphasize simplicity, practicality, and wholesome ingredients. Amish White Bread reflects that philosophy perfectly. It uses basic pantry staples yet produces a soft crumb and slightly sweet flavor that feels rich and satisfying. Because of its gentle sweetness, it appeals to both children and adults alike.
Moreover, this bread is incredibly versatile. You can serve it with savory meals, transform it into French toast, or use it for everyday sandwiches. Its neutral yet slightly sweet profile makes it adaptable to nearly any dish. That is why Mastering Amish White Bread has become a favorite goal for home bakers who want reliability without complication.
Why This Bread Feels Different
What sets this bread apart is its texture. It is soft without being crumbly, tender without being fragile. The balance comes from sugar, milk, and butter working together with yeast to create a light, airy structure.
In addition, the dough is forgiving. Even beginners can achieve excellent results with patience and attention. Because of this, many people choose it as their first homemade bread recipe. It builds confidence while rewarding effort with consistently beautiful loaves.
Ingredients and Dough Preparation Essentials
Gathering the Simple Ingredients
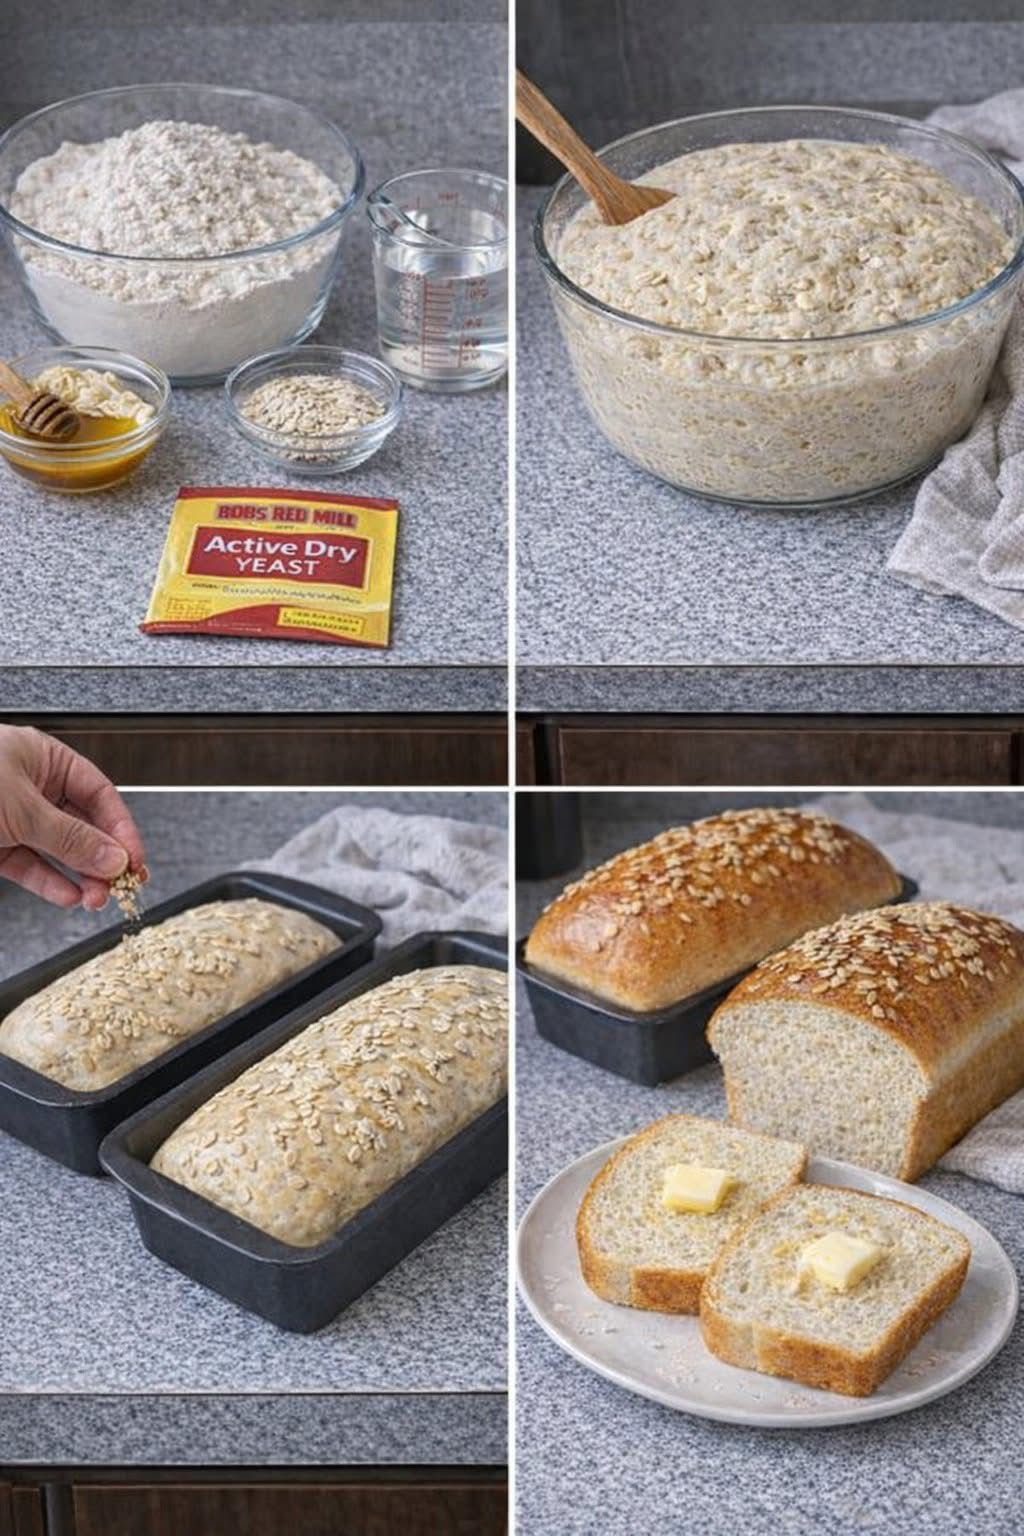
To begin Mastering Amish White Bread, you only need a few basic ingredients:
- Warm water
- Active dry yeast
- Granulated sugar
- Salt
- All-purpose flour
- Butter (softened)
- Milk (optional but recommended for richness)
Each ingredient plays a crucial role. The sugar feeds the yeast, the butter softens the crumb, and the milk enhances flavor and tenderness. Together, they create a balanced dough that rises beautifully and bakes into a golden loaf.
Because the ingredients are simple, freshness matters. Using fresh yeast and good-quality flour will noticeably improve your results.
Mixing and Forming the Dough
Start by dissolving sugar in warm water, then adding yeast. Allow it to bloom until foamy. This step ensures your yeast is active and ready to work. Next, mix in salt, butter, and milk before gradually adding flour.
As the flour incorporates, the dough will begin to form a soft, slightly sticky ball. At this stage, resist the urge to add too much flour. A slightly tacky dough leads to a softer bread.
Once combined, knead the dough until smooth and elastic. This develops gluten, which gives the bread its structure. The dough should feel soft, stretchy, and slightly springy when pressed.
Kneading, Proofing, and Shaping the Dough
Developing Structure Through Kneading
Kneading is essential for Mastering Amish White Bread because it builds strength in the dough. You can knead by hand or use a mixer with a dough hook. Either way, the goal is elasticity.
As you work the dough, it will transition from rough and sticky to smooth and cohesive. This transformation usually takes about 8 to 10 minutes. When properly kneaded, the dough should pass the “windowpane test,” stretching thin without tearing easily.
This step directly affects the final texture. Under-kneading results in dense bread, while proper kneading produces a soft, airy crumb.
First Rise and Dough Shaping
Once kneaded, place the dough in a lightly greased bowl. Cover it and allow it to rise in a warm environment until doubled in size. This usually takes about one hour, depending on room temperature.
After the first rise, gently punch down the dough to release air bubbles. Then shape it into a loaf by rolling it tightly and placing it into a greased loaf pan. Proper shaping helps ensure even baking and a smooth top.
Let the dough rise again until it rises just above the pan edge. This second rise is essential for achieving that signature fluffy texture.
Baking and Achieving the Perfect Texture
Oven Preparation and Baking Process
Preheat your oven to 350°F (175°C) before baking. Once the dough has completed its second rise, place it in the oven and bake until golden brown. This usually takes 25 to 30 minutes.
During baking, the loaf will continue to expand and develop its golden crust. The sugar in the dough helps create a lightly caramelized exterior, while the butter ensures softness inside.
To check doneness, tap the top of the loaf. A hollow sound indicates it is fully baked. For best results, allow it to cool before slicing.
Cooling and Storing for Freshness
After baking, remove the bread from the pan immediately and place it on a wire rack. Cooling prevents sogginess and preserves texture. Although it may be tempting to slice it right away, waiting ensures clean slices and better structure.
Store the bread in an airtight container or plastic bag. It stays soft for several days at room temperature. For longer storage, freeze individual slices and thaw as needed.
Personal Reflection on Homemade Bread
There was a time when homemade bread felt intimidating, like something reserved for experienced bakers with years of practice. The first attempt at making a simple loaf was far from perfect, but it was memorable. The kitchen filled with warmth, flour dusted every surface, and the smell of yeast and sugar slowly transformed the space.
That first loaf was uneven and slightly dense, yet it carried a sense of accomplishment. Over time, each attempt improved. The dough became smoother, the rises more predictable, and the texture softer. What once felt complicated eventually became a comforting routine.
Now, baking bread feels less like a task and more like a rhythm. It brings a quiet satisfaction that store-bought bread never quite matches. That journey is what makes Mastering Amish White Bread meaningful—it is not just about the loaf, but about the process of learning, improving, and enjoying every step.
FAQ
Why is my Amish White Bread dense?
Dense bread usually results from under-kneading or not allowing enough rise time. Ensure the dough doubles in size during proofing.
Can I use instant yeast instead of active dry yeast?
Yes, instant yeast works well and may reduce rising time slightly.
How do I keep the bread soft for longer?
Store it in an airtight container and avoid refrigeration, which can dry it out.
Can I make this bread without milk?
Yes, water can replace milk, but milk adds softness and richness.
Why didn’t my dough rise properly?
Old yeast or cold environments are common causes of poor rising.
Conclusion
Mastering Amish White Bread is about embracing simplicity and patience. With just a few ingredients and basic techniques, you can create a soft, flavorful loaf that fits into any meal. The process rewards attention and consistency, turning everyday baking into something deeply satisfying.
Whether you are new to bread making or refining your skills, this recipe offers reliability and comfort in every slice. The result is a homemade loaf that feels warm, inviting, and endlessly versatile.