Introduction
Few desserts bring as much joy and comfort as a classic chocolate layer cake. This timeless dessert is perfect for birthdays, anniversaries, and any event worth celebrating. With its rich cocoa flavors and creamy frosting, it’s a surefire way to impress your guests and create lasting memories. Whether you’re an experienced baker or a novice in the kitchen, this detailed guide will help you create a delicious and memorable chocolate layer cake from scratch.
Detailed Ingredients
To get started, gather your ingredients. This recipe requires:
– 2 cups all-purpose flour
– 2 ½ cups granulated sugar
– ¾ cup unsweetened cocoa powder
– 2 tsp baking powder
– 1 ½ tsp baking soda
– 1 tsp salt
– 1 cup whole milk, room temperature
– ½ cup vegetable oil
– 2 large eggs, room temperature
– 2 tsp vanilla extract
– 1 cup boiling water
For the frosting, you’ll need:
– 1 ½ cups unsalted butter, room temperature
– 4 cups powdered sugar, sifted
– ¾ cup unsweetened cocoa powder
– ¼ cup heavy cream
– 2 tsp vanilla extract
– ¼ tsp salt
Prep Time, Cook Time, Total Time, Yield
Preparation Time: 20 minutes
Cooking Time: 35 minutes
Total Time: 55 minutes
Yield: 12 servings
Detailed Directions and Instructions
Follow these steps to create your classic chocolate layer cake:
1. Preheat your oven to 350°F (175°C). Grease and line the bottom of three 8-inch round cake pans with parchment paper. This will help your cakes come out cleanly after baking.
2. In a large mixing bowl, combine the all-purpose flour, granulated sugar, unsweetened cocoa powder, baking powder, baking soda, and salt. Mix these dry ingredients until they’re well combined and free of lumps.
3. Add the whole milk, vegetable oil, eggs, and vanilla extract to the bowl with your dry ingredients. Using a mixer on medium speed, blend the ingredients until they’re thoroughly combined and you have a smooth batter.
4. Gradually add the boiling water to the batter. This step should be done slowly, with the mixer on low speed to prevent splashing. The batter will be quite thin, but this is how it should be.
5. Divide the batter evenly between the three prepared cake pans. Tap the pans gently on the countertop to release any air bubbles.
6. Bake the cakes in the preheated oven for 30-35 minutes, or until a toothpick inserted into the center of each cake comes out clean. Let the cakes cool in the pans for about 10 minutes, then turn them out onto wire racks to cool completely.
7. While the cakes are cooling, prepare the frosting. In a large bowl, beat the unsalted butter on medium speed until it’s smooth and creamy. Gradually add the sifted powdered sugar and unsweetened cocoa powder, beating on low speed until well incorporated.
8. Increase the mixer speed and add the heavy cream, vanilla extract, and salt. Continue to beat the frosting until it’s light, fluffy, and spreadable.
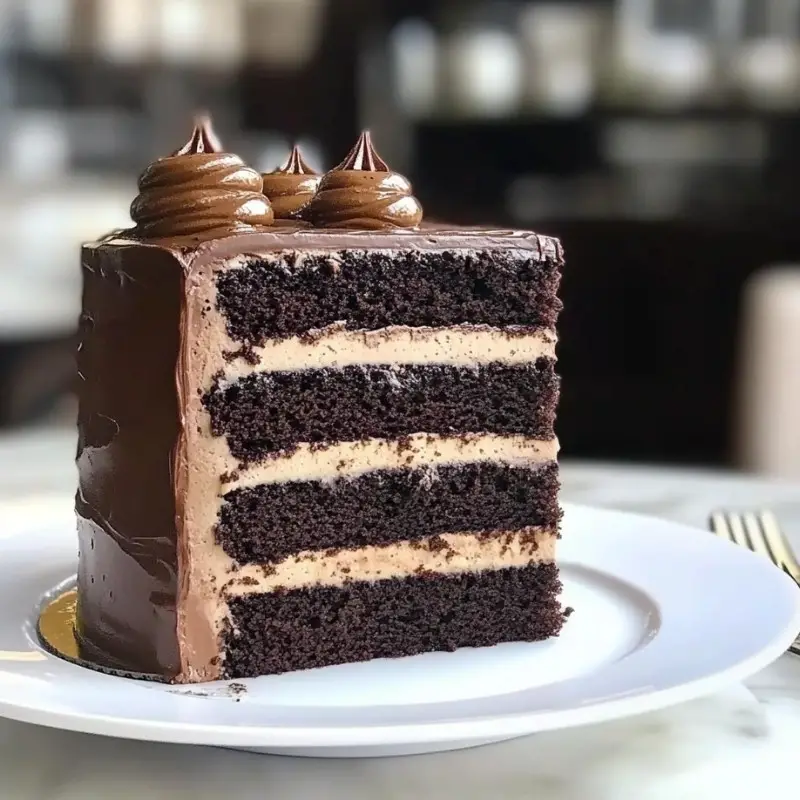
9. Once the cakes have completely cooled, you can start to assemble your cake. Place one cake layer on a serving plate or cake stand. Spread a generous amount of frosting on top of the first layer. Repeat with the second and third cake layers, frosting each layer as you go.
10. Use the remaining frosting to cover the top and sides of the cake. To achieve a smooth finish, use an offset spatula or a bench scraper. If desired, you can pipe decorative designs on the cake or add other embellishments.
11. Slice the cake and serve it to your delighted guests. Store any leftovers in an airtight container at room temperature for up to three days.
Notes
– Make sure all your ingredients are at room temperature before you start. This ensures that they blend together more easily.
– If you only have two 8-inch pans, you can bake the cakes in batches. The batter can sit out at room temperature while the first batch bakes.
– For an extra moist cake, you can brush each layer with a simple syrup made from equal parts sugar and water.
Cook Techniques-FAQ
1. Why is the batter so thin?
The thin batter is due to the inclusion of boiling water, which helps to dissolve the cocoa powder and ensures a moist, tender cake.
2. Can I use Dutch-processed cocoa powder?
Yes, you can use Dutch-processed cocoa powder, but it may affect the overall flavor and texture. Traditionally, unsweetened cocoa powder is used for a classic chocolate flavor.
3. How do I avoid lumps in my frosting?
Make sure to sift the powdered sugar and cocoa powder to eliminate any lumps before mixing them with the butter.
Conclusion
Creating a classic chocolate layer cake from scratch is an act of love that yields sweet rewards. With its rich chocolate layers and velvety frosting, this cake is perfect for any celebration. Whether it’s a birthday, anniversary, or any special occasion, this cake is destined to be the star of the show. Follow these steps and tips, and you’ll be well on your way to baking a masterpiece that will delight everyone.
More Recipes Suggestions and Combination
Chocolate complements many flavors, so feel free to experiment with different types of fillings and frostings for variety. Here are some suggestions:
– Chocolate Raspberry Cake: Add a layer of raspberry jam or fresh raspberries between the cake layers before frosting.
– Chocolate Orange Cake: Incorporate orange zest into the batter and frost with a chocolate orange ganache.
– Chocolate Peanut Butter Cake: Spread peanut butter frosting between the layers and cover the cake with chocolate ganache.
– Chocolate Coffee Cake: Add a shot of espresso to both the batter and frosting for a mocha-flavored delight.
With these variations, you can personalize your chocolate layer cake to fit any taste and occasion. Enjoy your baking journey!

Classic Chocolate Layer Cake
Ingredients
Method
- Preheat your oven to 350°F (175°C). Grease and line the bottom of three 8-inch round cake pans with parchment paper.
- In a large mixing bowl, combine the all-purpose flour, granulated sugar, unsweetened cocoa powder, baking powder, baking soda, and salt. Mix these dry ingredients until well combined.
- Add the whole milk, vegetable oil, eggs, and vanilla extract to the dry ingredients. Blend the mixture until smooth on medium speed.
- Gradually add the boiling water to the batter on low speed.
- Divide the batter evenly between the three prepared cake pans.
- Bake the cakes for 30-35 minutes, or until a toothpick inserted into the center comes out clean. Allow them to cool in the pans for about 10 minutes, then transfer to wire racks to cool completely.
- Beat the unsalted butter on medium speed until smooth and creamy.
- Gradually add the sifted powdered sugar and cocoa powder, beating on low speed until fully incorporated.
- Increase the mixer speed and add the heavy cream, vanilla extract, and salt. Beat until light and fluffy.
- Once the cakes are completely cooled, place one layer on a serving plate and spread frosting on top. Repeat with the second and third layers.
- Cover the top and sides of the cake with remaining frosting.
- Decorate the cake as desired and slice to serve.

