Introduction
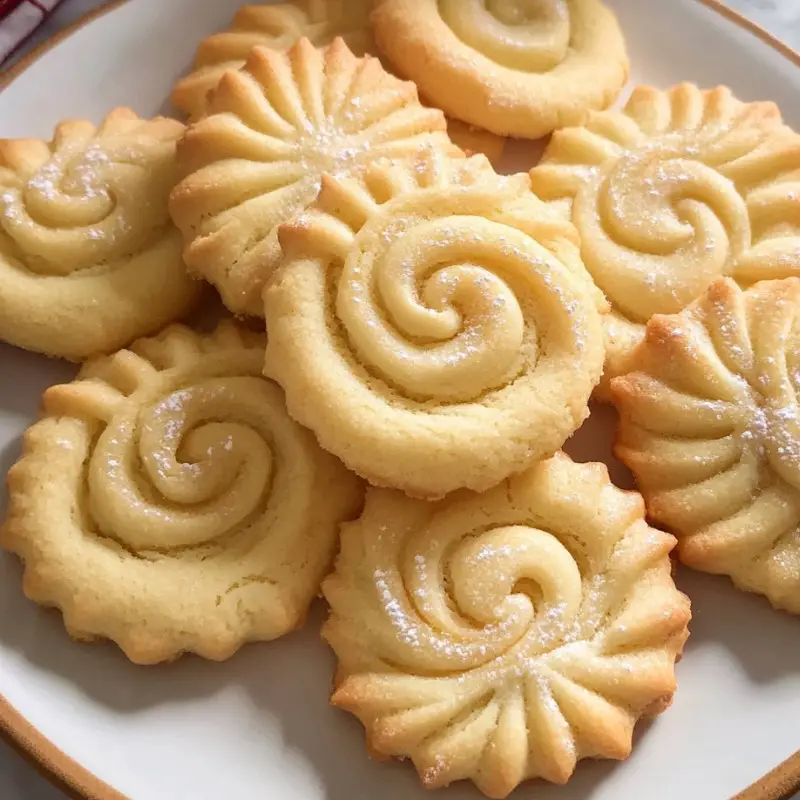
Danish Butter Cookies are a beloved treat that promises a taste of Denmark in every bite. With a crumbly texture and rich buttery flavor, these cookies are a timeless classic, often associated with moments of cozy indulgence and festive celebrations. Though often enjoyed as store-bought treats during the holidays, crafting them at home offers an experience closer to authenticity, paired with the satisfaction of home baking. Enjoying these cookies with a warm cup of tea can transform a simple afternoon into a blissful Nordic experience.
Detailed Ingredients
To create this Danish delight, gather these straightforward yet essential ingredients:
– 1 cup unsalted butter, softened
The foundation of these cookies is the butter, lending them their characteristic richness. Make sure it’s softened to achieve a smooth cream when mixed with sugar.
– 3/4 cup granulated sugar
Sugar sweetens the cookies to perfection and helps achieve the desired texture.
– 1 large egg
The egg acts as a binding agent, integrating the ingredients well and giving the cookie its desired consistency.
– 1 teaspoon vanilla extract
Vanilla provides a depth of flavor that complements the buttery taste, adding a subtle aromatic essence.
– 2 1/4 cups all-purpose flour
Flour is the structural element, holding the cookies together, offering the delicate crumb we all love.
– 1/4 teaspoon salt
A touch of salt enhances all the flavors, balancing the sweetness and richness.
Prep Time, Cook Time, Total Time, Yield
Making these delightful cookies is a breeze and requires little time commitment. The prep time is approximately 20 minutes, while the cook time is about 15 minutes. This means you’re only looking at a total time of around 35 minutes from start to finish. Such efficiency allows for the production of about 40 cookies, perfect for sharing or gifting, or simply savoring over the week.
Detailed Directions and Instructions
The simplicity of Danish Butter Cookies is one of their most appealing aspects. Follow these instructions to achieve cookie perfection.
1. Preheat your oven to 350°F (175°C) and line two baking sheets with parchment paper. This step ensures that your cookies don’t stick and bake evenly.
2. In a large mixing bowl, cream the softened butter and granulated sugar together until the mixture is light and fluffy. This process usually takes about three to five minutes and is crucial for the texture of your cookies.
3. Add the egg and vanilla extract to the butter mixture. Beat until everything is well combined to ensure that the flavors are distributed evenly.
4. In a separate bowl, whisk together the flour and salt. Gradually incorporate this into the butter mixture, beating on a low speed until just combined. Overmixing can lead to tough cookies, so mix just until you can no longer see the flour.
5. Transfer the resulting dough to a pastry bag fitted with a large star tip. This step is key to achieving the traditional shape. Pipe the dough onto the prepared baking sheets in 2-inch circles or any shape you prefer.
6. Bake the cookies in your preheated oven for 12-15 minutes, or until the edges are lightly golden. The sweet aroma will let you know they’re almost ready.
7. Allow the cookies to cool on the baking sheets for about 5 minutes before transferring them to a wire rack to cool completely. This helps them firm up.
8. Store in an airtight container to maintain their crispness and enjoy at your leisure.
Notes
A few notes to keep in mind: The consistency of your butter is crucial, as it should be softened but not melted. If your dough is too soft to handle, refrigerate it for a bit before piping. Additionally, for an extra layer of indulgence, consider adding a sprinkle of colored sugar or dipping half of the baked cookies in melted chocolate for a festive look.
Cook Techniques
Several techniques can enhance your butter cookie baking. The creaming of butter and sugar is one of the most critical steps; it’s not just about blending but achieving a certain texture that holds air and gives the cookie its lift and crumbly texture. Piping the dough requires a bit of practice to perfect, ensuring even and consistent shapes. Finally, slightly underbaking the cookies by a minute can allow them to continue baking on the tray and reach the ideal crunchiness without overcooking the edges.
FAQ
Q: Can I use salted butter instead of unsalted?
A: Yes, but you should then omit the added salt to balance the flavor.
Q: What can I do if I don’t have a pastry bag?
A: You can use a sturdy plastic bag with the tip cut off or simply shape the dough by hand.
Q: How do I store these cookies?
A: Store them in an airtight container at room temperature to keep them fresh and crisp.
Conclusion
Danish Butter Cookies provide a taste of Scandinavian tradition that’s a delight for any cookie lover. Their melt-in-the-mouth delicacy is both satisfying and comforting, especially when paired with a warm beverage. With this recipe, you can now bring the warmth of Denmark into your home, sharing joy with family and friends.
More Recipes Suggestions and Combinations
While these cookies stand magnificently on their own, consider using them as components in other desserts. They can be crumbled atop ice cream, used as a crust for cheesecakes, or accompanied by a selection of fine cheeses and fruits for a modern twist. For those seeking more Danish delights, try exploring recipes like Risalamande, a Danish rice pudding, or Smørrebrød, Danish open-faced sandwiches. Whatever your choice, let the world of Danish cuisine inspire your culinary adventures.
Danish Butter Cookies
Ingredients
Method
- Preheat your oven to 350°F (175°C) and line two baking sheets with parchment paper.
- In a large mixing bowl, cream the softened butter and granulated sugar together until light and fluffy, about 3-5 minutes.
- Add the egg and vanilla extract to the butter mixture and beat until well combined.
- In a separate bowl, whisk together the flour and salt, then gradually incorporate into the butter mixture, mixing on low speed until just combined.
- Transfer the dough to a pastry bag fitted with a large star tip and pipe onto prepared baking sheets in 2-inch circles.
- Bake for 12-15 minutes, or until the edges are lightly golden.
- Allow the cookies to cool on the baking sheets for about 5 minutes before transferring to a wire rack to cool completely.
- Store in an airtight container to maintain crispness.