Before we dive in—thank you so much for dropping by my cozy little craft nook today! It warms my heart to know you’re here, ready to make something beautiful with your own two hands. These Blue Crayon Raindrop Suncatchers are exactly the kind of simple, charming craft that will make your windows sparkle, even when the skies are grey.

If you love easy, colorful projects like this, be sure to subscribe below—I’d be thrilled to send more DIY joy straight to your inbox!


What Are Blue Crayon Raindrop Suncatchers?

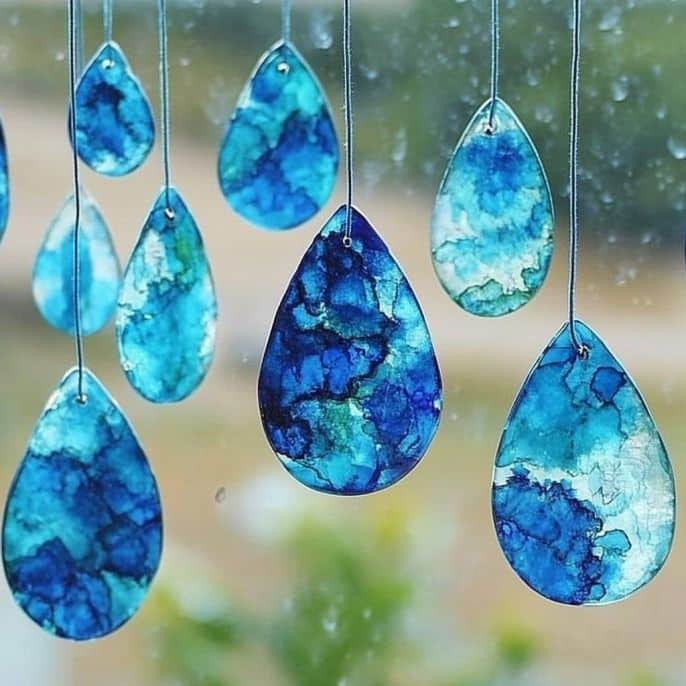
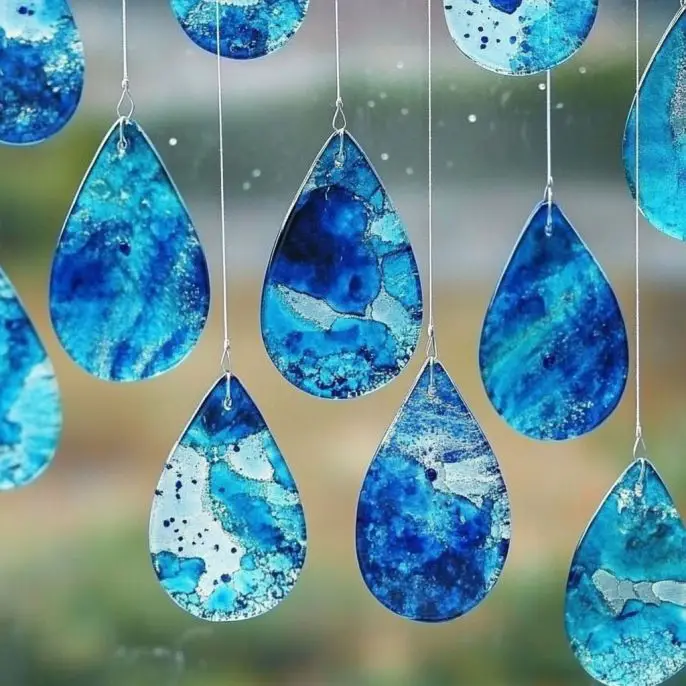
These suncatchers are made by melting down bits of blue crayons between sheets of waxed paper to create a gorgeous, stained-glass effect. Once cooled, you cut them into delicate raindrop shapes and hang them in your window where they dance in the sunlight. It’s the perfect blend of art, color, and a touch of rainy day magic!


Why You’ll Love This Craft

💙 Uses up old crayons—hello, upcycling!
💙 Super simple and kid-friendly (with a little adult help for the ironing).
💙 Looks stunning when the sun shines through.
💙 Quick project with endless possibilities for color mixing!


What Do They Look Like?

When finished, your suncatchers look like little watercolor droplets, shimmering in the window light. The wax melts into beautiful swirls and streaks—each raindrop totally unique, just like the real ones! I’m kicking myself for not snapping a picture of my window last spring—trust me, it was magical!


Benefits of Making Your Own Suncatchers

✔️ Encourages creativity and fine motor skills for little hands.
✔️ Adds a touch of handmade decor to brighten your windows.
✔️ Great rainy day craft with minimal mess.
✔️ A sweet, simple gift for friends or family.


Ingredients You’ll Need

  • Blue crayons (various shades look amazing!)

  • Pencil or crayon sharpener

  • Waxed paper

  • Iron (adult use only, please!)

  • Scissors

  • Embroidery floss or string


Helpful Tools

  • Hole punch (to make hanging holes)

  • Marker (for tracing raindrop shapes)

  • Old towel or parchment paper (to protect your ironing board)


Ingredient Additions & Fun Variations

🌈 Add a pop of purple or white crayon shavings for stormy cloud vibes.
✨ Sprinkle in a bit of fine glitter before melting for a subtle sparkle.
🧵 Swap embroidery floss for clear fishing line if you want them to look like they’re floating!

See also  Glittery Ocean in a Bottle – A Mesmerizing DIY Sensory Craft for All Ages


How to Make Blue Crayon Raindrop Suncatchers

1️⃣ Pick & Prep Your Crayons

Choose your favorite blues—light, dark, turquoise—whatever calls to you! Peel off the wrappers carefully.

2️⃣ Make the Shavings

Use a pencil or crayon sharpener to create shavings. Spread them out evenly on a piece of waxed paper.

3️⃣ Get Ready to Melt

Lay another sheet of waxed paper on top. If you’re worried about spills, sandwich your project between old towels or parchment paper to protect your iron and ironing board.

4️⃣ Melt the Magic

With an adult’s help, iron the wax paper sandwich on the lowest setting. Keep the iron moving slowly—watch the wax melt into beautiful swirls!

5️⃣ Let It Cool

Remove from heat and let your melted masterpiece cool completely.

6️⃣ Cut Out Your Raindrops

Draw raindrop shapes with a marker. Cut them out carefully with scissors.

7️⃣ Add a Way to Hang

Use a hole punch to make a small hole at the top of each raindrop. Thread with embroidery floss or string.

8️⃣ Hang & Enjoy!

Hang your suncatchers in a sunny window and watch them catch the light—instant mood booster!


Tips & Variations

💧 Try layering different blues for an ocean effect.
💧 Use cookie cutters as stencils for perfect shapes.
💧 Add a bit of clear plastic between the waxed paper for extra shine.


Storage Instructions

These suncatchers are delicate! If you’re not hanging them right away, store them flat between sheets of wax paper in a cool, dry place.


General Information

Always supervise kids when using an iron. This project works best on a protected surface—old towels or parchment paper will keep melted wax from getting where you don’t want it!


Frequently Asked Questions

Can I use other crayon colors?

Absolutely! Try rainbow raindrops, autumn leaf shapes, or even multicolor circles for a sunburst effect.

Will the suncatchers melt in the sun?

Nope! The wax is protected between the waxed paper, so they’ll hold up well on a sunny window.

How long do they last?

With gentle handling, they can last for years—just keep them away from direct heat sources when not displayed.

See also  Jellyfish Salt Painting: A Magical Ocean-Inspired Craft for All Ages

Wrap-Up—Your Windows Will Thank You!

These Blue Crayon Raindrop Suncatchers are the perfect little craft to chase away rainy day blues. Simple, stunning, and a total delight to hang up when you’re done. If you give this craft a try, I’d love to see how your window looks—share your creations on Pinterest and tag me so I can celebrate your crafty magic!

Want more ways to brighten your windows? Try these next:

  • DIY Melted Crayon Suncatchers (rainbow version!)

  • Easy Paper Plate Stained Glass

  • Homemade Tissue Paper Sunbursts


Approximate Nutritional Information

Zero calories, 100% heartwarming creative fun. 😊✨

Happy crafting, my friend—may your windows always sparkle! 💙

Blue Crayon Raindrop Suncatchers

These charming suncatchers, made from melted blue crayon shavings, add a beautiful stained-glass effect to any window, perfect for brightening rainy days.
Prep Time 15 minutes
Cook Time 5 minutes
Total Time 20 minutes
Servings: 1 craft
Course: Craft, DIY

Ingredients
  

Suncatcher Materials
  • 5 pieces Blue crayons Various shades for best effect
  • 1 piece Waxed paper
  • 1 piece Iron Adult use only
  • 1 piece Scissors
  • 1 length Embroidery floss or string
Helpful Tools
  • 1 piece Hole punch To make hanging holes
  • 1 piece Marker For tracing raindrop shapes
  • 1 piece Old towel or parchment paper To protect the ironing board

Method
 

Preparation
  1. Choose your favorite blue crayons and peel off the wrappers carefully.
  2. Use a pencil or crayon sharpener to create shavings and spread them out evenly on a piece of waxed paper.
  3. Lay another sheet of waxed paper on top. If worried about spills, sandwich your project between old towels or parchment paper.
Melting and Cutting
  1. With an adult’s help, iron the wax paper sandwich on the lowest setting, keeping the iron moving slowly to melt the wax.
  2. Remove from heat and let your melted masterpiece cool completely.
  3. Draw raindrop shapes with a marker and cut them out carefully with scissors.
Finishing Touches
  1. Use a hole punch to make a small hole at the top of each raindrop and thread with embroidery floss or string.
  2. Hang your suncatchers in a sunny window to catch the light.

Notes

These suncatchers are delicate. Store them flat between sheets of wax paper in a cool, dry place if not hanging immediately. Always supervise kids when using an iron.

Blue Crayon Raindrop Suncatchers

These charming suncatchers, made from melted blue crayon shavings, add a beautiful stained-glass effect to any window, perfect for brightening rainy days.
Prep Time 15 minutes
Cook Time 5 minutes
Total Time 20 minutes
Servings: 1 craft
Course: Craft, DIY

Ingredients
  

Helpful Tools
  • 1 piece Hole punch For making hanging holes
  • 1 piece Marker For tracing raindrop shapes
  • 1 piece Old towel or parchment paper To protect your ironing board

Method
 

Preparation
  1. Choose your favorite blues—light, dark, turquoise—whatever calls to you! Peel off the wrappers carefully.
  2. Use a pencil or crayon sharpener to create shavings. Spread them out evenly on a piece of waxed paper.
  3. Lay another sheet of waxed paper on top. If you’re worried about spills, sandwich your project between old towels or parchment paper to protect your iron and ironing board.
Melting
  1. With an adult’s help, iron the wax paper sandwich on the lowest setting. Keep the iron moving slowly—watch the wax melt into beautiful swirls!
  2. Remove from heat and let your melted masterpiece cool completely.
Finishing Touches
  1. Draw raindrop shapes with a marker. Cut them out carefully with scissors.
  2. Use a hole punch to make a small hole at the top of each raindrop. Thread with embroidery floss or string.
  3. Hang your suncatchers in a sunny window and watch them catch the light—instant mood booster!

Notes

Try layering different blues for an ocean effect. Use cookie cutters as stencils for perfect shapes. Add a bit of clear plastic between the waxed paper for extra shine. Store flat between sheets of wax paper in a cool, dry place.

Similar Posts

Leave a Reply

Your email address will not be published. Required fields are marked *

Recipe Rating