Before we dive into the dreamy texture and hands-on joy of homemade kinetic sand, let me just say thank you for being here. Whether you’re a parent looking to make playtime extra special, a teacher searching for sensory activities that won’t break the bank, or just a craft-lover chasing a little magic—you’re in the right place.
This DIY kinetic sand recipe is an absolute winner. It’s satisfying to make, calming to play with, and endlessly customizable. Think soft, moldable, and mess-resistant—like beach sand’s cooler, stay-inside cousin!
💌 Want more engaging DIY sensory activities like this one? Subscribe now and I’ll send you this recipe and other hands-on ideas straight to your inbox!
What Is Homemade Kinetic Sand?
Kinetic sand is soft, stretchy, and sticks together just enough to build, squish, and shape—but without the sticky mess of other doughs or slimes. This version uses basic household ingredients and creates a velvety-smooth, moldable texture that kids and adults love to run through their fingers. It’s science and play wrapped up in one soothing, sensory-packed experience.
Why You’ll Love This DIY Kinetic Sand
🖐️ Calming and therapeutic—great for sensory seekers
🌿 Non-toxic and safe for little hands
🎨 Customizable with color, glitter, or scent
💰 Budget-friendly with pantry ingredients
🧠 STEM + playtime in one tactile activity
What It Feels Like
If you’ve never played with kinetic sand before—imagine the feel of soft, beachy sand that holds its shape when pressed but flows smoothly when you let it fall. It’s soft, moldable, and a bit stretchy, almost like a cross between sand and play dough. Honestly? It’s kind of addictive!
Benefits of Kinetic Sand Play
Enhances fine motor skills and hand strength
Encourages creative play and imaginative building
Supports sensory development
Can be calming and soothing for both kids and adults
A great alternative to screen time—no batteries required!
🧂 Ingredients
2 cups fine sand (craft or play sand works best)
1 cup cornstarch or flour
½ cup clear or white school glue
½ tablespoon water
Optional:
Food coloring (any shade you like)
Glitter (for sparkle)
Cocoa powder (for a natural, earthy scent or color)


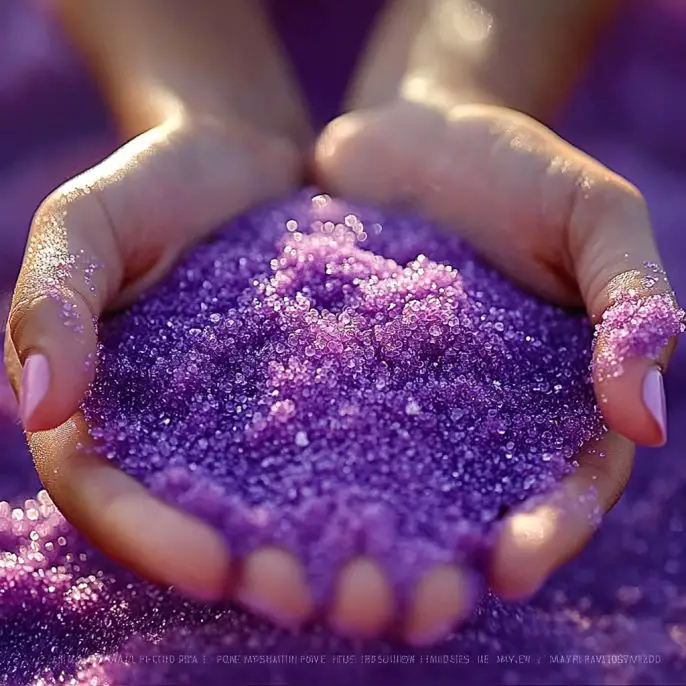
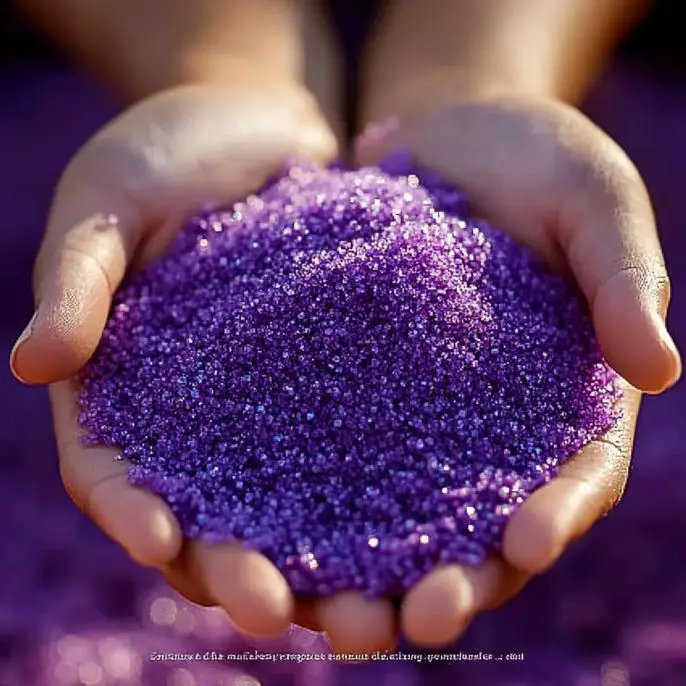
Homemade Kinetic Sand
Make your own moldable, squeezable kinetic sand using just a few pantry and craft supplies. It’s a sensory play favorite for kids—and relaxing for adults too!Ingredients
Equipment
Method
- In a large bowl, measure 2 cups of fine sand and pour it in.
- Add 1 cup of cornstarch or flour. Mix with a spoon or whisk until fully combined.
- Slowly pour in 1/2 cup of glue. Stir until mixture begins to clump together.
- Add 1/2 tablespoon water. Knead the mixture with hands until you reach the desired texture.
- Optional: Add food coloring, glitter, or cocoa powder. Knead again to distribute evenly.
- Transfer kinetic sand to an airtight container or ziplock bag to keep it fresh.
Notes
Store in an airtight container to keep your kinetic sand soft and moldable. Adjust the texture by adding a bit more sand (to dry) or a drop of water (to moisten). Add scents or color for themed fun!
🛠️ Tools You’ll Need
Large mixing bowl
Spoon or whisk
Measuring cups and spoons
Airtight container or zip-top bag for storage
Gloves (optional for mixing colored batches)
🎨 How to Make Kinetic Sand at Home
1. Measure & Combine the Sand
Pour 2 cups of fine sand into a large bowl. The finer the sand, the smoother your kinetic sand will feel.
2. Add Cornstarch or Flour
Add 1 cup of cornstarch or flour to the sand. Mix thoroughly with a spoon or whisk to combine.
3. Pour in the Glue
Slowly add ½ cup of school glue into the sand mixture. Stir with a spoon or your hands until everything starts to come together into clumps.
4. Add Water & Knead
Add ½ tablespoon of water to the mixture. Use your hands to knead and squeeze until the texture becomes soft and moldable. If it’s too dry, add a few drops of water. If it’s sticky, add a little more sand or cornstarch.
5. Customize with Add-Ins
Add optional extras like a few drops of food coloring, a pinch of glitter, or even a little cocoa powder. Mix thoroughly until evenly blended.
6. Store It Safely
Transfer your kinetic sand into a zip-top bag or airtight container to keep it soft and ready for play whenever inspiration strikes!

✨ Tips & Fun Variations
Color Combos: Divide your batch into small bowls and make rainbow shades with different food colorings.
Scented Sand: Add a drop or two of lavender, peppermint, or citrus essential oil for a sensory boost.
Themed Sand: Use cocoa powder for “dirt” or brown sugar for “beach sand.”
Sensory Bins: Add scoops, molds, or toys for a full kinetic sand sensory station!
🧺 Storage & Shelf Life
Store in an airtight container or ziplock bag to prevent it from drying out.
If your sand gets a bit dry after a few days, knead in a tiny splash of water or a drop of glue to refresh it.
Lasts several weeks with proper storage.
🔬 How It Works: A Bit of Science
The glue (a polymer) and the cornstarch form a network of bonds that give the sand its unique, moldable quality. The sand grains are coated and bound lightly—enough to stick to each other but not to your hands. It’s an easy intro to basic polymer chemistry, and it’s a hands-on way to explore materials science and texture play.
🙋 FAQ
Can I use beach sand?
Yes, if it’s clean and very fine. Wash and dry it thoroughly first to remove salt or debris.
Which is better: cornstarch or flour?
Both work! Cornstarch gives a silkier texture, while flour is slightly more dough-like. Try both and see what you prefer.
Is this edible?
Nope! It’s non-toxic, but not meant to be eaten. Always supervise little ones who are tempted to taste-test.
🧁 Conclusion
Making homemade kinetic sand is more than just a DIY project—it’s a sensory-rich, screen-free, joy-filled experience that offers hours of imaginative fun. It’s creative, calming, and just messy enough to be wildly entertaining without driving you crazy. 😉
Once you try it, you’ll be asking yourself why you didn’t make it sooner!
🌈 More Sensory Fun You’ll Love
📸 Let’s See Your Sand Creations!
If you made your own batch of kinetic sand, I’d love to see it!
Share your photos on Pinterest or Instagram and tag me so we can inspire more families with colorful, creative play!
🍬 Nutritional Info?
Not this time—this sand’s for play, not for snacking. But it does feed your imagination and soothe the senses. Win-win! 💕
Thanks for stopping by! Until next time—stay curious, stay crafty, and let your hands lead the way.