Introduction
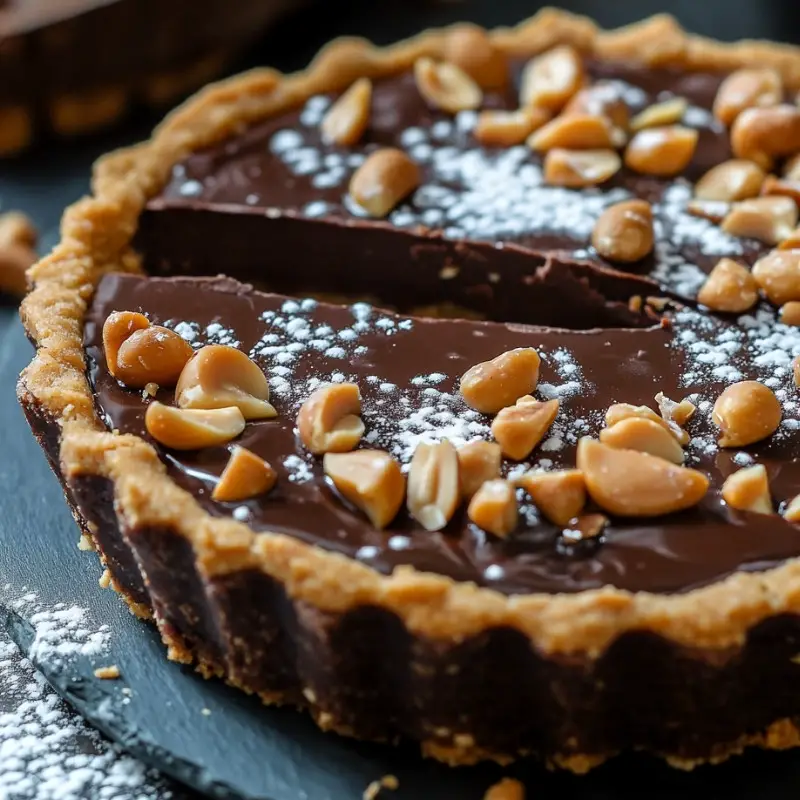
Indulge yourself with this luscious Chocolate Peanut Butter Tart—perfect for an extra-special Valentine’s Day dessert. A harmony of rich chocolate and creamy peanut butter, this tart is sure to captivate hearts at first bite.
Detailed Ingredients with measures
For the crust:
– 200 g chocolate cookies, crushed
– 80 g unsalted butter, melted
For the filling:
– 250 ml heavy cream
– 200 g dark chocolate, chopped
– 150 g peanut butter (smooth)
– 50 g powdered sugar
For the topping:
– 50 g dark chocolate, melted
– 30 g roasted peanuts, chopped
Prep Time
20 minutes
Cook Time, Total Time, Yield
Cook Time: 10 minutes
Total Time: 2 hours 30 minutes (including chilling time)
Yield: 8 servings
Directions:
1. Preheat your oven to 180°C (350°F).
2. Combine the crushed chocolate cookies and melted butter in a mixing bowl. Press the mixture evenly into the bottom and sides of a tart pan. Bake for 10 minutes and allow to cool completely.
3. In a saucepan, heat the heavy cream over medium heat until it’s just about to boil. Pour the hot cream over the chopped dark chocolate in a heatproof bowl. Let it sit for 2 minutes, then stir until smooth.
4. In a separate bowl, whisk together the peanut butter and powdered sugar until fluffy. Spread the peanut butter mixture over the cooled crust evenly.
5. Pour the chocolate ganache over the peanut butter layer, smoothing the top with a spatula.
6. Chill the tart in the refrigerator for at least 2 hours, or until set.
7. Once set, drizzle the melted dark chocolate over the top and sprinkle with chopped peanuts. Serve and enjoy!
#chocolatetart #peanutbutterlove #valentinesdessert #decadentdesserts #sweettooth #homemadegoodness #bakingtherapy #cocoalover #indulgenttreats #tartrecipe
Detailed Directions and Instructions
Step 1: Preheat the Oven
Begin your delightful journey by preheating your oven to 180°C (350°F). This step ensures a perfectly baked crust, setting the stage for the luscious layers to come.
Step 2: Prepare the Crust
In a mixing bowl, combine 200 g of crushed chocolate cookies with 80 g of melted unsalted butter. Stir until you have a uniform mixture. Press this mixture evenly into the bottom and up the sides of a tart pan to create a beautiful, crunchy crust. Bake it in the preheated oven for 10 minutes, then set aside to cool completely. The aroma of warm chocolate will fill your kitchen!
Step 3: Make the Chocolate Ganache
In a saucepan, heat 250 ml of heavy cream over medium heat until it is just about to boil, bubbling gently. Remove it from the heat and pour the hot cream over 200 g of chopped dark chocolate in a heatproof bowl. Allow it to sit for 2 minutes so the chocolate can soften, then stir until you achieve a smooth and glossy ganache—like liquid silk!
Step 4: Prepare the Peanut Butter Layer
In a separate bowl, whisk together 150 g of smooth peanut butter and 50 g of powdered sugar until the mixture becomes fluffy and creamy. Imagine the rich, nutty scent wafting through your kitchen as you spread this delightful layer evenly over the cooled crust.
Step 5: Layer the Chocolate Ganache
Next, gently pour the luscious chocolate ganache over the peanut butter layer, using a spatula to carefully smooth the top. Watch as the layers merge together, creating an irresistible combination of flavors.
Step 6: Chill the Tart
Place the tart in the refrigerator to chill for at least 2 hours, allowing the flavors to meld and the layers to set. The anticipation will build as you imagine the decadent treat awaiting you!
Step 7: Finish with the Topping
Once the tart has set, drizzle 50 g of melted dark chocolate artfully over the top. Then sprinkle with 30 g of chopped roasted peanuts for a delightful crunch. The visual presentation will beckon everyone to indulge!
Step 8: Serve and Enjoy
Slice the tart into generous pieces and serve. Enjoy the rich and creamy blend of chocolate and peanut butter with every bite, savoring the symphony of flavors.
Notes
Flavor Variations
For a twist, consider adding a teaspoon of vanilla extract to the peanut butter layer for an aromatic enhancement that complements the chocolate beautifully.
Texture Tips
Ensure the crust is pressed firmly into the pan, which will prevent it from crumbling when sliced. A tightly packed crust provides a sturdy base for the rich filling.
Presentation Ideas
Serve the tart with a dollop of whipped cream or a scoop of vanilla ice cream to elevate this dessert to a whole new level of indulgence. A sprinkle of sea salt over the top might also create a delectable contrast!
Storing Leftovers
If you have leftovers, store them in an airtight container in the refrigerator for up to 3 days. The flavors continue to deepen, making it even more enjoyable when you return for another slice!
Cook techniques
Crushing Cookies
Use a food processor or a rolling pin to crush the chocolate cookies into fine crumbs for a smooth tart crust. Ensure there are no large chunks.
Melting Chocolate
Melt chocolate carefully over low heat or using a double boiler. Stir constantly to avoid scorching and achieve a silky consistency.
Whisking Peanut Butter
When whisking peanut butter with powdered sugar, use a hand mixer or a whisk until the mixture becomes fluffy and light, ensuring a creamy texture.
Chilling the Tart
For best results, chill the tart in the refrigerator for at least 2 hours to allow the filling to set properly. This ensures clean slices when serving.
Drizzling Chocolate
Use a piping bag or a spoon to drizzle melted chocolate over the tart. This adds a decorative touch and enhances presentation.
FAQ
Can I use milk chocolate instead of dark chocolate?
Yes, you can use milk chocolate for a sweeter flavor, but it will alter the richness of the tart.
How can I make the crust gluten-free?
Substitute chocolate cookies with gluten-free chocolate cookies or use ground almonds or gluten-free graham crackers as a base.
What type of peanut butter is best for this recipe?
Smooth peanut butter works best for a creamy filling. Avoid natural peanut butter with excessive oil separation for consistent texture.
Can I make this tart ahead of time?
Yes, you can prepare the tart a day in advance. Just keep it covered in the refrigerator until ready to serve.
How do I store leftovers?
Store leftovers in an airtight container in the refrigerator for up to three days. Allow to come to room temperature before serving for best flavor.
Conclusion
The Chocolate Peanut Butter Tart is a quintessential dessert that harmoniously balances rich flavors and creamy textures, making it an ideal choice for special occasions or a delightful treat any day. With its effortless elegance and crowd-pleasing appeal, this tart is sure to impress both family and friends. Treat yourself and your loved ones to this indulgent dessert that’s not only easy to make but also a feast for the senses.
Peanut Butter Brownies
Enjoy the same rich flavors of chocolate and peanut butter with fudgy brownies, featuring swirls of creamy peanut butter throughout for a delightful bite.
Chocolate Chip Peanut Butter Cookies
Combine classic chocolate chip cookies with the added creaminess of peanut butter, creating a chewy delight that will satisfy any sweet tooth.
Peanut Butter Cupcakes
Bake moist chocolate cupcakes filled with a luscious peanut butter frosting, topped with a drizzle of chocolate ganache for an irresistible dessert.
Chocolate Peanut Butter Milkshake
Blend together creamy peanut butter, rich chocolate ice cream, and milk for a thick, indulgent milkshake that’s perfect for a warm day or as a dessert treat.
Chocolate Dipped Peanut Butter Rice Crispy Treats
Elevate the classic rice crispy treats by incorporating peanut butter and dipping them in melted chocolate for a crunchy, sweet snack.
Peanut Butter Mousse
Whip up a light and airy peanut butter mousse, infused with rich chocolate, for a simple yet decadent dessert that melts in your mouth.
Chocolate Peanut Butter Energy Bites
For a healthier alternative, create no-bake energy bites made with oats, honey, peanut butter, and dark chocolate chips for a quick snack that satisfies cravings.
Chocolate Peanut Butter Tart
Ingredients
Method
- Preheat your oven to 180°C (350°F).
- Combine the crushed chocolate cookies and melted butter in a mixing bowl. Press the mixture evenly into the bottom and sides of a tart pan. Bake for 10 minutes and allow to cool completely.
- In a saucepan, heat the heavy cream over medium heat until it's just about to boil. Pour the hot cream over the chopped dark chocolate in a heatproof bowl. Let it sit for 2 minutes, then stir until smooth.
- In a separate bowl, whisk together the peanut butter and powdered sugar until fluffy. Spread the peanut butter mixture over the cooled crust evenly.
- Pour the chocolate ganache over the peanut butter layer, smoothing the top with a spatula.
- Chill the tart in the refrigerator for at least 2 hours, or until set.
- Once set, drizzle the melted dark chocolate over the top and sprinkle with chopped peanuts. Serve and enjoy!