


Introduction
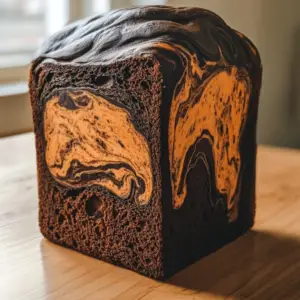
Mint Cream Cheese Brownies are a decadent twist on a classic favorite. With a rich, fudgy brownie base and a creamy mint-flavored cheesecake layer, these brownies are sure to impress anyone who takes a bite. Perfect for a special occasion or just a festive treat!
Detailed Ingredients with measures
Brownie layer:
Dark chocolate: 200g
Unsalted butter: 150g
Granulated sugar: 200g
Large eggs: 3
Vanilla extract: 5ml
All-purpose flour: 125g
Cocoa powder: 25g
Salt: 2g
Mint cream cheese layer:
Cream cheese: 225g
Granulated sugar: 50g
Egg: 1
Peppermint extract: 5ml
Green food coloring: a few drops (optional)
Prep Time
20 minutes
Cook Time, Total Time, Yield
Cook Time: 35 minutes
Total Time: 55 minutes
Yield: 16 brownies
Directions:
1. Preheat your oven to 175°C and line a 20x20cm baking pan with parchment paper, leaving an overhang for easy removal.
2. In a heatproof bowl, melt together the dark chocolate and butter over a pot of simmering water, stirring until smooth. Remove from heat and let it cool slightly.
3. Stir in the sugar until combined, then beat in the eggs one at a time. Add the vanilla extract.
4. Sift in the flour, cocoa powder, and salt, gently folding until just combined. Be careful not to overmix.
5. Pour the brownie batter into the prepared pan, smoothing the top with a spatula.
6. For the mint cream cheese layer, beat together the cream cheese and sugar in a medium bowl until smooth.
7. Mix in the egg, peppermint extract, and green food coloring until well combined.
8. Carefully spoon the mint layer over the brownie layer, spreading it evenly.
9. Use a knife to gently swirl the mint layer into the brownie batter for a marbled effect.
10. Bake for 30-35 minutes or until a toothpick inserted into the center comes out with a few moist crumbs.
11. Allow the brownies to cool in the pan for about 15 minutes, then lift them out using the parchment. Once fully cooled, slice into squares and enjoy!
Detailed Directions and Instructions
Step 1: Preheat the Oven
Begin by preheating your oven to 175°C. Prepare a 20x20cm baking pan by lining it with parchment paper, ensuring you leave an overhang to facilitate easy lifting after baking.
Step 2: Melt Chocolate and Butter
In a heatproof bowl, combine the dark chocolate and unsalted butter. Place the bowl over a pot of simmering water, stirring continuously until the mixture is smooth and well blended. Once melted, remove it from heat and allow it to cool slightly, enticing you with its rich aroma.
Step 3: Mix in Sugar and Eggs
Stir in the granulated sugar into the chocolate and butter mixture until fully combined. Next, beat in the large eggs, one at a time, mixing well after each addition. Add the vanilla extract to infuse the mixture with a warm, fragrant note.
Step 4: Incorporate Dry Ingredients
Sift the all-purpose flour, cocoa powder, and salt into the mixture. Gently fold the dry ingredients into the wet mixture using a spatula, being careful not to overmix. The batter should be thick and fudgy, promising a moist texture.
Step 5: Prepare the Brownie Base
Pour the luscious brownie batter into the prepared baking pan. Use a spatula to smooth the top evenly, creating a canvas for the creamy layer to come.
Step 6: Make the Mint Cream Cheese Layer
In a medium bowl, beat together the cream cheese and granulated sugar until the blend is smooth and creamy. The aroma of cream cheese combined with sugar will be irresistible.
Step 7: Add Egg and Flavoring
Mix in the egg, peppermint extract, and a few drops of green food coloring (if using) to give a delightful hue. Ensure everything is well combined; the minty scent should now fill the air.
Step 8: Layer the Mint Mixture
Carefully spoon the mint cream cheese mixture over the brownie layer in the baking pan, spreading it evenly with the back of a spoon or a spatula.
Step 9: Swirl for a Marbled Effect
Using a knife, gently swirl the mint layer into the brownie batter. You’re creating a beautiful marbled pattern that will not only look appealing but also mix the flavors beautifully.
Step 10: Bake the Brownies
Place the pan in the preheated oven and bake for 30-35 minutes. When done, a toothpick inserted into the center should come out with a few moist crumbs. Your kitchen will be filled with the heavenly scent of chocolate and mint.
Step 11: Cool and Slice
Once baked, allow the brownies to cool in the pan for about 15 minutes. Carefully lift them out using the overhanging parchment paper. After they have cooled completely, slice them into squares, ready to enjoy.
Notes
Ingredient Variations
Feel free to substitute the dark chocolate with semi-sweet chocolate for a slightly different flavor, or try using white chocolate for a unique twist.
Storage Tips
Store the brownies in an airtight container at room temperature for up to 5 days, or in the refrigerator for a longer shelf life. They can also be frozen for up to three months.
Serving Suggestions
Serve these brownies warm with a scoop of vanilla ice cream or with whipped cream for an indulgent dessert. Pair with a hot cup of coffee or mint tea to enhance the minty flavors.
Recipe Adjustments
For a more intense mint flavor, adjust the peppermint extract to your liking, or consider adding chocolate chips or chopped nuts to the brownie layer for added texture.
Cook techniques
Melting chocolate and butter
Use a heatproof bowl and a pot of simmering water to gently melt the chocolate and butter together. This method prevents burning and ensures a smooth mixture.
Folding ingredients
When combining the dry ingredients into the wet mixture, use a gentle folding motion. This helps maintain the airiness of the batter and prevents overmixing, which can lead to dense brownies.
Swirling layers for marbling
To create a marbled effect, use a knife to gently swirl the mint cream cheese layer into the brownie batter. Avoid excessive mixing to maintain distinct layers.
Baking tips
Check for doneness by inserting a toothpick into the center. It should come out with a few moist crumbs, indicating the brownies are perfectly baked without being overcooked.
FAQ
Can I use different chocolate?
Yes, you can use semi-sweet or milk chocolate, but keep in mind that it may alter the flavor and sweetness of the brownies.
How should I store the brownies?
Store the brownies in an airtight container at room temperature for up to 3 days, or refrigerate for longer freshness.
Can I make these brownies ahead of time?
Absolutely! These brownies can be made a day in advance. Just make sure to store them properly to maintain freshness.
What can I use instead of peppermint extract?
You can substitute peppermint extract with mint extract for a different flavor profile, or use vanilla extract for a more subtle taste.
Can I freeze the brownies?
Yes, you can freeze the brownies. Wrap them tightly in plastic wrap and then place them in a freezer-safe bag. They will last for up to 3 months.
Conclusion
These Mint Cream Cheese Brownies are an indulgent dessert that beautifully combines the rich flavors of chocolate with the refreshing taste of mint. Their unique layers make them a delightful treat for any occasion, leaving a lasting impression on all who indulge.
Mint Chocolate Chip Cookies
Combine the classic chocolate chip cookie with mint extract and add chocolate chips for extra flavor and texture.
Mint Layer Cake
Create a stunning layer cake by alternating chocolate and mint-flavored cakes, layered with mint cream cheese frosting.
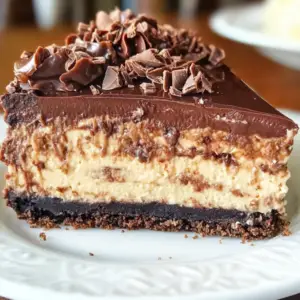
Chocolate Mint Cheesecake
Prepare a chocolate cheesecake with a minty twist, using a chocolate cookie crust and topping it with mint cream.
Mint-infused Hot Chocolate
Enhance your favorite hot chocolate with a few drops of peppermint extract for a comforting winter beverage.
Minty Fruit Salad
Add a dash of mint extract or fresh mint leaves to a fruit salad for a refreshing and vibrant dish.
Mint Chocolate Bark
Melt dark chocolate, sprinkle with crushed mint candies, and let it set for a crunchy treat that’s easy to make.


DIY Aroma Stones: Naturally Scented, Beautifully Handmade
How to Make Tie-Dye Bouncy Balls at Home (Fun DIY for Kids & Crafty Adults!)
Salt Crystal Painting: A Magical Art Project That Mesmerizes
Bioplastic Suncatchers: A Bright, Earth-Friendly Craft You’ll Absolutely Love 🌞