Introduction
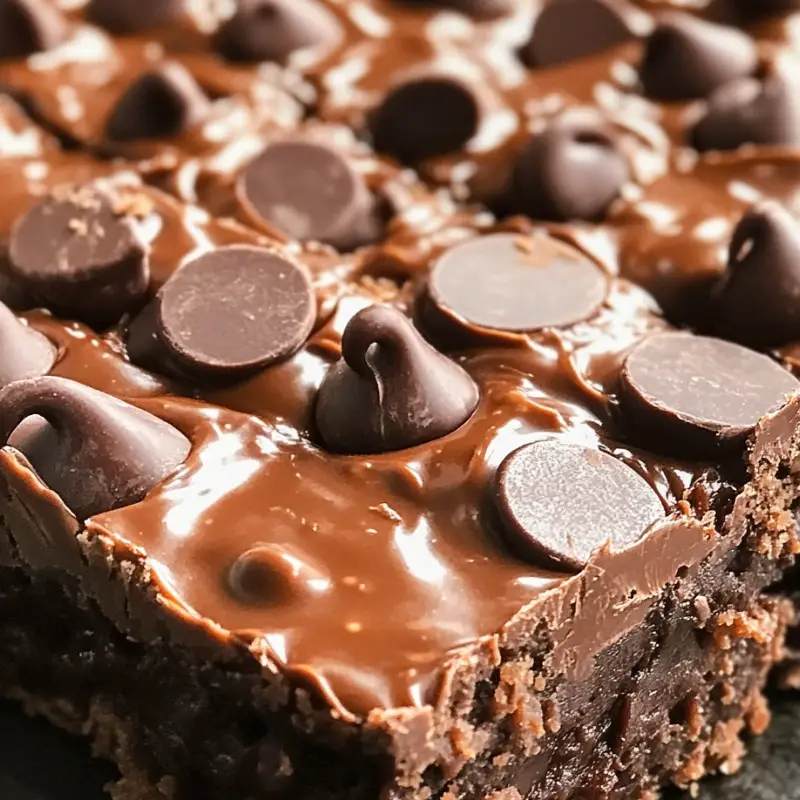
Indulge yourself with these decadent no-bake chocolate peanut butter bars. Perfectly balanced with creamy peanut butter, rich chocolate, and a delightful crunch, these treats are easy to make and a crowd favorite. They are an ideal dessert for any occasion or a sweet snacking option.
Detailed Ingredients with measures
230g digestive biscuits (crushed)
200g unsalted butter (melted)
250g creamy peanut butter
200g powdered sugar
200g milk chocolate chips
100g semi-sweet chocolate chips
50ml heavy cream
Prep Time
15 minutes
Cook Time, Total Time, Yield
Cook Time: 0 minutes
Total Time: 2 hours 15 minutes
Yield: 16 bars
Directions
1. Prepare an 8×8 inch square baking pan by lining it with parchment paper, allowing some overhang for easy removal.
2. In a large mixing bowl, combine crushed digestive biscuits and melted butter until fully incorporated. Press the mixture evenly into the prepared baking pan to form a crust.
3. In a separate bowl, blend the peanut butter and powdered sugar until smooth and creamy. Spread this peanut butter mixture evenly over the biscuit crust using a spatula.
4. In a microwave-safe bowl, melt the milk chocolate chips, semi-sweet chocolate chips, and heavy cream together in 30-second intervals, stirring between each interval until the mixture is smooth and fully melted.
5. Pour the melted chocolate over the peanut butter layer, spreading it evenly with a spatula.
6. Refrigerate the bars for at least 2 hours or until the chocolate is set completely.
7. Once set, lift the bars out of the pan using the parchment paper overhang. Cut into squares and serve. Enjoy these rich, indulgent bites!
**
Detailed Directions and Instructions
**
1. Prepare the Baking Pan
Begin by taking an 8×8 inch square baking pan and lining it with parchment paper. Ensure to leave an overhang on the sides, which will make it easier to lift the bars out when they’re set.
2. Make the Biscuit Base
In a large mixing bowl, combine 230g of crushed digestive biscuits with 200g of melted unsalted butter. Mix until the biscuits are fully coated with butter. Transfer this mixture to the prepared pan and press it down evenly to create a solid, compact crust.
3. Prepare the Peanut Butter Layer
In another bowl, blend together 250g of creamy peanut butter and 200g of powdered sugar. Stir until the mixture is perfectly smooth and creamy. Spread this delightful peanut butter layer evenly over the biscuit crust, using a spatula to ensure an even distribution.
4. Melt the Chocolate Topping
Take a microwave-safe bowl and combine 200g of milk chocolate chips, 100g of semi-sweet chocolate chips, and 50ml of heavy cream. Microwave this mixture in 30-second intervals, stirring between each until the chocolate is fully melted and smooth, creating a luscious chocolate sauce.
5. Assemble the Bars
Pour the melted chocolate mixture over the peanut butter layer. Use a spatula to carefully spread the chocolate evenly over the top, ensuring every bit is covered.
6. Chill to Set
Place the assembled bars into the refrigerator for a minimum of 2 hours, or until the chocolate layer has completely set and firmed up.
7. Serve the Bars
Once set, lift the bars out of the pan using the parchment paper overhang. Cut them into squares with a sharp knife and serve. Indulge in these rich and satisfying chocolate peanut butter bites!
**
Notes
**
Adjusting Sweetness
Feel free to adjust the amount of powdered sugar based on your sweetness preference. You can use less if you enjoy a more balanced flavor with the saltiness of the peanut butter.
Chocolate Options
Swap the milk chocolate or semi-sweet chocolate chips with dark chocolate for a richer taste, or use dairy-free chocolate chips to make this dessert vegan.
Storage Tips
Store any leftover bars in an airtight container in the fridge. They will stay fresh for up to a week. Enjoy chilled or let them sit at room temperature for a few minutes before serving for a softer bite.
Add Some Crunch
For extra texture, consider adding crushed nuts like peanuts or a sprinkle of sea salt on top of the chocolate layer before chilling.
Cook Techniques
Crushing Digestive Biscuits
To achieve the desired crumb consistency for your crust, place the digestive biscuits in a ziplock bag and use a rolling pin or a heavy object to crush them into fine crumbs. Alternatively, you can pulse the biscuits in a food processor until they reach a fine crumb texture.
Melt Chocolate Without Burning
When melting chocolate, use a microwave-safe bowl and heat in short intervals of 30 seconds. Stir between each interval to ensure even melting and to prevent the chocolate from burning. This method helps maintain the chocolate’s silky texture.
Spreading Peanut Butter Mixture
To easily spread the peanut butter mixture over the crust, use a spatula dipped in warm water. This will help the mixture glide smoothly without sticking.
Even Chocolate Layer
When pouring the melted chocolate over the peanut butter layer, use a spatula to spread it gently in an even layer. This will give a neat appearance to the bars and ensure uniform chocolate coverage.
Cooling for Set Bars
Allow the bars to set in the refrigerator for a minimum of 2 hours. This time allows the chocolate to firm up properly, making it easier to cut clean squares without the layers separating.
FAQ
Can I substitute the digestive biscuits with another type of cookie?
Yes, you can use graham crackers, vanilla wafers, or any other cookie that you prefer for the crust.
What if I don’t have unsalted butter?
If you only have salted butter, you can use it, but be aware that it may alter the overall taste slightly due to the added salt.
How can I make these bars gluten-free?
You can use gluten-free digestive biscuits or a suitable gluten-free cookie alternative in the recipe.
Can I use natural peanut butter instead of creamy peanut butter?
Yes, but natural peanut butter may result in a different texture. Ensure to stir it well before use since it can be more runny.
How do I store the leftover bars?
Store any leftover bars in an airtight container in the refrigerator for up to a week. They can also be frozen for longer storage.
Conclusion
These No-Bake Chocolate Peanut Butter Delight Bars are a luxurious treat that combines rich flavors and textures, making them the perfect indulgence for any dessert lover. With minimal effort and no baking required, you’ll be able to create a delicious dessert that will impress friends and family. Enjoy these bars as a sweet end to your meals or a delightful snack anytime you crave something sweet.
More recipes suggestions and combination
Chocolate Almond No-Bake Bars
Substitute peanut butter with almond butter and add chopped almonds for a nutty flavor.
Luxurious Coconut Chocolate Bars
Incorporate shredded coconut into the peanut butter layer for a tropical twist.
Crunchy Hazelnut Delight Bars
Use crushed hazelnuts in the crust and layer Nutella with chocolate for a rich, nutty flavor.
Dark Chocolate Raspberry Bars
Layer in some fresh raspberries between the peanut butter and chocolate for a fruity contrast.
Mint Chocolate Peanut Butter Bars
Add a few drops of peppermint extract to the peanut butter mixture for a refreshing minty flavor.
Superfood Chocolate Bars
Incorporate chia seeds or flaxseeds into the crust for added health benefits.
Peanut Butter Banana Bliss Bars
Mix in mashed ripe bananas with the peanut butter layer for added moisture and flavor.