Before we dive into this dazzling little science-meets-art project, I just want to say—thank you for being here! Whether you’re a curious parent, a crafty teacher, or a weekend DIY warrior, your presence means the world. You’re the heartbeat of this community, and sharing these joyful, hands-on moments with you is what keeps this space vibrant!
If you haven’t already, subscribe to get this recipe straight to your inbox—along with more crafty gems, kitchen wins, and family-friendly fun!
Why You’ll Love This DIY Borax Crystals Project
This isn’t just a craft—it’s an experience. Creating your own borax crystals is part science experiment, part creative expression, and completely magical.
✨ Reasons to love it:
Uses common household ingredients
Engaging and educational for kids
Ready in just one overnight wait
Perfect for gifting, decorating, or learning!
The end result? Glistening, gem-like formations that look like they belong on a holiday tree or in a jewelry box. Anything but boring!!
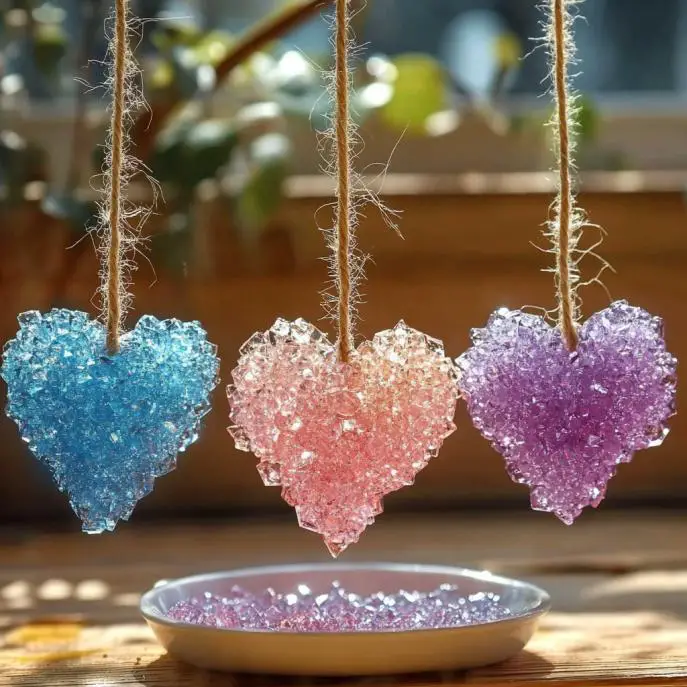
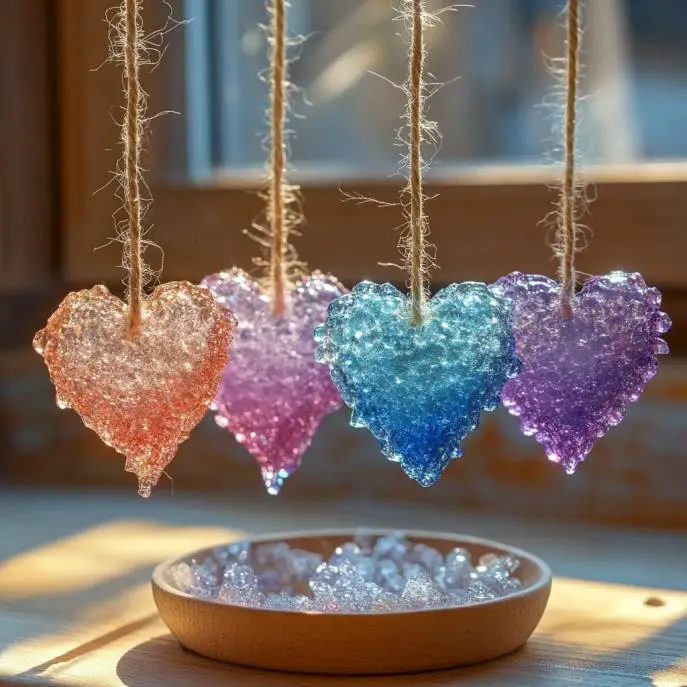
What Do Borax Crystals Look and Feel Like?
The crystals you’ll grow are glassy, intricate, and surprisingly strong. They form on your pipe cleaner like frost on a windowpane—sparkly and symmetrical. Depending on your food coloring, they can be icy blue, ruby red, emerald green… you get the idea. I’m kicking myself for not having shot it under sunlight—it truly looks magical!
Benefits of Making Borax Crystals at Home
STEM-friendly: Great introduction to chemistry and crystal formation.
Creative bonding: Ideal for a weekend craft session with kids.
Decor-ready: Hang them in windows, on Christmas trees, or use as unique gifts.
Ingredients & Tools
Ingredients:
3 tablespoons Borax powder
1 cup boiling water
Optional: Food coloring (for extra sparkle!)
Tools:
A glass jar or clear container
Pipe cleaners
String
Pencil or chopstick
Measuring spoon

How to Make DIY Borax Crystals (Step-by-Step)
1. Shape the Pipe Cleaner
Twist your pipe cleaner into a fun shape—snowflake, heart, star, or your initials. Make sure it fits into your jar without touching the sides or bottom.
2. Attach the String
Tie one end of the string to your shape and the other to a pencil or chopstick. This will suspend your creation in the solution.
3. Mix the Magic Solution
Carefully pour 1 cup of boiling water into your jar. Add 3 tablespoons of Borax and stir until fully dissolved. Add a few drops of food coloring if you like.
4. Submerge the Shape
Lower your shape into the jar, letting the pencil rest on top to keep it suspended.
5. Wait & Watch
Place the jar somewhere safe and undisturbed. Leave it overnight. As the water cools, crystals will begin to form.
6. Remove & Admire
Gently lift your sparkly creation from the jar and lay it on a paper towel to dry. Voila!
Tips & Variations
Try twisting multiple colors of pipe cleaners together for a marbled crystal look.
Use different jar sizes to make crystal ornaments of varying scales.
Want bigger crystals? Use more Borax—up to 4 tablespoons per cup of water.
What to Do With Your Borax Crystals
Hang them in the window to catch the light
String them into garlands
Use as handmade gifts or party favors
Incorporate into holiday decorations
How to Store Your Crystals
Keep them in a dry area or sealed bag to prevent moisture from dulling the sparkle. They’re surprisingly durable but handle them with care—these are delicate beauties!
Frequently Asked Questions
Can I reuse the Borax solution?
Nope—once the crystals form, the solution is pretty spent. But it’s cheap to make again!
Are Borax crystals safe to touch?
Yes, but always supervise kids. And wash hands after handling.
Will the crystals keep growing?
Nope! Growth stops once you remove them from the solution.
In Summary…
Creating DIY Borax Crystals is the kind of project that wows you twice—once while you’re making it, and again every time you look at the finished product. It’s simple, sparkly, science-y fun you’ll want to do over and over again!
More DIY Magic You’ll Love
Share Your Creations!
If you try this DIY, I’d love to see what you make! Leave a review, post a pic, or pin it to your Pinterest board and tag me. Let’s keep the inspiration rolling!
Nutritional Information
None here—just sparkle and science! 😉
Would you like me to turn this into a printable or Pinterest-ready pin too?